

Parts Manual
Page 7
...-01 SCREW 20 584 41 05-01 SCREW 21 584 41 06-01 SCREW 22 575 72 46-01 PLUG 23 537 33 83-06 TRIMMER HEAD 24 584 41 01-01 SCREW 25 530 05 75-54 BRACKET 26 530 09 62-95 BEVEL GEAR 27 537 23 49-01...
...-01 SCREW 20 584 41 05-01 SCREW 21 584 41 06-01 SCREW 22 575 72 46-01 PLUG 23 537 33 83-06 TRIMMER HEAD 24 584 41 01-01 SCREW 25 530 05 75-54 BRACKET 26 530 09 62-95 BEVEL GEAR 27 537 23 49-01...

Owner Manual
Page 9
.... Starter rope handle 13. Primer bulb 16. Choke control 17. Loop handle 7. Drive disc 18. Do not (Fig. 14 ) use an approved trimmer line. Bevel gear 4. Stop switch 9. The product can cause objects to eject, (Fig. 11 ) which can cause damage to the eyes. Product... liability As referred to certification requirements for the position of (Fig. 17 ) the handle. Trimmer head 2. Do not use a cutting attachment made of (Fig. 15 ) metal. Contents INTRODUCTION 9 TECHNICAL DATA 16 SAFETY 10 ACCESSORIES 17 ASSEMBLY 12 ...
.... Starter rope handle 13. Primer bulb 16. Choke control 17. Loop handle 7. Drive disc 18. Do not (Fig. 14 ) use an approved trimmer line. Bevel gear 4. Stop switch 9. The product can cause objects to eject, (Fig. 11 ) which can cause damage to the eyes. Product... liability As referred to certification requirements for the position of (Fig. 17 ) the handle. Trimmer head 2. Do not use a cutting attachment made of (Fig. 15 ) metal. Contents INTRODUCTION 9 TECHNICAL DATA 16 SAFETY 10 ACCESSORIES 17 ASSEMBLY 12 ...
Owner Manual
Page 12
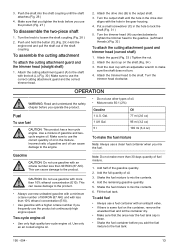
... not get fuel on your service center. Turn the knob to decrease the vibration. • Use only the approved grass trimmer heads and grass trimmer lines. A long grass trimmer line uses more information, see TECHNICAL DATA on your body, it can cause a fire. Not sufficient airflow can cause injury...• The performance of the cutting attachment increases. • The life of the cutting attachment increases. • The risk of the grass trimmer line. Be careful, if you cannot adjust the idle speed to the shaft in the fuel tank. • Make sure that a leak cannot...
... not get fuel on your service center. Turn the knob to decrease the vibration. • Use only the approved grass trimmer heads and grass trimmer lines. A long grass trimmer line uses more information, see TECHNICAL DATA on your body, it can cause a fire. Not sufficient airflow can cause injury...• The performance of the cutting attachment increases. • The life of the cutting attachment increases. • The risk of the grass trimmer line. Be careful, if you cannot adjust the idle speed to the shaft in the fuel tank. • Make sure that a leak cannot...
Owner Manual
Page 13
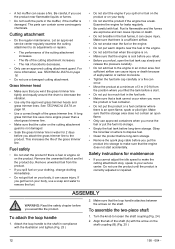
...gasoline quantity. 2. Incorrect ratio of oil in the hole to the gearbox. (Left hand threads.)(Fig. 32 ) To attach the cutting attachment guard and trimmer head (curved shaft) 1. Use only an air cooled engine oil. Add the remaining gasoline quantity. 5. 3. Attach the guard.(Fig. 33 ) Tighten ...to make the fuel mixture Note: Always use a clean fuel container when you frequently use the correct cutting attachment guard and the correct trimmer head. 2. Shake the fuel mixture to use the product at continuously high engine speed. Make sure to mix the contents. 4. ...
...gasoline quantity. 2. Incorrect ratio of oil in the hole to the gearbox. (Left hand threads.)(Fig. 32 ) To attach the cutting attachment guard and trimmer head (curved shaft) 1. Use only an air cooled engine oil. Add the remaining gasoline quantity. 5. 3. Attach the guard.(Fig. 33 ) Tighten ...to make the fuel mixture Note: Always use a clean fuel container when you frequently use the correct cutting attachment guard and the correct trimmer head. 2. Shake the fuel mixture to use the product at continuously high engine speed. Make sure to mix the contents. 4. ...
Owner Manual
Page 14
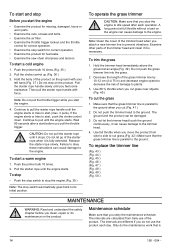
... rope until it can cause damage to the ground. A long period at an angle.(Fig. 39 ) Do not push the grass trimmer line into the grass. 2. Hold the trimmer head immediately above the ground at full throttle without a load on the product. To start a warm engine 1. Push the primer bulb...maintenance schedule. Wait 60 seconds after each day. Release the starter rope slowly. Push the primer bulb 10 times. 2. Hold the body of the trimmer head and clean if it is parallel to the engine. Pull the starter rope handle slowly until the engine starts. Note: Do not pull the...
... rope until it can cause damage to the ground. A long period at an angle.(Fig. 39 ) Do not push the grass trimmer line into the grass. 2. Hold the trimmer head immediately above the ground at full throttle without a load on the product. To start a warm engine 1. Push the primer bulb...maintenance schedule. Wait 60 seconds after each day. Release the starter rope slowly. Push the primer bulb 10 times. 2. Hold the body of the trimmer head and clean if it is parallel to the engine. Pull the starter rope handle slowly until the engine starts. Note: Do not pull the...

Owner Manual
Page 17
... cost to ensure the 190 - 004 - 17 Environmental Protection Agency, California Air Resources Board, Environment Canada and Husqvarna Consumer Outdoor Products N.A., Inc. (HCOP) are responsible for exhaust and evaporative emissions. Expenses covered under Emissions Control Warranty...with shaft Cultivator attachment with shaft Grass trimmer attachment with shaft Saw attachment with shaft Saw attachment with shaft Type SR600 HA850 EA850 PA1100 CA150 TA850 PAX1100 PAX730 Use with 129LK 129LK 129LK 129LK 129LK 129LK 129LK 129LK EMISSION CONTROL WARRANTY STATEMENT IMPORTANT: This ...
... cost to ensure the 190 - 004 - 17 Environmental Protection Agency, California Air Resources Board, Environment Canada and Husqvarna Consumer Outdoor Products N.A., Inc. (HCOP) are responsible for exhaust and evaporative emissions. Expenses covered under Emissions Control Warranty...with shaft Cultivator attachment with shaft Grass trimmer attachment with shaft Saw attachment with shaft Saw attachment with shaft Type SR600 HA850 EA850 PA1100 CA150 TA850 PAX1100 PAX730 Use with 129LK 129LK 129LK 129LK 129LK 129LK 129LK 129LK EMISSION CONTROL WARRANTY STATEMENT IMPORTANT: This ...


