Owner's Manual
Page 2
...Ceiling Plate 5 3 • Assembling the Blades 6 4 • Assembling the Top Housing 7 5 • Assembling and Hanging the Fan..........8 6 • Setting the Remote Transmitter and Reveiver 9 7 • Wiring the Fan 10 8 • Installing the Canopy 12 9 • Completing Your Installation With a Light Fixture 13 10 &#...8226; Operating the Remote Control and Mounting the Holder 14 11 • Operating and Cleaning Your Ceiling Fan 15 12 • Troubleshooting 16 Welcome Your new Hunter® ceiling fan is an addition to your home or...
...Ceiling Plate 5 3 • Assembling the Blades 6 4 • Assembling the Top Housing 7 5 • Assembling and Hanging the Fan..........8 6 • Setting the Remote Transmitter and Reveiver 9 7 • Wiring the Fan 10 8 • Installing the Canopy 12 9 • Completing Your Installation With a Light Fixture 13 10 &#...8226; Operating the Remote Control and Mounting the Holder 14 11 • Operating and Cleaning Your Ceiling Fan 15 12 • Troubleshooting 16 Welcome Your new Hunter® ceiling fan is an addition to your home or...
Owner's Manual
Page 3
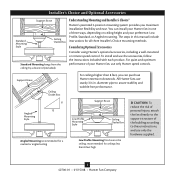
... and ease. diameter pipe to these instructions, and use sturdy 3/4 in one of your Hunter fan, use the accessories, follow the instructions included with each product. Considering Optional Accessories Consider using Hunter's optional accessories, including a wall-mounted or remote speed control. Angled Mounting Style 8 12 Angled Mounting recommended for a vaulted or angled ceiling...
... and ease. diameter pipe to these instructions, and use sturdy 3/4 in one of your Hunter fan, use the accessories, follow the instructions included with each product. Considering Optional Accessories Consider using Hunter's optional accessories, including a wall-mounted or remote speed control. Angled Mounting Style 8 12 Angled Mounting recommended for a vaulted or angled ceiling...
Owner's Manual
Page 9
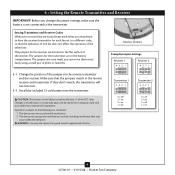
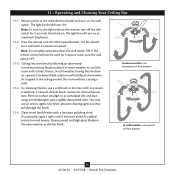
... jumpers in the battery compartment. Setting Transmitter and Receiver Codes When two or more fans are located on 9 42700-01 • 01/15/08 • Hunter Fan Company If they don't match, the transmitter will not function. 6-2. Receiver Jumpers Example Jumpers Settings Receiver 1 432 1 432 1 Receiver 2 432 1 ... small; The jumpers for the receiver are located near each other fans. The jumpers are in the remote transmitter and the receiver. you may not cause harmful interference. 2. WARNING: Use only the Hunter Fan speed control supplied with part 15 of the receiver.
... jumpers in the battery compartment. Setting Transmitter and Receiver Codes When two or more fans are located on 9 42700-01 • 01/15/08 • Hunter Fan Company If they don't match, the transmitter will not function. 6-2. Receiver Jumpers Example Jumpers Settings Receiver 1 432 1 432 1 Receiver 2 432 1 ... small; The jumpers for the receiver are located near each other fans. The jumpers are in the remote transmitter and the receiver. you may not cause harmful interference. 2. WARNING: Use only the Hunter Fan speed control supplied with part 15 of the receiver.
Owner's Manual
Page 14
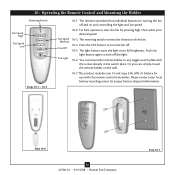
... turns the light on and controlling the light and fan speed. 10-2. Or, you can mount the remote holder to full brightness. For best operation, start the fan by pressing high, then select your local ...switch plate. The reversing switch reverses the direction of the fan. 10-4. You can simply mount the remote holder on the wall. 10-7.This product includes one 12-volt type 23A, MN-21 battery for ... battery disposal information. Step 10-6 14 42700-01 • 01/15/08 • Hunter Fan Company Step 10-7 Push the light button again to turn the fan off and on to any ...
... turns the light on and controlling the light and fan speed. 10-2. Or, you can mount the remote holder to full brightness. For best operation, start the fan by pressing high, then select your local ...switch plate. The reversing switch reverses the direction of the fan. 10-4. You can simply mount the remote holder on the wall. 10-7.This product includes one 12-volt type 23A, MN-21 battery for ... battery disposal information. Step 10-6 14 42700-01 • 01/15/08 • Hunter Fan Company Step 10-7 Push the light button again to turn the fan off and on to any ...
Owner's Manual
Page 15
...Operating and Cleaning Your Ceiling Fan 11-1. The light kit will not be used for added protection and beauty. If the remote control will turn off the wall switch for 5 seconds, then back on. You may use an artistic agent, but ... to prevent scratching. Restore power at the main electrical panel and turn on at the ceiling around the room without the remote, turn on the wall switch. The fan should turn on the light without causing a draft. 11-4. Clean wood finish... cleaning finishes, use upward air flow pattern 15 42700-01 • 01/15/08 • Hunter Fan Company
...Operating and Cleaning Your Ceiling Fan 11-1. The light kit will not be used for added protection and beauty. If the remote control will turn off the wall switch for 5 seconds, then back on. You may use an artistic agent, but ... to prevent scratching. Restore power at the main electrical panel and turn on at the ceiling around the room without the remote, turn on the wall switch. The fan should turn on the light without causing a draft. 11-4. Clean wood finish... cleaning finishes, use upward air flow pattern 15 42700-01 • 01/15/08 • Hunter Fan Company
Parts Guide
Page 1
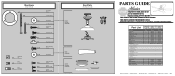
..., 8-32 Canopy Screw Screw, Low Profile Wood Screw Blade Assembly Screw Flat Washer Screw, Machine, 6-32 Wire Nut Mounting Isolator Balancing Kit Ballast Remote Receiver Remote Transmitter Remote Control Cradle Model # Asm. If parts are included in the box. REFER TO THE INSTALLATION MANUAL FOR FULL ASSEMBLY INSTRUCTIONS. Dwg. # Finish Qnty...21628 98988-02 Brushed Bronze Part # 84050-01 84005-01 63722-25 92542-01 94245-01 94246-01 85219-01 94242-01 76238-58 98988-00-861 1 07570-01 07570-01 1 87108-01 87108-01 1 87075-01 87075-01 1 85095-03 85095-03 1 85093-01 85093-01 Hunter...
..., 8-32 Canopy Screw Screw, Low Profile Wood Screw Blade Assembly Screw Flat Washer Screw, Machine, 6-32 Wire Nut Mounting Isolator Balancing Kit Ballast Remote Receiver Remote Transmitter Remote Control Cradle Model # Asm. If parts are included in the box. REFER TO THE INSTALLATION MANUAL FOR FULL ASSEMBLY INSTRUCTIONS. Dwg. # Finish Qnty...21628 98988-02 Brushed Bronze Part # 84050-01 84005-01 63722-25 92542-01 94245-01 94246-01 85219-01 94242-01 76238-58 98988-00-861 1 07570-01 07570-01 1 87108-01 87108-01 1 87075-01 87075-01 1 85095-03 85095-03 1 85093-01 85093-01 Hunter...


