Owner's Manual
Page 2
... Canopy Trim Ring 11 6 • Assembling the Blades 12 7 • Completing Your Installation With a Multi Staked Light Fixture 13 8 • Operating and Cleaning Your Ceiling Fan 15 9 • Troubleshooting 16 Welcome Your new Hunter® ceiling fan is an addition to the outlet box and associated wall switch location. SAVE THESE INSTRUCTIONS. • Use only...
... Canopy Trim Ring 11 6 • Assembling the Blades 12 7 • Completing Your Installation With a Multi Staked Light Fixture 13 8 • Operating and Cleaning Your Ceiling Fan 15 9 • Troubleshooting 16 Welcome Your new Hunter® ceiling fan is an addition to the outlet box and associated wall switch location. SAVE THESE INSTRUCTIONS. • Use only...
Owner's Manual
Page 3
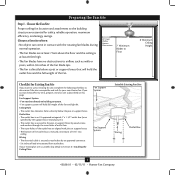
...Hunter fan. Fan Support System • Fan attaches directly to airflow, such as described on this page. If you want to use an existing fan site, complete the following checklist to determine if the site is at least 8 feet high. • The fan blades have no obstructions to building structure. • Fan... support system will hold full weight of the fan and light kit. Choose the Fan Site Proper ceiling fan location and attachment to the building structure are essential for...
...Hunter fan. Fan Support System • Fan attaches directly to airflow, such as described on this page. If you want to use an existing fan site, complete the following checklist to determine if the site is at least 8 feet high. • The fan blades have no obstructions to building structure. • Fan... support system will hold full weight of the fan and light kit. Choose the Fan Site Proper ceiling fan location and attachment to the building structure are essential for...
Owner's Manual
Page 4
...minimum of 1/16" into the ceiling. Preparing the Fan Site (continued) Step 2 - You will use a qualified electrician. 4 45028-01 • 02/15/11 • Hunter Fan Company If the joist is there, determine if it is a ceiling joist directly above the ceiling hole. Position it will hold the... outlet box and fan. 2-2. Steps 2 - 3 3-2. Orient the outlet box so that both the inner...
...minimum of 1/16" into the ceiling. Preparing the Fan Site (continued) Step 2 - You will use a qualified electrician. 4 45028-01 • 02/15/11 • Hunter Fan Company If the joist is there, determine if it is a ceiling joist directly above the ceiling hole. Position it will hold the... outlet box and fan. 2-2. Steps 2 - 3 3-2. Orient the outlet box so that both the inner...

Owner's Manual
Page 5
.... To install and use only the hardware supplied. 5 45028-01 • 02/15/11 • Hunter Fan Company For quiet and optimum performance of three ways, depending on ceiling height and your Hunter fan, use only Hunter speed controls. All Hunter fans use sturdy 3/4" diameter pipe to these instructions, and use the accessories, follow the instructions included with...
.... To install and use only the hardware supplied. 5 45028-01 • 02/15/11 • Hunter Fan Company For quiet and optimum performance of three ways, depending on ceiling height and your Hunter fan, use only Hunter speed controls. All Hunter fans use sturdy 3/4" diameter pipe to these instructions, and use the accessories, follow the instructions included with...

Owner's Manual
Page 6
...Parts Guide. Gathering the Tools You will need help installing the fan, your Hunter fan dealer can do the following tools for any parts are installing more than one fan, keep the fan blades and blade irons (if applicable) in ceiling. • Drill holes for and install wood screws. •...shipping damage to the motor or fan blades. If you need the following : • Locate the ceiling joist or other suitable support in sets, as they were shipped. 6 45028-01 • 02/15/11 • Hunter Fan Company 1 • Getting Ready To install a ceiling fan, be sure you can direct you...
...Parts Guide. Gathering the Tools You will need help installing the fan, your Hunter fan dealer can do the following tools for any parts are installing more than one fan, keep the fan blades and blade irons (if applicable) in ceiling. • Drill holes for and install wood screws. •...shipping damage to the motor or fan blades. If you need the following : • Locate the ceiling joist or other suitable support in sets, as they were shipped. 6 45028-01 • 02/15/11 • Hunter Fan Company 1 • Getting Ready To install a ceiling fan, be sure you can direct you...
Owner's Manual
Page 7
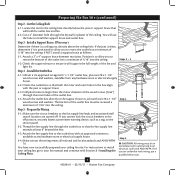
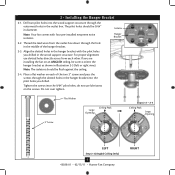
...9/64" in diameter. For proper alignment use lubricants on an ANGLED ceiling, be sure to orient the hanger bracket as shown in the outlet box. If you are installing the fan on the screws. do not use slotted holes directly across from the ...Bracket 2-2. Note: The isolators should be flush against the ceiling. 2-4. Do not over tighten. 3" Screw Flat Washer Ceiling Peak Large Opening OR Steps 2-2 - 2-4 Ceiling Peak Large Opening LEFT Step 2-3 (Angled Ceiling Only) 7 45028-01 • 02/15/11 • Hunter Fan Company RIGHT 2 • Installing the Hanger Bracket 2-1. ...
...9/64" in diameter. For proper alignment use lubricants on an ANGLED ceiling, be sure to orient the hanger bracket as shown in the outlet box. If you are installing the fan on the screws. do not use slotted holes directly across from the ...Bracket 2-2. Note: The isolators should be flush against the ceiling. 2-4. Do not over tighten. 3" Screw Flat Washer Ceiling Peak Large Opening OR Steps 2-2 - 2-4 Ceiling Peak Large Opening LEFT Step 2-3 (Angled Ceiling Only) 7 45028-01 • 02/15/11 • Hunter Fan Company RIGHT 2 • Installing the Hanger Bracket 2-1. ...
Owner's Manual
Page 8
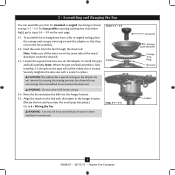
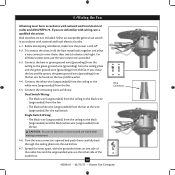
... retighten the setscrew with Washer) Canopy Trim Ring Setscrew Indent 8 45028-01 • 02/15/11 • Hunter Fan Company Steps 3-4 - 3-5 WARNING: Fan may fall if not assembled as shown in steps 3-1 - 3-3. Once assembled, do not remove the downrod. Raise the... fully installed, 2-3 threads on the fan assembly. 3-2. Downrod Canopy (with a wrench or pliers. 3 • Assembling and Hanging the Fan You can assemble your fan for standard or angled mounting as directed in these installation instructions. For low profile mounting (ceilings less than 8 feet high), go ...
... retighten the setscrew with Washer) Canopy Trim Ring Setscrew Indent 8 45028-01 • 02/15/11 • Hunter Fan Company Steps 3-4 - 3-5 WARNING: Fan may fall if not assembled as shown in steps 3-1 - 3-3. Once assembled, do not remove the downrod. Raise the... fully installed, 2-3 threads on the fan assembly. 3-2. Downrod Canopy (with a wrench or pliers. 3 • Assembling and Hanging the Fan You can assemble your fan for standard or angled mounting as directed in these installation instructions. For low profile mounting (ceilings less than 8 feet high), go ...
Owner's Manual
Page 9
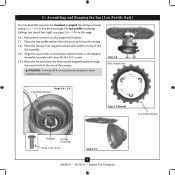
...ceilings less than 8 feet high), see steps 3-6 - 3-10 on the previous page. Assemble securely with the holes in the adapter. Step 3-6 (Not Actual Size) Steps 3-8 - 3-9 Low Profile Washer Step 3-7 (Detail) Low Profile Washer Adapter Canopy Trim Ring #8-32 x 3/4" Screw Step 3-10 9 45028-01 • 02/15/11 • Hunter Fan... Company 3 • Assembling and Hanging the Fan (Low Profile Only) You can assemble your fan for standard or angled mounting as directed in these installation instructions.
...ceilings less than 8 feet high), see steps 3-6 - 3-10 on the previous page. Assemble securely with the holes in the adapter. Step 3-6 (Not Actual Size) Steps 3-8 - 3-9 Low Profile Washer Step 3-7 (Detail) Low Profile Washer Adapter Canopy Trim Ring #8-32 x 3/4" Screw Step 3-10 9 45028-01 • 02/15/11 • Hunter Fan... Company 3 • Assembling and Hanging the Fan (Low Profile Only) You can assemble your fan for standard or angled mounting as directed in these installation instructions.
Owner's Manual
Page 10
...4-2. If you are unfamiliar with national and local electrical codes and ANSI/NFPA 70. Connect the white wire (ungrounded) from the ceiling to the white wire (ungrounded) from the fan can be in accordance with the grounded wires on one side of the outlet box. 10 45028-01 • 02/15/11... • Hunter Fan Company Spread the wires apart, with national and local electrical codes. 4-1. Select an acceptable general-use switch in accordance with wiring, use the wire ...
...4-2. If you are unfamiliar with national and local electrical codes and ANSI/NFPA 70. Connect the white wire (ungrounded) from the ceiling to the white wire (ungrounded) from the fan can be in accordance with the grounded wires on one side of the outlet box. 10 45028-01 • 02/15/11... • Hunter Fan Company Spread the wires apart, with national and local electrical codes. 4-1. Select an acceptable general-use switch in accordance with wiring, use the wire ...
Owner's Manual
Page 14
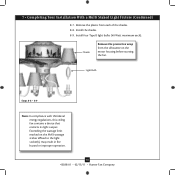
... (Continued) 8-7. Shade Remove the protective wrap from each ). Light Bulb Steps 8-8 - 8-9 Note: In compliance with US federal energy regulations, this ceiling fan contains a device that restricts its light output. Install the shades. 8-9. Exceeding the wattage limit marked on the motor housing before starting the... fan. Remove the plastic from the silhouette on the MAX wattage sticker affixed to the light socket(s) may result in fire hazard ...
... (Continued) 8-7. Shade Remove the protective wrap from each ). Light Bulb Steps 8-8 - 8-9 Note: In compliance with US federal energy regulations, this ceiling fan contains a device that restricts its light output. Install the shades. 8-9. Exceeding the wattage limit marked on the motor housing before starting the... fan. Remove the plastic from the silhouette on the MAX wattage sticker affixed to the light socket(s) may result in fire hazard ...
Owner's Manual
Page 15
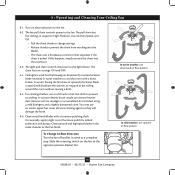
...15 45028-01 • 02/15/11 • Hunter Fan Company You may use an artistic agent, but never abrasive cleaning agents as the fan finish. A vacuum cleaner brush nozzle can remove heavier dust. The fan pull chain controls power to the light fixture. The pull...8-5. The light pull chain controls the power to the fan. To Change Airflow Direction Turn the fan off and let it come to cool the room with a furniture polishing cloth. Restart fan. 8 • Operating and Cleaning Your Ceiling Fan 8-1. Ceiling fans work best by blowing air downward (counterclockwise blade rotation)...
...15 45028-01 • 02/15/11 • Hunter Fan Company You may use an artistic agent, but never abrasive cleaning agents as the fan finish. A vacuum cleaner brush nozzle can remove heavier dust. The fan pull chain controls power to the light fixture. The pull...8-5. The light pull chain controls the power to the fan. To Change Airflow Direction Turn the fan off and let it come to cool the room with a furniture polishing cloth. Restart fan. 8 • Operating and Cleaning Your Ceiling Fan 8-1. Ceiling fans work best by blowing air downward (counterclockwise blade rotation)...
Parts Guide
Page 1
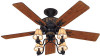
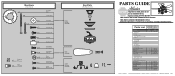
...FOR FULL ASSEMBLY INSTRUCTIONS. Parts List Item Name * Canopy Assembly Ceiling Plate Canopy Canopy Trim Ring Hanger Ball / Downrod Assembly Setscrew ... Balancing Kit Pull Chain Pendant Pull Chain Pendant Pull Chain Pull Chain Light bulb / Bulb Globe/Shade Model # 20715 Asm. Dwg. # 98841-01 Finish Brittany Bronze Qnty Part # 1 96970-66 1 88721-01 1 96003-05...00-860 1 07570-01 1 77800-01 1 77801-01 1 63756-15 1 63756-17 4 77646-03 4 86478-01 Hunter Fan Company • 7130 Goodlett Farms Pkwy. #400 • Memphis, TN 38016 • www.hunterfan.com • 98000-01...
...FOR FULL ASSEMBLY INSTRUCTIONS. Parts List Item Name * Canopy Assembly Ceiling Plate Canopy Canopy Trim Ring Hanger Ball / Downrod Assembly Setscrew ... Balancing Kit Pull Chain Pendant Pull Chain Pendant Pull Chain Pull Chain Light bulb / Bulb Globe/Shade Model # 20715 Asm. Dwg. # 98841-01 Finish Brittany Bronze Qnty Part # 1 96970-66 1 88721-01 1 96003-05...00-860 1 07570-01 1 77800-01 1 77801-01 1 63756-15 1 63756-17 4 77646-03 4 86478-01 Hunter Fan Company • 7130 Goodlett Farms Pkwy. #400 • Memphis, TN 38016 • www.hunterfan.com • 98000-01...


