

User Manual
Page 1
Digital Terrestrial MHP Receiver The default PIN Code is set to 0000. User's Manual DTT-3600
Digital Terrestrial MHP Receiver The default PIN Code is set to 0000. User's Manual DTT-3600

User Manual
Page 2
... translated in part or whole without notice. Copyright (Copyright © 2010 HUMAX Corporation) Not to be able to your product for purchasing a HUMAX product. GB2 User's Manual Keep this manual. Warranty The warranty does not cover parts which could result in this user's manual next to safely install, use and maintain the installation. Warnings, Cautions...
... translated in part or whole without notice. Copyright (Copyright © 2010 HUMAX Corporation) Not to be able to your product for purchasing a HUMAX product. GB2 User's Manual Keep this manual. Warranty The warranty does not cover parts which could result in this user's manual next to safely install, use and maintain the installation. Warnings, Cautions...

User Manual
Page 3
... explosion, observe polarities indicated inside the battery compartment. Important notice The batteries of batteries or new and old batteries. Batteries must be supported. GB3 User's Manual
... explosion, observe polarities indicated inside the battery compartment. Important notice The batteries of batteries or new and old batteries. Batteries must be supported. GB3 User's Manual

User Manual
Page 4
... may result in electric fire or shock. 3. VENTILATION • The slots on top of the product must be placed on the marking label. GB4 User's Manual Failure to dust the product. 5. Please read the following safety precautions carefully. CONNECTION TO THE TV • Disconnect the product from the mains before cleaning...
... may result in electric fire or shock. 3. VENTILATION • The slots on top of the product must be placed on the marking label. GB4 User's Manual Failure to dust the product. 5. Please read the following safety precautions carefully. CONNECTION TO THE TV • Disconnect the product from the mains before cleaning...

User Manual
Page 5
...; Disconnect the power cord in the unit, where they can be sure the service technician uses replacement parts specified by the user. 2. Warning 1. GB5 User's Manual EXTRANEOUS OBJECTS • Do not insert anything through the openings in case of time. LIGHTNING, STORM or NOT IN USE • Unplug the product from...
...; Disconnect the power cord in the unit, where they can be sure the service technician uses replacement parts specified by the user. 2. Warning 1. GB5 User's Manual EXTRANEOUS OBJECTS • Do not insert anything through the openings in case of time. LIGHTNING, STORM or NOT IN USE • Unplug the product from...

User Manual
Page 6
Service and Support GB38 GB6 User's Manual Basic Operation GB18 3.1 Installation Wizard GB18 3.2 Basic Function GB19 4. Software Update GB32 5.1 OTA (Over the Air GB32 6. Contents 1. Specification GB36 8. Trouble Shooting GB33 6.1 Trouble Shooting ...
Service and Support GB38 GB6 User's Manual Basic Operation GB18 3.1 Installation Wizard GB18 3.2 Basic Function GB19 4. Software Update GB32 5.1 OTA (Over the Air GB32 6. Contents 1. Specification GB36 8. Trouble Shooting GB33 6.1 Trouble Shooting ...

User Manual
Page 7
Always keep the battery inserted in figure below. GB7 User's Manual Before Using the Product 1.1 Package Contents When you have all the necessary items shown in the remote control. • Package contents may occur if the remote control is missing or damaged, please contact your package contents, make sure you unpack your product dealer for a long time. If any of items is left without battery for replacement. Remote Control Quick Guide Quick Guide SCART Cable Batteries Note: • Faults may vary according to area. 1.
Always keep the battery inserted in figure below. GB7 User's Manual Before Using the Product 1.1 Package Contents When you have all the necessary items shown in the remote control. • Package contents may occur if the remote control is missing or damaged, please contact your package contents, make sure you unpack your product dealer for a long time. If any of items is left without battery for replacement. Remote Control Quick Guide Quick Guide SCART Cable Batteries Note: • Faults may vary according to area. 1.
User Manual
Page 8
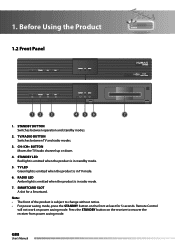
... saving mode, press the STANDBY button on power saving mode. STANDBY BUTTON Switches between TV and radio modes. 3. CH CH DTT-3600 1. TV/RADIO BUTTON Switches between operation and standby modes. 2. GB8 User's Manual Before Using the Product CH CH 1.2 Front Panel CH CH 1 2 3 4 5 6 7 1. TV LED Green light is emitted when the product...
... saving mode, press the STANDBY button on power saving mode. STANDBY BUTTON Switches between TV and radio modes. 3. CH CH DTT-3600 1. TV/RADIO BUTTON Switches between operation and standby modes. 2. GB8 User's Manual Before Using the Product CH CH 1.2 Front Panel CH CH 1 2 3 4 5 6 7 1. TV LED Green light is emitted when the product...
User Manual
Page 9
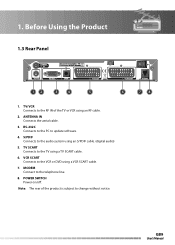
TV SCART Connects to the telephone line. 8. GB9 User's Manual DTT-3600/DTV-4700_ (100119) 1. Before Using the Product ANTENNA IN 9 90-250V~50/60Hz TV/VCR RS-232C SPDIF 1.3 Rear Panel TV SCART VCR SCART MODEM ...
TV SCART Connects to the telephone line. 8. GB9 User's Manual DTT-3600/DTV-4700_ (100119) 1. Before Using the Product ANTENNA IN 9 90-250V~50/60Hz TV/VCR RS-232C SPDIF 1.3 Rear Panel TV SCART VCR SCART MODEM ...
User Manual
Page 10
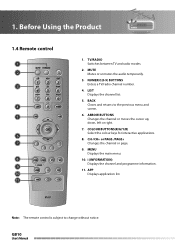
...+ Changes the channel or page. 9. APP 17 Displays application list. 18 19 Note: The remote control is subject to the previous m1e3nu and 6. GB10 User's Manual LIST Displays the channel list. 5. ARROW BUTTONS 14 Changes the channel or moves the cursor up, down, left or right. 7. NUMERIC(0-9) BUTTONS Enters a TV/radio...
...+ Changes the channel or page. 9. APP 17 Displays application list. 18 19 Note: The remote control is subject to the previous m1e3nu and 6. GB10 User's Manual LIST Displays the channel list. 5. ARROW BUTTONS 14 Changes the channel or moves the cursor up, down, left or right. 7. NUMERIC(0-9) BUTTONS Enters a TV/radio...

User Manual
Page 11
OK Selects a menu or con rms the selected operation. 16. SOUNDTRACK Displays the soundtrack list. 19. GUIDE 12 Displays the programme guide. 14. TEXT 14 Switches between operation and standby modes. 13. STANDBY Switches between the teletext and TV modes. 18. V-/V+ 13 Adjusts the audio volume. 17. SUBTITLE 15 Displays the subtitle language list. 16 17 18 19 GB11 User's Manual EXIT Exits all On-Screen Display (OSD) screens. 15. 1. Before Using the Product 12.
OK Selects a menu or con rms the selected operation. 16. SOUNDTRACK Displays the soundtrack list. 19. GUIDE 12 Displays the programme guide. 14. TEXT 14 Switches between operation and standby modes. 13. STANDBY Switches between the teletext and TV modes. 18. V-/V+ 13 Adjusts the audio volume. 17. SUBTITLE 15 Displays the subtitle language list. 16 17 18 19 GB11 User's Manual EXIT Exits all On-Screen Display (OSD) screens. 15. 1. Before Using the Product 12.

User Manual
Page 12
... to the TV, VCR or other devices. ANTENNA IN 9 90-250V~50/60Hz TV/VCR RS-232C SPDIF TV SCART VCR SCART MODEM GB12 User's Manual ANTENNA IN TV/VCR RS-232C 9 90-250V~50/60Hz SPDIF TV SCART VCR SCART MODEM 2. Note: If you have. The product provides various interfaces...
... to the TV, VCR or other devices. ANTENNA IN 9 90-250V~50/60Hz TV/VCR RS-232C SPDIF TV SCART VCR SCART MODEM GB12 User's Manual ANTENNA IN TV/VCR RS-232C 9 90-250V~50/60Hz SPDIF TV SCART VCR SCART MODEM 2. Note: If you have. The product provides various interfaces...

User Manual
Page 13
VCR SCART MODEM ANTENNA IN 9 90-250V~50/60Hz TV/VCR RS-232C SPDIF TV SCART VCR SCART MODEM RF Cable SCART Cable TV Antenna IN TV SCART Note: Connect the product and the TV using a SCART or an RF cable. 2. Setup ANTENNA IN 9 90-250V~50/60Hz 2.2 Connecting the TV TV/VCR RS-232C SPDIF TV SCART Connect the product and the TV using an RF cable to watch analogue channels. GB13 User's Manual
VCR SCART MODEM ANTENNA IN 9 90-250V~50/60Hz TV/VCR RS-232C SPDIF TV SCART VCR SCART MODEM RF Cable SCART Cable TV Antenna IN TV SCART Note: Connect the product and the TV using a SCART or an RF cable. 2. Setup ANTENNA IN 9 90-250V~50/60Hz 2.2 Connecting the TV TV/VCR RS-232C SPDIF TV SCART Connect the product and the TV using an RF cable to watch analogue channels. GB13 User's Manual

User Manual
Page 14
Setup 2.3 Connecting the TV and VCR You can either: 1. ANTENNA IN 9 90-250V~50/60Hz TV/VCR RS-232C SPDIF TV SCART VCR SCART MODEM GB14 User's Manual RF Cable VCR Antenna IN VCR Antenna OUT SCART Cable VCR SCART RF Cable SCART Cable TV Antenna IN TV SCART Connect the product and the TV/VCR using an RF cable. Connect the product and the TV/VCR using a SCART cable. 2. 2.
Setup 2.3 Connecting the TV and VCR You can either: 1. ANTENNA IN 9 90-250V~50/60Hz TV/VCR RS-232C SPDIF TV SCART VCR SCART MODEM GB14 User's Manual RF Cable VCR Antenna IN VCR Antenna OUT SCART Cable VCR SCART RF Cable SCART Cable TV Antenna IN TV SCART Connect the product and the TV/VCR using an RF cable. Connect the product and the TV/VCR using a SCART cable. 2. 2.

User Manual
Page 15
ANTENNA IN 9 90-250V~50/60Hz TV/VCR RS-232C SPDIF TV SCART VCR SCART MODEM Modem Cable LAN GB15 User's Manual 2. Setup 2.4 Connecting the Modem Connect a modem cable to the product.
ANTENNA IN 9 90-250V~50/60Hz TV/VCR RS-232C SPDIF TV SCART VCR SCART MODEM Modem Cable LAN GB15 User's Manual 2. Setup 2.4 Connecting the Modem Connect a modem cable to the product.

User Manual
Page 16
Setup 2.5 Connecting the Audio System Connect the product and the Dolby Digital decoder for higher quality sound using an S/PDIF cable. ANTENNA IN 9 90-250V~50/60Hz TV/VCR RS-232C SPDIF TV SCART VCR SCART MODEM S/PDIF Cable S/PDIF GB16 User's Manual 2.
Setup 2.5 Connecting the Audio System Connect the product and the Dolby Digital decoder for higher quality sound using an S/PDIF cable. ANTENNA IN 9 90-250V~50/60Hz TV/VCR RS-232C SPDIF TV SCART VCR SCART MODEM S/PDIF Cable S/PDIF GB16 User's Manual 2.

User Manual
Page 17
Power on by pressing the STANDBY button on the remote control. Then, connect a plug of the adapter to a power input jack. CH VCR SCART MODEM GB17 User's Manual Connect an adapter to a wall outlet. 2. 2. Setup 2.6 Powering On 1.
Power on by pressing the STANDBY button on the remote control. Then, connect a plug of the adapter to a power input jack. CH VCR SCART MODEM GB17 User's Manual Connect an adapter to a wall outlet. 2. 2. Setup 2.6 Powering On 1.
User Manual
Page 18
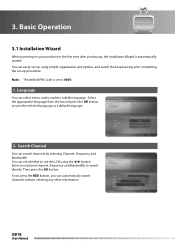
... to save the selected language as a default language. 2. If you press the RED button, you can select menu, audio, and the subtitle language. GB18 User's Manual Search Channel You can set whether to use the LCN using simple organization and options, and watch the broadcasting after purchasing, the Installation Wizard is...
... to save the selected language as a default language. 2. If you press the RED button, you can select menu, audio, and the subtitle language. GB18 User's Manual Search Channel You can set whether to use the LCN using simple organization and options, and watch the broadcasting after purchasing, the Installation Wizard is...

User Manual
Page 19
... the i button while watching a program. Channel name 4. Press the GREEN button to add a channel. Press the EXIT button to the next. Program name GB19 User's Manual 3. Press the OK button to move to hide the Program Banner. Press the OK button to the LCN using the RED button. The General Information...
... the i button while watching a program. Channel name 4. Press the GREEN button to add a channel. Press the EXIT button to the next. Program name GB19 User's Manual 3. Press the OK button to move to hide the Program Banner. Press the OK button to the LCN using the RED button. The General Information...

User Manual
Page 20
... no available program information, program information is displayed to view detailed information. Press the i button again while the program banner is not displayed. GB20 User's Manual Program broadcasting time and progress bar: displays program playing time and progress bar. 6. Press the button to adjust the audio volume. Current time and date...
... no available program information, program information is displayed to view detailed information. Press the i button again while the program banner is not displayed. GB20 User's Manual Program broadcasting time and progress bar: displays program playing time and progress bar. 6. Press the button to adjust the audio volume. Current time and date...


