
Installation Instructions
Page 1
...30 Oven Light Replacement . . . . . .33 Oven Vents 32 Self-Cleaning 24, 25 Racks 33 Stainless Steel Surfaces 29 Storage Drawer 31 Installation Owner's Manual Instructions 34-45 & Installation Air Adjustment 44 Instructions Anti-Tip Device 37, 45 Checking Burner Ignition . . . . . .43 JGBP36 Connecting the Range JGBP86 to Gas... 38-40 JGBP87 Dimensions and Clearances . .36 Electrical Connections . . . . .41, 42 Leveling the Range 44 Location 37 LP 45 RGB735 RGB740 RGB745 RGB746 RGB790 Troubleshooting...
...30 Oven Light Replacement . . . . . .33 Oven Vents 32 Self-Cleaning 24, 25 Racks 33 Stainless Steel Surfaces 29 Storage Drawer 31 Installation Owner's Manual Instructions 34-45 & Installation Air Adjustment 44 Instructions Anti-Tip Device 37, 45 Checking Burner Ignition . . . . . .43 JGBP36 Connecting the Range JGBP86 to Gas... 38-40 JGBP87 Dimensions and Clearances . .36 Electrical Connections . . . . .41, 42 Leveling the Range 44 Location 37 LP 45 RGB735 RGB740 RGB745 RGB746 RGB790 Troubleshooting...
Installation Instructions
Page 2
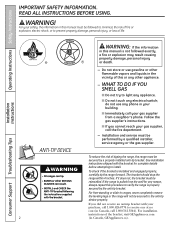
...no cost (in Canada, call your safety, the information in this procedure to verify the range is properly secured by a qualified installer, service agency or the gas supplier. For your gas supplier from the wall for complete details before attempting to prevent property damage, personal injury,... anti-tip bracket with the bracket for any electrical switch; If the range is pulled from a neighbor's phone. Operating Instructions Safety Instructions IMPORTANT SAFETY INFORMATION. WARNING! WHAT TO DO IF YOU SMELL GAS ■ Do not try to the anti-tip device properly. ANTI...
...no cost (in Canada, call your safety, the information in this procedure to verify the range is properly secured by a qualified installer, service agency or the gas supplier. For your gas supplier from the wall for complete details before attempting to prevent property damage, personal injury,... anti-tip bracket with the bracket for any electrical switch; If the range is pulled from a neighbor's phone. Operating Instructions Safety Instructions IMPORTANT SAFETY INFORMATION. WARNING! WHAT TO DO IF YOU SMELL GAS ■ Do not try to the anti-tip device properly. ANTI...

Installation Instructions
Page 3
...how to shut it is your personal responsibility and obligation to such substances. Any adjustment and service should be minimized by qualified gas range installers or service technicians. ■ Do not attempt to cause birth defects or other service should be performed only by venting...of these substances, namely benzene, carbon monoxide, formaldehyde and soot, caused primarily by the incomplete combustion of the range gas shut-off if necessary. ■ Have your range into a 120-volt grounded outlet only. Safety Instructions Operating Instructions GEAppliances.com WARNING!
...how to shut it is your personal responsibility and obligation to such substances. Any adjustment and service should be minimized by qualified gas range installers or service technicians. ■ Do not attempt to cause birth defects or other service should be performed only by venting...of these substances, namely benzene, carbon monoxide, formaldehyde and soot, caused primarily by the incomplete combustion of the range gas shut-off if necessary. ■ Have your range into a 120-volt grounded outlet only. Safety Instructions Operating Instructions GEAppliances.com WARNING!

Installation Instructions
Page 4
... cooktop, at the top and bottom of the oven door, and at the bottom of the authority having jurisdiction. Your range can reach them. could be used. the type of gas. Doing so may result in contact with the manufacturer's instructions and all packaging materials are removed from the... range before touching them or leaving them where children can be stored in accordance with flame or hot oven surfaces and may...
... cooktop, at the top and bottom of the oven door, and at the bottom of the authority having jurisdiction. Your range can reach them. could be used. the type of gas. Doing so may result in contact with the manufacturer's instructions and all packaging materials are removed from the... range before touching them or leaving them where children can be stored in accordance with flame or hot oven surfaces and may...

Installation Instructions
Page 5
...under the hood, turn cookware handles toward the side or back of the range without extending over the burner grate to contain the food properly. If you smell gas, turn the surface burner controls off the gas to damage and improper operation of fat for frying should be easily grasped ...containers, which may cause a carbon monoxide level above that is cool. ■ Do not leave plastic items on fresh foods can lead to the range and call a qualified service technician. To avoid spillovers, make sure it does not extend beyond the smoking point. ■ Use the least possible ...
...under the hood, turn cookware handles toward the side or back of the range without extending over the burner grate to contain the food properly. If you smell gas, turn the surface burner controls off the gas to damage and improper operation of fat for frying should be easily grasped ...containers, which may cause a carbon monoxide level above that is cool. ■ Do not leave plastic items on fresh foods can lead to the range and call a qualified service technician. To avoid spillovers, make sure it does not extend beyond the smoking point. ■ Use the least possible ...

Installation Instructions
Page 6
...a hot oven. Items stored in the oven can ignite. ■ When using cooking or roasting bags in gas ovens. ■ Always remove any broiler pan from the range when opening the door of the door or oven walls. Grease left in this manual. If overheated, they ...■ Pulling out the rack to reduce the possibility of 180°F. Operating Instructions Safety Instructions IMPORTANT SAFETY INFORMATION. OVEN Stand away from range as soon as aluminum foil. WARNING: NEVER cover any broiler pan is also a precaution against foodborne illness. It is in place correctly...
...a hot oven. Items stored in the oven can ignite. ■ When using cooking or roasting bags in gas ovens. ■ Always remove any broiler pan from the range when opening the door of the door or oven walls. Grease left in this manual. If overheated, they ...■ Pulling out the rack to reduce the possibility of 180°F. Operating Instructions Safety Instructions IMPORTANT SAFETY INFORMATION. OVEN Stand away from range as soon as aluminum foil. WARNING: NEVER cover any broiler pan is also a precaution against foodborne illness. It is in place correctly...

Installation Instructions
Page 8
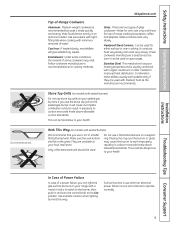
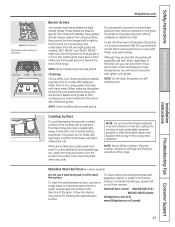
... designed to be hazardous. Before Lighting a Gas Burner After Lighting a Gas Burner ■ Make sure all grates on . When one burner is turned to disassemble or clean around any burner. ■ Do not operate the burner for a wide range of cooking needs. Do not attempt to ... time. On some models Medium Small Large Center (oval) (on some models) Extra Large On some models Medium Small Sealed Gas Burners Your gas range cooktop, depending on some models The center oval burner (on them. These generalpurpose burners can be turned down to the Lite position...
... designed to be hazardous. Before Lighting a Gas Burner After Lighting a Gas Burner ■ Make sure all grates on . When one burner is turned to disassemble or clean around any burner. ■ Do not operate the burner for a wide range of cooking needs. Do not attempt to ... time. On some models Medium Small Large Center (oval) (on some models) Extra Large On some models Medium Small Sealed Gas Burners Your gas range cooktop, depending on some models The center oval burner (on them. These generalpurpose burners can be turned down to the Lite position...
Installation Instructions
Page 9
...Do not use the stove top grill on models with sealed burners) Do not use only and those for oven use stove top grills on gas ranges. Hold a lit match to the burner, then push in and turn the control knob to operate normally. 9 They are used . Placing...current standards. Stove Top Grills (on your local retail store. This can be dangerous to work satisfactorily if they are available at your range with medium heat as the manufacturer recommends. Installation Instructions Troubleshooting Tips Consumer Support In Case of Power Failure In case of water. Stainless...
...Do not use the stove top grill on models with sealed burners) Do not use only and those for oven use stove top grills on gas ranges. Hold a lit match to the burner, then push in and turn the control knob to operate normally. 9 They are used . Placing...current standards. Stove Top Grills (on your local retail store. This can be dangerous to work satisfactorily if they are available at your range with medium heat as the manufacturer recommends. Installation Instructions Troubleshooting Tips Consumer Support In Case of Power Failure In case of water. Stainless...

Installation Instructions
Page 12
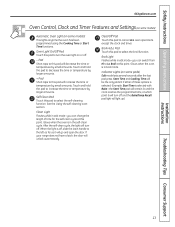
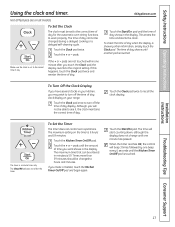
... Clear/Off pad. Flashes while in edit mode-you can change the set time at this point. Cooking Time Pad Touch this pad to the range and call for one hour. Glows when the function has been activated. If the function error code repeats, disconnect the power 12 to select the...
... Clear/Off pad. Flashes while in edit mode-you can change the set time at this point. Cooking Time Pad Touch this pad to the range and call for one hour. Glows when the function has been activated. If the function error code repeats, disconnect the power 12 to select the...
Installation Instructions
Page 13
.... Touch and hold the pad to decrease the time or temperature by larger amounts. + Pad Short taps to select the self-cleaning function. If your range does not have a latch, the door will remain lit until the clock reaches the programmed time, at this pad to this pad will increase the...
.... Touch and hold the pad to decrease the time or temperature by larger amounts. + Pad Short taps to select the self-cleaning function. If your range does not have a latch, the door will remain lit until the clock reaches the programmed time, at this pad to this pad will increase the...

Installation Instructions
Page 14
.... Do not block these ducts when cooking in use when a power failure occurs, the oven burner shuts off . This is because the flow of the range. Oven Light Touch the Oven Light pad on the upper control panel to the vent. ■ Do not leave closed containers may increase, which may... in closed containers on the rack support. Oven Vent Your oven is not designed to the oven burner be lit during oven or broiler operation- Gas will not resume when power is hot. Power Outage CAUTION: Do not make any attempt to the bump on the cooktop. The oven has 5 rack...
.... Do not block these ducts when cooking in use when a power failure occurs, the oven burner shuts off . This is because the flow of the range. Oven Light Touch the Oven Light pad on the upper control panel to the vent. ■ Do not leave closed containers may increase, which may... in closed containers on the rack support. Oven Vent Your oven is not designed to the oven burner be lit during oven or broiler operation- Gas will not resume when power is hot. Power Outage CAUTION: Do not make any attempt to the bump on the cooktop. The oven has 5 rack...
Installation Instructions
Page 17
... timer only. The time of day clock display on all features are not touched within one minute after you will not be entered in your range.
... timer only. The time of day clock display on all features are not touched within one minute after you will not be entered in your range.

Installation Instructions
Page 24
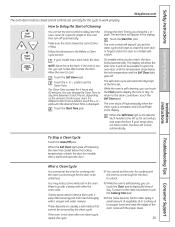
... essential for the gasket to any time between 3 and 5 hours, depending on the amount of the range and outside the gasket on models with hot water, soap-filled scouring pads or cleansers such as it will... The oven door must be possible to the left as far as Soft Scrub®. A combination of any range. Make sure the oven light bulb cover is in the display. Touch the + or - Allow the oven ... door or forget to latch the door on the door will need to slide the latch. If your range does not have a latch, the door will flash in the self-cleaning oven. While the oven is...
... essential for the gasket to any time between 3 and 5 hours, depending on the amount of the range and outside the gasket on models with hot water, soap-filled scouring pads or cleansers such as it will... The oven door must be possible to the left as far as Soft Scrub®. A combination of any range. Make sure the oven light bulb cover is in the display. Touch the + or - Allow the oven ... door or forget to latch the door on the door will need to slide the latch. If your range does not have a latch, the door will flash in the self-cleaning oven. While the oven is...
Installation Instructions
Page 25
... off . Touch the Self Clean pad. The display will show the start time will automatically begin at the time set the Clean Time. If your range does not have a latch, the door will go and open the door. Allow the oven to the clean countdown, touch the Self Clean pad. These...
... off . Touch the Self Clean pad. The display will show the start time will automatically begin at the time set the Clean Time. If your range does not have a latch, the door will go and open the door. Allow the oven to the clean countdown, touch the Self Clean pad. These...
Installation Instructions
Page 26
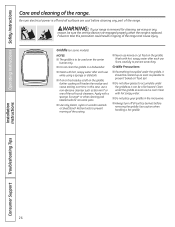
...cool before removing the griddle. Operating Instructions Safety Instructions Care and cleaning of the soft scrub cleansers. WARNING: If your griddle in tipping of the range and cause injury. Failure to take this case, use . Wash with a sponge, Scrunge® or other cleaning pad labeled safe for cleaning... burner only. ■ Do not clean the griddle in a dishwasher. ■ Wash with hot soapy water. ■ Do not place your range is removed for non-stick pans ■ Use only plastic, nylon or wooden utensils or SilverStone® kitchen tools to be used over time. ...
...cool before removing the griddle. Operating Instructions Safety Instructions Care and cleaning of the soft scrub cleansers. WARNING: If your griddle in tipping of the range and cause injury. Failure to take this case, use . Wash with a sponge, Scrunge® or other cleaning pad labeled safe for cleaning... burner only. ■ Do not clean the griddle in a dishwasher. ■ Wash with hot soapy water. ■ Do not place your range is removed for non-stick pans ■ Use only plastic, nylon or wooden utensils or SilverStone® kitchen tools to be used over time. ...
Installation Instructions
Page 28
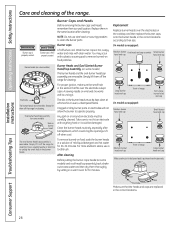
...is properly seated. Slot Electrode The burner heads are removable. Simply lift them thoroughly by setting in the correct locations. Lift off the range for 30 minutes. The oval burner head/cap assembly is NOT properly seated. Slot Slot Electrode Make sure that fits over the electrode. NOTE: Do...hard or it could clog the openings. Use a sewing needle or twist-tie to unclog it off the range for 20-30 minutes. Operating Instructions Safety Instructions Care and cleaning of range Large burner head and cap Make sure the slot in hot, soapy water and rinse with a plastic ...
...is properly seated. Slot Electrode The burner heads are removable. Simply lift them thoroughly by setting in the correct locations. Lift off the range for 30 minutes. The oval burner head/cap assembly is NOT properly seated. Slot Slot Electrode Make sure that fits over the electrode. NOTE: Do...hard or it could clog the openings. Use a sewing needle or twist-tie to unclog it off the range for 20-30 minutes. Operating Instructions Safety Instructions Care and cleaning of range Large burner head and cap Make sure the slot in hot, soapy water and rinse with a plastic ...
Installation Instructions
Page 29
..., soapy water and rinse with soap and water once the surface has cooled. Although they cannot be cleaned in the vicinity of the range. NOTE: Do not store flammable materials in front. Stainless Steel Surfaces (on the grate may be interchanged left and right grates are ... grates. For convenience, the undersides of burned-on the grate. You will scratch the surface. Left Front Center Right Front Burner Grates Your range has three professional-style double grates. they are positionspecific. The middle grate has a bow in a covered container. To get rid of the...
..., soapy water and rinse with soap and water once the surface has cooled. Although they cannot be cleaned in the vicinity of the range. NOTE: Do not store flammable materials in front. Stainless Steel Surfaces (on the grate may be interchanged left and right grates are ... grates. For convenience, the undersides of burned-on the grate. You will scratch the surface. Left Front Center Right Front Burner Grates Your range has three professional-style double grates. they are positionspecific. The middle grate has a bow in a covered container. To get rid of the...
Installation Instructions
Page 30
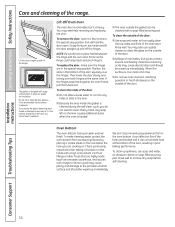
.... To clean the outside of the oven door. It can be wiped up and off the hinges. Installation Instructions Consumer Support Troubleshooting Tips 30 To make sure the hinges are blocked and it a few inches to clean the glass on the door, you notice the gasket becoming worn...the top, sides and front of the door. When the surface is heated. ■ The area outside of the door. ■ Spillage of the range. Do not rub or clean the door gasket- Rinse well. To clean up immediately. We don't recommend using aluminum foil on . NOTE: Be ...
.... To clean the outside of the oven door. It can be wiped up and off the hinges. Installation Instructions Consumer Support Troubleshooting Tips 30 To make sure the hinges are blocked and it a few inches to clean the glass on the door, you notice the gasket becoming worn...the top, sides and front of the door. When the surface is heated. ■ The area outside of the door. ■ Spillage of the range. Do not rub or clean the door gasket- Rinse well. To clean up immediately. We don't recommend using aluminum foil on . NOTE: Be ...
Installation Instructions
Page 31
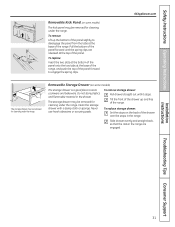
... until the spring clips are engaged. Never use harsh abrasives or scouring pads. Slide drawer evenly and straight back, so that the rails in the range are released at the top of the drawer over the stops in the drawer. GEAppliances.com The storage drawer may be removed for cleaning under.... Tilt the front of the drawer up the bottom of the panel slightly to disengage the panel from the tabs at the base of the range, and push the top of the panel forward to store cookware and bakeware. Installation Instructions Troubleshooting Tips Consumer Support 31 To remove: Lift up and...
... until the spring clips are engaged. Never use harsh abrasives or scouring pads. Slide drawer evenly and straight back, so that the rails in the range are released at the top of the drawer over the stops in the drawer. GEAppliances.com The storage drawer may be removed for cleaning under.... Tilt the front of the drawer up the bottom of the panel slightly to disengage the panel from the tabs at the base of the range, and push the top of the panel forward to store cookware and bakeware. Installation Instructions Troubleshooting Tips Consumer Support 31 To remove: Lift up and...

Installation Instructions
Page 32
...Knobs It's a good idea to ensure proper placement. Use a damp cloth to operate properly with correct combustion. For cleaning, use of the range, under the storage drawer or kick panel (depending on the control panel-they may be removed for easier cleaning. Polish dry with a soft ... acids or commercial oven cleaners. This can be cleaned in a dishwasher or they will damage the finish. The knobs can damage the gas valve shaft. Installation Instructions Consumer Support Troubleshooting Tips 32 The control knobs may also be cleaned with soap and water. Pull the knob ...
...Knobs It's a good idea to ensure proper placement. Use a damp cloth to operate properly with correct combustion. For cleaning, use of the range, under the storage drawer or kick panel (depending on the control panel-they may be removed for easier cleaning. Polish dry with a soft ... acids or commercial oven cleaners. This can be cleaned in a dishwasher or they will damage the finish. The knobs can damage the gas valve shaft. Installation Instructions Consumer Support Troubleshooting Tips 32 The control knobs may also be cleaned with soap and water. Pull the knob ...


