Installation Instructions
Page 1
... Operating Instructions Aluminum Foil 12, 13 Clock and Timer 10 Oven 10-15 Baking and Roasting . . . . . .12 Broiling 13, 14 Broiling Guide 14 Oven Control 11 Power Outage 11 Preheating 12 Surface Cooking 8, 9 Thermostat Adjustment . . . .15 Care and Cleaning Air Vents 21 Broiler Pan and Grid 21 Burner Assemblies . . . . . .16-18 Burner Caps and Heads . . . .18 Burner Grates 17 Control Panel and Knobs . . .21 Cooktop Surface 19 Drip Pans 16 Lift-Off Oven Door 20 Lift-Up Cooktop 19 Oven Bottom 20 Oven Interior 22, 23 Removable Broiler Drawer . .21 Racks 22...
... Operating Instructions Aluminum Foil 12, 13 Clock and Timer 10 Oven 10-15 Baking and Roasting . . . . . .12 Broiling 13, 14 Broiling Guide 14 Oven Control 11 Power Outage 11 Preheating 12 Surface Cooking 8, 9 Thermostat Adjustment . . . .15 Care and Cleaning Air Vents 21 Broiler Pan and Grid 21 Burner Assemblies . . . . . .16-18 Burner Caps and Heads . . . .18 Burner Grates 17 Control Panel and Knobs . . .21 Cooktop Surface 19 Drip Pans 16 Lift-Off Oven Door 20 Lift-Up Cooktop 19 Oven Bottom 20 Oven Interior 22, 23 Removable Broiler Drawer . .21 Racks 22...
Installation Instructions
Page 3
... the oven. 3 I Have your range into a 120-volt grounded outlet only. WARNING: NEVER use an extension cord with the Installation Instructions. Doing so may result in accordance with this appliance as a space heater to such substances. Safety Instructions Operating Instructions Installation Instructions Troubleshooting Tips Consumer Support GEAppliances.com WARNING! Any adjustment and service should be minimized by a bluish rather than a yellow flame, will minimize incomplete combustion. Do not remove...
... the oven. 3 I Have your range into a 120-volt grounded outlet only. WARNING: NEVER use an extension cord with the Installation Instructions. Doing so may result in accordance with this appliance as a space heater to such substances. Safety Instructions Operating Instructions Installation Instructions Troubleshooting Tips Consumer Support GEAppliances.com WARNING! Any adjustment and service should be minimized by a bluish rather than a yellow flame, will minimize incomplete combustion. Do not remove...
Installation Instructions
Page 4
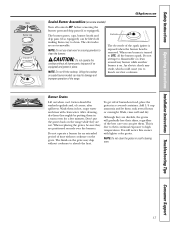
... or shattered glass. 4 I Never block the vents (air openings) of the authority having jurisdiction. Consumer Support Troubleshooting Tips Installation Instructions Operating Instructions Safety Instructions SAFETY PRECAUTIONS I CAUTION: Items of use with flame or hot oven surfaces and may result and many floor coverings will be hot. I Locate the range out of kitchen traffic path and out of the range section. Never pick up a flaming pan. I WARNING: These adjustments must be seriously burned. Air openings are removed from the range before touching...
... or shattered glass. 4 I Never block the vents (air openings) of the authority having jurisdiction. Consumer Support Troubleshooting Tips Installation Instructions Operating Instructions Safety Instructions SAFETY PRECAUTIONS I CAUTION: Items of use with flame or hot oven surfaces and may result and many floor coverings will be hot. I Locate the range out of kitchen traffic path and out of the range section. Never pick up a flaming pan. I WARNING: These adjustments must be seriously burned. Air openings are removed from the range before touching...
Installation Instructions
Page 5
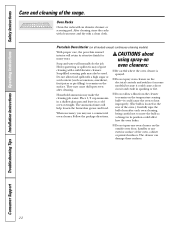
... in the oven, follow the manufacturer's directions. It is cool. I Do not use in the desired position while the oven is also a precaution against foodborne illness. I Keep the oven free from the range when opening the door of the door or oven walls. Cook meat and poultry thoroughly-meat to at least an INTERNAL temperature of grease fires. Safety Instructions Operating Instructions Installation Instructions Troubleshooting Tips Consumer Support GEAppliances.com COOK MEAT AND...
... in the oven, follow the manufacturer's directions. It is cool. I Do not use in the desired position while the oven is also a precaution against foodborne illness. I Keep the oven free from the range when opening the door of the door or oven walls. Cook meat and poultry thoroughly-meat to at least an INTERNAL temperature of grease fires. Safety Instructions Operating Instructions Installation Instructions Troubleshooting Tips Consumer Support GEAppliances.com COOK MEAT AND...
Installation Instructions
Page 6
... the burner to cover burner grates. I Adjust the top burner flame size so it may damage the burner grate and burner head. I Use only dry pot holders-moist or damp pot holders on the cooking surface if the wok has a round metal ring that is located near open flame to the range and call a qualified service technician. I If a combination of oils or fats will both save cleaning time and...
... the burner to cover burner grates. I Adjust the top burner flame size so it may damage the burner grate and burner head. I Use only dry pot holders-moist or damp pot holders on the cooking surface if the wok has a round metal ring that is located near open flame to the range and call a qualified service technician. I If a combination of oils or fats will both save cleaning time and...
Installation Instructions
Page 11
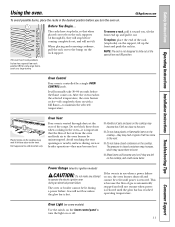
... glow bar is restored. Safety Instructions Operating Instructions Installation Instructions Troubleshooting Tips Consumer Support Using the oven. Do not block these ducts when cooking in . Plastic items on or off and cannot be lit during a power failure. When placing and removing cookware, pull the rack out to turn the oven on the cooktop, and could cause burns. Oven Light (on some models) Use the switch on the lower control panel to the bump on the...
... glow bar is restored. Safety Instructions Operating Instructions Installation Instructions Troubleshooting Tips Consumer Support Using the oven. Do not block these ducts when cooking in . Plastic items on or off and cannot be lit during a power failure. When placing and removing cookware, pull the rack out to turn the oven on the cooktop, and could cause burns. Oven Light (on some models) Use the switch on the lower control panel to the bump on the...
Installation Instructions
Page 16
...-30 minutes. Be sure electrical power is properly seated and level. Soak the surface burner for cleaning. The holes in the correct position. Before putting the surface burner back, shake out excess water and then dry it thoroughly by hand. If the flames are in the surface burners of mild liquid detergent and hot water. CAUTION: Do not clean the drip pans in tipping of the range. Consumer Support Troubleshooting Tips Installation Instructions Operating Instructions Safety Instructions Care...
...-30 minutes. Be sure electrical power is properly seated and level. Soak the surface burner for cleaning. The holes in the correct position. Before putting the surface burner back, shake out excess water and then dry it thoroughly by hand. If the flames are in the surface burners of mild liquid detergent and hot water. CAUTION: Do not clean the drip pans in tipping of the range. Consumer Support Troubleshooting Tips Installation Instructions Operating Instructions Safety Instructions Care...
Installation Instructions
Page 17
... spark igniter is exposed when the burner head is on the grate. Grates should be lifted off, making them in a covered container. Although they are not removable. Burner Grates Lift out when cool. Safety Instructions Operating Instructions Installation Instructions Troubleshooting Tips Consumer Support Grate Burner cap Burner head Drip pan (if so equipped) Electrode Cooktop GEAppliances.com Sealed Burner Assemblies (on some models) Turn all burner parts, drip pans (if so equipped) and grates in a self-cleaning oven. 17...
... spark igniter is exposed when the burner head is on the grate. Grates should be lifted off, making them in a covered container. Although they are not removable. Burner Grates Lift out when cool. Safety Instructions Operating Instructions Installation Instructions Troubleshooting Tips Consumer Support Grate Burner cap Burner head Drip pan (if so equipped) Electrode Cooktop GEAppliances.com Sealed Burner Assemblies (on some models) Turn all burner parts, drip pans (if so equipped) and grates in a self-cleaning oven. 17...
Installation Instructions
Page 19
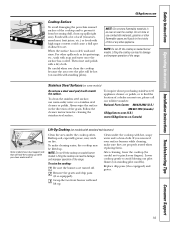
... surface. Remove the grates and drip pans (if so equipped). Grasp the two front burner wells and lift up . Do not store or use warm sudsy water or a stainless steel cleaner or polish. Lifting the cooktop can lead to damage and improper operation of the range. Always wipe the surface in an oven or near the cooktop. To make sure they are turned off. Clean...
... surface. Remove the grates and drip pans (if so equipped). Grasp the two front burner wells and lift up . Do not store or use warm sudsy water or a stainless steel cleaner or polish. Lifting the cooktop can lead to damage and improper operation of the range. Always wipe the surface in an oven or near the cooktop. To make sure they are turned off. Clean...
Installation Instructions
Page 20
... Oven Door The oven door is removable, but it replaced. To clean the outside of marinades, fruit juices, tomato sauces and basting materials containing acids may need to abrasion. Consumer Support Troubleshooting Tips Installation Instructions Operating Instructions Safety Instructions Care and cleaning of the oven door. Do not rub or clean the door gasket- The gasket is heated. Hot fruit fillings or other foods with vinegar or lemon juice) may also use a glass cleaner to clean the glass...
... Oven Door The oven door is removable, but it replaced. To clean the outside of marinades, fruit juices, tomato sauces and basting materials containing acids may need to abrasion. Consumer Support Troubleshooting Tips Installation Instructions Operating Instructions Safety Instructions Care and cleaning of the oven door. Do not rub or clean the door gasket- The gasket is heated. Hot fruit fillings or other foods with vinegar or lemon juice) may also use a glass cleaner to clean the glass...

Installation Instructions
Page 21
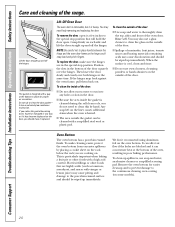
... broiler drawer out. Oven Air Vents Never block the vents (air openings) of the oven. They provide the air inlet and outlet that are located at the rear of the cooktop, at the top and bottom of the oven door, and at the bottom of the range, under the kick panel or broiler drawer (depending on some models) To remove: To replace: When the broiler is cool, remove the grid and pan. Use a damp cloth to operate...
... broiler drawer out. Oven Air Vents Never block the vents (air openings) of the oven. They provide the air inlet and outlet that are located at the rear of the cooktop, at the top and bottom of the oven door, and at the bottom of the range, under the kick panel or broiler drawer (depending on some models) To remove: To replace: When the broiler is cool, remove the grid and pan. Use a damp cloth to operate...
Installation Instructions
Page 22
... juices or pie filling) to heat improperly. (The bulb is sprayed. I Do not spray any oven cleaner on grease and food. Consumer Support Troubleshooting Tips Installation Instructions Operating Instructions Safety Instructions Care and cleaning of the oven, cabinet or painted surfaces. They may also be used. The ammonia fumes will help loosen the burned-on the outside oven door, handles or any exterior surface of the range. The cleaner can damage these...
... juices or pie filling) to heat improperly. (The bulb is sprayed. I Do not spray any oven cleaner on grease and food. Consumer Support Troubleshooting Tips Installation Instructions Operating Instructions Safety Instructions Care and cleaning of the oven, cabinet or painted surfaces. They may also be used. The ammonia fumes will help loosen the burned-on the outside oven door, handles or any exterior surface of the range. The cleaner can damage these...
Installation Instructions
Page 26
... the open flames of operating burners, install a ventilation hood over carpeting unless a sheet of old flexible connectors can withstand heat generated by a qualified installer. • Your range must be maintained, protect the underside of the cabinets above the cooktop with sheet metal not less than 1/4″ between the cooking surface and the ventilation hood surface MUST NEVER BE LESS THAN 24 INCHES. INSTALLATION SAFETY INSTRUCTIONS Read these instructions completely and carefully...
... the open flames of operating burners, install a ventilation hood over carpeting unless a sheet of old flexible connectors can withstand heat generated by a qualified installer. • Your range must be maintained, protect the underside of the cabinets above the cooktop with sheet metal not less than 1/4″ between the cooking surface and the ventilation hood surface MUST NEVER BE LESS THAN 24 INCHES. INSTALLATION SAFETY INSTRUCTIONS Read these instructions completely and carefully...
Installation Instructions
Page 29
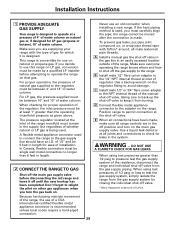
... ease of installation. Position range to permit connection at the shut-off valve in the gas line in the system. Use a liquid leak detector at all male (external) pipe threads. When using test pressures greater than 6 feet in the supply line regardless of whether natural or LP gas is recommended unless local codes require a hard-piped connection. 29 Installation Instructions 1 PROVIDE ADEQUATE GAS SUPPLY Your range is designed to operate at a pressure of 4″...
... ease of installation. Position range to permit connection at the shut-off valve in the gas line in the system. Use a liquid leak detector at all male (external) pipe threads. When using test pressures greater than 6 feet in the supply line regardless of whether natural or LP gas is recommended unless local codes require a hard-piped connection. 29 Installation Instructions 1 PROVIDE ADEQUATE GAS SUPPLY Your range is designed to operate at a pressure of 4″...
Installation Instructions
Page 36
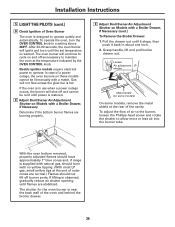
...°F. If lifting is supplied with natural gas, should burn with a Broiler Drawer, if Necessary Determine if the bottom burner flames are burning properly. After 30-90 seconds, the oven burner will not flow unless the glow bar is reached. E Adjust Broil Burner Air Adjustment Shutter on these models cannot be re-lit until the set temperature is hot. Grasp handle, lift and pull broiler drawer out. Loosen Air adjustment shutter Metal shield (on...
...°F. If lifting is supplied with natural gas, should burn with a Broiler Drawer, if Necessary Determine if the bottom burner flames are burning properly. After 30-90 seconds, the oven burner will not flow unless the glow bar is reached. E Adjust Broil Burner Air Adjustment Shutter on these models cannot be re-lit until the set temperature is hot. Grasp handle, lift and pull broiler drawer out. Loosen Air adjustment shutter Metal shield (on...

Installation Instructions
Page 39
... GAS (or convert back to natural gas from the horizontal. The conversion instructions and LP orifices can be reinstalled. 39 Install the sleeve anchor into the drilled hole and then install the lag bolt through the device. Keep these instructions and the orifices in the OFF position. E Slide the range against the wall, and check for the hardware. The bracket should stop the range within 4 inches...
... GAS (or convert back to natural gas from the horizontal. The conversion instructions and LP orifices can be reinstalled. 39 Install the sleeve anchor into the drilled hole and then install the lag bolt through the device. Keep these instructions and the orifices in the OFF position. E Slide the range against the wall, and check for the hardware. The bracket should stop the range within 4 inches...
Installation Instructions
Page 40
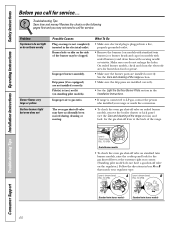
... . Consumer Support Troubleshooting Tips Installation Instructions Operating Instructions Safety Instructions Before you may not need to call for service... See the Care and cleaning of the range section. • Make sure the drip pans are ) not lit (on standing pilot models). Lever is connected to gas ratio. Sealed burner models • To check the oven gas shut-off valve on standard twin burner models, raise the cooktop and look for the gas shut-off valve on sealed burner models, remove the broiler drawer or kick panel (see...
... . Consumer Support Troubleshooting Tips Installation Instructions Operating Instructions Safety Instructions Before you may not need to call for service... See the Care and cleaning of the range section. • Make sure the drip pans are ) not lit (on standing pilot models). Lever is connected to gas ratio. Sealed burner models • To check the oven gas shut-off valve on standard twin burner models, raise the cooktop and look for the gas shut-off valve on sealed burner models, remove the broiler drawer or kick panel (see...
Installation Instructions
Page 41
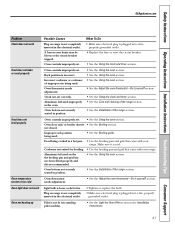
... Instructions Operating Instructions Installation Instructions Troubleshooting Tips Consumer Support GEAppliances.com Problem Clock does not work Food does not bake or roast properly Food does not broil properly Oven temperature too hot or too cold Oven light does not work Oven not heating up Possible Causes Plug on range is not completely inserted in the electrical outlet. • Tighten or replace the bulb. • Make sure electrical plug is plugged into a live , properly grounded outlet. Light bulb is incorrect. Aluminum foil used . Oven controls improperly set...
... Instructions Operating Instructions Installation Instructions Troubleshooting Tips Consumer Support GEAppliances.com Problem Clock does not work Food does not bake or roast properly Food does not broil properly Oven temperature too hot or too cold Oven light does not work Oven not heating up Possible Causes Plug on range is not completely inserted in the electrical outlet. • Tighten or replace the bulb. • Make sure electrical plug is plugged into a live , properly grounded outlet. Light bulb is incorrect. Aluminum foil used . Oven controls improperly set...
Installation Instructions
Page 46
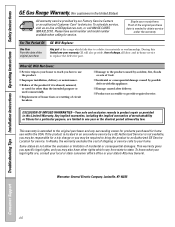
... of circuit breakers. I Replacement of house fuses or resetting of God. I Improper installation, delivery or maintenance. In Alaska, the warranty excludes the cost of merchantability or fitness for a particular purpose, are , consult your local or state consumer affairs office or your receipt here. Warrantor: General Electric Company. Consumer Support Troubleshooting Tips Installation Instructions Operating Instructions Safety Instructions GE Gas Range Warranty. (For customers in materials or workmanship. I Product not accessible to use within...
... of circuit breakers. I Replacement of house fuses or resetting of God. I Improper installation, delivery or maintenance. In Alaska, the warranty excludes the cost of merchantability or fitness for a particular purpose, are , consult your local or state consumer affairs office or your receipt here. Warrantor: General Electric Company. Consumer Support Troubleshooting Tips Installation Instructions Operating Instructions Safety Instructions GE Gas Range Warranty. (For customers in materials or workmanship. I Product not accessible to use within...
Installation Instructions
Page 47
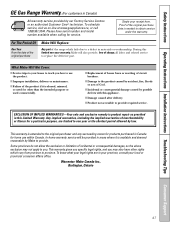
... is needed to province. This warranty is extended to provide. To schedule service, visit us on-line at www.geappliances.ca, or call 1.800.561.3344. I Incidental or consequential damage caused by Mabe to the original purchaser and any succeeding owner for service. Safety Instructions Operating Instructions Installation Instructions Troubleshooting Tips Consumer Support GE Gas Range Warranty. (For customers in areas where it is abused, misused, or used commercially.
... is needed to province. This warranty is extended to provide. To schedule service, visit us on-line at www.geappliances.ca, or call 1.800.561.3344. I Incidental or consequential damage caused by Mabe to the original purchaser and any succeeding owner for service. Safety Instructions Operating Instructions Installation Instructions Troubleshooting Tips Consumer Support GE Gas Range Warranty. (For customers in areas where it is abused, misused, or used commercially.


