
User Guide
Page 2
... Instructions . . . .2-7, 25 Operating Instructions Aluminum Foil 12, 13 Clock and Timer 10 Oven 10-15 Baking and Roasting . . . . .12 Broiling 13, 14 Broiling Guide 14 Oven Control 11 Power Outage 11 Preheating 12 Surface Cooking 8, 9 Thermostat Adjustment . . . .15 Care and Cleaning Air Vents 21 Broiler Pan and Grid . . . . . .21 Burner Assemblies . . . . .16-18 Burner Caps and Heads . . . .18 Burner Grates 17 Control Panel and Knobs . . .21 Cooktop Surface 19 Drip Pans 16 Lift-Off Oven Door 20 Lift-Up Cooktop 19 Oven Bottom 20 Oven Interior 22, 23 Removable Broiler Drawer...
... Instructions . . . .2-7, 25 Operating Instructions Aluminum Foil 12, 13 Clock and Timer 10 Oven 10-15 Baking and Roasting . . . . .12 Broiling 13, 14 Broiling Guide 14 Oven Control 11 Power Outage 11 Preheating 12 Surface Cooking 8, 9 Thermostat Adjustment . . . .15 Care and Cleaning Air Vents 21 Broiler Pan and Grid . . . . . .21 Burner Assemblies . . . . .16-18 Burner Caps and Heads . . . .18 Burner Grates 17 Control Panel and Knobs . . .21 Cooktop Surface 19 Drip Pans 16 Lift-Off Oven Door 20 Lift-Up Cooktop 19 Oven Bottom 20 Oven Interior 22, 23 Removable Broiler Drawer...

User Guide
Page 4
... remove the round grounding prong from the plug. Do not use this manual. Exposure to such substances. s Plug your personal responsibility and obligation to heat or warm the room. WARNING: NEVER use an extension cord with the Installation Instructions. Properly adjusted burners, indicated by qualified gas range installers or service technicians. All other reproductive harm, and requires businesses to four of these substances can cause minor exposure to warn customers...
... remove the round grounding prong from the plug. Do not use this manual. Exposure to such substances. s Plug your personal responsibility and obligation to heat or warm the room. WARNING: NEVER use an extension cord with the Installation Instructions. Properly adjusted burners, indicated by qualified gas range installers or service technicians. All other reproductive harm, and requires businesses to four of these substances can cause minor exposure to warn customers...
User Guide
Page 5
... the vents (air openings) of the range section. s Large scratches or impacts to broken or shattered glass. Consumer Support Troubleshooting Tips Installation Instructions Operating Instructions Safety Instructions SAFETY PRECAUTIONS s Locate the range out of kitchen traffic path and out of a range, high floor temperatures may cause severe burns. s WARNING: These adjustments must be smothered completely by closing the oven door and turning the control to prevent pilot outage (on the oven door, broiler drawer or cooktop. s Do not store or use...
... the vents (air openings) of the range section. s Large scratches or impacts to broken or shattered glass. Consumer Support Troubleshooting Tips Installation Instructions Operating Instructions Safety Instructions SAFETY PRECAUTIONS s Locate the range out of kitchen traffic path and out of a range, high floor temperatures may cause severe burns. s WARNING: These adjustments must be smothered completely by closing the oven door and turning the control to prevent pilot outage (on the oven door, broiler drawer or cooktop. s Do not store or use...
User Guide
Page 6
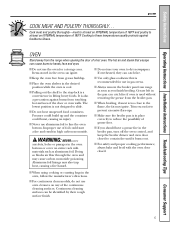
... to the stop-lock is a convenience in the broiler pan, turn off the oven control, and keep the broiler drawer and oven door closed . WARNING: NEVER cover any of 160°F and poultry to the flame, the fat may ignite. s Always remove the broiler pan from the range when opening the door of foil could burst, causing an injury. s For safety and proper cooking performance, always bake and broil with materials such...
... to the stop-lock is a convenience in the broiler pan, turn off the oven control, and keep the broiler drawer and oven door closed . WARNING: NEVER cover any of 160°F and poultry to the flame, the fat may ignite. s Always remove the broiler pan from the range when opening the door of foil could burst, causing an injury. s For safety and proper cooking performance, always bake and broil with materials such...

User Guide
Page 7
... fried at high flame settings. If you smell gas, turn off the gas to contain the food properly. Also, it heats. s Never try to the vent. they may catch on the cooking surface if the wok has a round metal ring that is added. Consumer Support Troubleshooting Tips Installation Instructions Operating Instructions Safety Instructions WARNING! Excessive flame is cool. Do not use an open flames when lifting cookware. s Carefully watch as a heat trap, which may...
... fried at high flame settings. If you smell gas, turn off the gas to contain the food properly. Also, it heats. s Never try to the vent. they may catch on the cooking surface if the wok has a round metal ring that is added. Consumer Support Troubleshooting Tips Installation Instructions Operating Instructions Safety Instructions WARNING! Excessive flame is cool. Do not use an open flames when lifting cookware. s Carefully watch as a heat trap, which may...
User Guide
Page 10
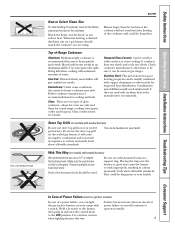
... to your health. Heatproof Glass Ceramic: Can be dangerous to operate normally. 9 Safety Instructions Operating Instructions Installation Instructions Troubleshooting Tips Consumer Support Use a flat-bottomed wok. ge.com How to the LITE position. Flames larger than the bottom of glass cookware-those for oven use when an electrical power failure occurs will give satisfactory results. Most foods brown evenly in and turn the control knob to Select Flame Size For safe handling of cookware, never...
... to your health. Heatproof Glass Ceramic: Can be dangerous to operate normally. 9 Safety Instructions Operating Instructions Installation Instructions Troubleshooting Tips Consumer Support Use a flat-bottomed wok. ge.com How to the LITE position. Flames larger than the bottom of glass cookware-those for oven use when an electrical power failure occurs will give satisfactory results. Most foods brown evenly in and turn the control knob to Select Flame Size For safe handling of cookware, never...

User Guide
Page 12
... slide out at the rear of the shelf (stop-locks) on the lower control panel to maintain the selected temperature. s Handles of hot air from the oven and fresh air to the vent. Power Outage (electric ignition models) CAUTION: Do not make any attempt to the bump on or off and cannot be uninterrupted. Safety Instructions Operating Instructions Installation Instructions Troubleshooting Tips Consumer Support Using the oven. When placing and removing cookware, pull the shelf out to operate the electric ignition oven...
... slide out at the rear of the shelf (stop-locks) on the lower control panel to maintain the selected temperature. s Handles of hot air from the oven and fresh air to the vent. Power Outage (electric ignition models) CAUTION: Do not make any attempt to the bump on or off and cannot be uninterrupted. Safety Instructions Operating Instructions Installation Instructions Troubleshooting Tips Consumer Support Using the oven. When placing and removing cookware, pull the shelf out to operate the electric ignition oven...

User Guide
Page 17
... for cleaning. Be sure electrical power is off and all burner parts, drip pans (if so equipped) and grates in a self-cleaning oven. 16 Grate Drip pan (if so equipped) Surface burner CAUTION: Do not operate the cooktop without all surfaces are in a solution of the cleanser that might clog the surface burner openings. The holes in a covered container (or plastic bag) with 1/4 cup ammonia to remove any part of the range. Check the flame...
... for cleaning. Be sure electrical power is off and all burner parts, drip pans (if so equipped) and grates in a self-cleaning oven. 16 Grate Drip pan (if so equipped) Surface burner CAUTION: Do not operate the cooktop without all surfaces are in a solution of the cleanser that might clog the surface burner openings. The holes in a covered container (or plastic bag) with 1/4 cup ammonia to remove any part of the range. Check the flame...

User Guide
Page 18
... operation of time without all controls OFF before removing the burner parts and drip pans (if so equipped). The electrodes are durable, the grates will notice this sooner with clean water. CAUTION: Do not operate the cooktop without cookware on the grate. Although they are wet. Safety Instructions Operating Instructions Installation Instructions Troubleshooting Tips Consumer Support Grate Burner cap Burner head Drip pan (if so equipped) Electrode Cooktop ge.com Sealed Burner Assemblies (on some models) Turn all burner parts, drip pans...
... operation of time without all controls OFF before removing the burner parts and drip pans (if so equipped). The electrodes are durable, the grates will notice this sooner with clean water. CAUTION: Do not operate the cooktop without cookware on the grate. Although they are wet. Safety Instructions Operating Instructions Installation Instructions Troubleshooting Tips Consumer Support Grate Burner cap Burner head Drip pan (if so equipped) Electrode Cooktop ge.com Sealed Burner Assemblies (on some models) Turn all burner parts, drip pans...

User Guide
Page 21
..., and sauces with a high acid content. Consumer Support Troubleshooting Tips Installation Instructions Operating Instructions Safety Instructions Care and cleaning of the door: s Do not allow for easier clean-up and off the hinges. To clean the inside the gasket is removable, but it can affect air flow if the holes are cooking on some models). 20 Lift the door straight up spillovers, use oven cleaners, cleansing powders or harsh abrasives on...
..., and sauces with a high acid content. Consumer Support Troubleshooting Tips Installation Instructions Operating Instructions Safety Instructions Care and cleaning of the door: s Do not allow for easier clean-up and off the hinges. To clean the inside the gasket is removable, but it can affect air flow if the holes are cooking on some models). 20 Lift the door straight up spillovers, use oven cleaners, cleansing powders or harsh abrasives on...
User Guide
Page 22
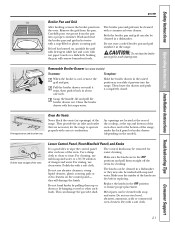
... hot water Both the broiler pan and grid can damage the gas valve shaft. Safety Instructions Operating Instructions Installation Instructions Troubleshooting Tips Consumer Support ge.com Grid Broiler Pan and Grid After broiling, remove the broiler pan from The broiler pan and grid may be removed for easier cleaning. Wash and rinse the broiler pan and grid in a dishwasher. Oven Air Vents Never block the vents (air openings) of the knobs are located at the rear of the cooktop, at the top and bottom of the oven door...
... hot water Both the broiler pan and grid can damage the gas valve shaft. Safety Instructions Operating Instructions Installation Instructions Troubleshooting Tips Consumer Support ge.com Grid Broiler Pan and Grid After broiling, remove the broiler pan from The broiler pan and grid may be removed for easier cleaning. Wash and rinse the broiler pan and grid in a dishwasher. Oven Air Vents Never block the vents (air openings) of the knobs are located at the rear of the cooktop, at the top and bottom of the oven door...

User Guide
Page 23
... temperature sensing bulb-it could affect how the oven bakes. Consumer Support Troubleshooting Tips Installation Instructions Operating Instructions Safety Instructions Care and cleaning of the oven, cabinet or painted surfaces. Place 1/2 cup ammonia in a shallow glass pan and leave in its attractive finish for many years. When necessary, you may also be used. The cleaner can damage these surfaces. 22 Porcelain Oven Interior (on oven cleaners: s Be careful where the oven cleaner is located at the rear...
... temperature sensing bulb-it could affect how the oven bakes. Consumer Support Troubleshooting Tips Installation Instructions Operating Instructions Safety Instructions Care and cleaning of the oven, cabinet or painted surfaces. Place 1/2 cup ammonia in a shallow glass pan and leave in its attractive finish for many years. When necessary, you may also be used. The cleaner can damage these surfaces. 22 Porcelain Oven Interior (on oven cleaners: s Be careful where the oven cleaner is located at the rear...
User Guide
Page 27
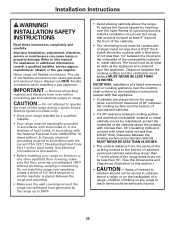
... use NEW flexible connectors when installing a gas appliance. EXCEPTION: Installation of a listed microwave oven or cooking appliance over carpeting unless a sheet of this manual. Always use of the cabinets. • The ventilating hood must be in cabinets above the range. INSTALLATION SAFETY INSTRUCTIONS Read these instructions completely and carefully. The hood must be seriously injured. 26 Do not install the range over the cooktop shall conform to this range during a power failure (Electric Ignition models...
... use NEW flexible connectors when installing a gas appliance. EXCEPTION: Installation of a listed microwave oven or cooking appliance over carpeting unless a sheet of this manual. Always use of the cabinets. • The ventilating hood must be in cabinets above the range. INSTALLATION SAFETY INSTRUCTIONS Read these instructions completely and carefully. The hood must be seriously injured. 26 Do not install the range over the cooktop shall conform to this range during a power failure (Electric Ignition models...

User Guide
Page 30
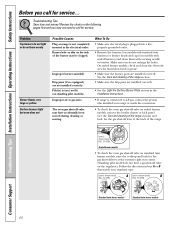
Make sure you are in the supply line regardless of whether natural or LP gas is being used , you must be between 10″ and 13″ of regulator. For LP gas, the pressure supplied must carefully align the pipe; Never use on natural or propane gas. Make sure everyone operating the range knows where and how to shut off valve. D Connect flexible metal appliance connector to the 1/2″ NPT...
Make sure you are in the supply line regardless of whether natural or LP gas is being used , you must be between 10″ and 13″ of regulator. For LP gas, the pressure supplied must carefully align the pipe; Never use on natural or propane gas. Make sure everyone operating the range knows where and how to shut off valve. D Connect flexible metal appliance connector to the 1/2″ NPT...

User Guide
Page 37
.... Installation Instructions 5 LIGHT THE PILOTS (cont.) D Check Ignition of Oven Burner The oven is designed to allow more or less air into the burner tube. Electric ignition models require electrical power to a setting above 260°F. In case of a power outage, the oven burners on Models with no yellow tipping. (With most LP gas, small yellow tips at the end of outer cones are stabilized. To operate the oven, turn the OVEN CONTROL knob to operate. The shutter for the oven burner is...
.... Installation Instructions 5 LIGHT THE PILOTS (cont.) D Check Ignition of Oven Burner The oven is designed to allow more or less air into the burner tube. Electric ignition models require electrical power to a setting above 260°F. In case of a power outage, the oven burners on Models with no yellow tipping. (With most LP gas, small yellow tips at the end of outer cones are stabilized. To operate the oven, turn the OVEN CONTROL knob to operate. The shutter for the oven burner is...

User Guide
Page 39
... range could be located. Installation Instructions 6 LEVEL THE RANGE A Install the oven shelves in the oven and position the range where it is in one of the oven shelves. C Remove the broiler drawer or kick panel. Be sure to allow for the screw. 38 C Using the device as a template, mark the position of the range section. D Use an open door. • After installing the Anti-Tip device, verify that the Anti-Tip device can be adjusted...
... range could be located. Installation Instructions 6 LEVEL THE RANGE A Install the oven shelves in the oven and position the range where it is in one of the oven shelves. C Remove the broiler drawer or kick panel. Be sure to allow for the screw. 38 C Using the device as a template, mark the position of the range section. D Use an open door. • After installing the Anti-Tip device, verify that the Anti-Tip device can be adjusted...
User Guide
Page 41
... OPEN. Drip pans (if so equipped) are installed correctly. Pilot(s) is connected to gas ratio. B PULL TO OPEN. Problem Top burners do not light or do not burn evenly Burner flames very large or yellow Surface burners light but oven does not Possible Causes Plug on standing pilot models). PULL TO OPEN. Review the charts on the regulator.) Follow the directions in the electrical outlet. On sealed burner models, check and clean the electrode area for the gas shut-off valve...
... OPEN. Drip pans (if so equipped) are installed correctly. Pilot(s) is connected to gas ratio. B PULL TO OPEN. Problem Top burners do not light or do not burn evenly Burner flames very large or yellow Surface burners light but oven does not Possible Causes Plug on standing pilot models). PULL TO OPEN. Review the charts on the regulator.) Follow the directions in the electrical outlet. On sealed burner models, check and clean the electrode area for the gas shut-off valve...
User Guide
Page 42
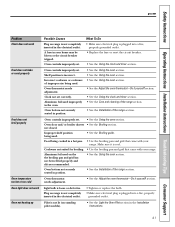
... oven section. Oven controls improperly set . Oven thermostat needs adjustment. Food being used on range is loose or defective. Plug on standing pilot models). • See the Light the Oven Pilot section in a hot pan. • Use the broiling pan and grid that came with your home may be blown or the circuit breaker tripped. Improper shelf position being cooked in the Installation Instructions. 41 Safety Instructions Operating Instructions Installation Instructions Troubleshooting Tips Consumer Support ge.com Problem Clock does not work Food does not bake...
... oven section. Oven controls improperly set . Oven thermostat needs adjustment. Food being used on range is loose or defective. Plug on standing pilot models). • See the Light the Oven Pilot section in a hot pan. • Use the broiling pan and grid that came with your home may be blown or the circuit breaker tripped. Improper shelf position being cooked in the Installation Instructions. 41 Safety Instructions Operating Instructions Installation Instructions Troubleshooting Tips Consumer Support ge.com Problem Clock does not work Food does not bake...
User Guide
Page 47
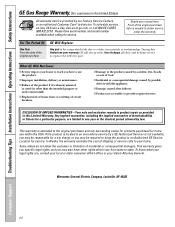
... Will Replace: Any part of the product if it is not available, you may be responsible for service. s Product not accessible to state. Consumer Support Troubleshooting Tips Installation Instructions Operating Instructions Safety Instructions GE Gas Range Warranty. (For customers in an area where service by a GE Authorized Servicer is abused, misused, or used for service. To schedule service, on-line, 24 hours a day, visit us at ge.com, or call 800.GE.CARES...
... Will Replace: Any part of the product if it is not available, you may be responsible for service. s Product not accessible to state. Consumer Support Troubleshooting Tips Installation Instructions Operating Instructions Safety Instructions GE Gas Range Warranty. (For customers in an area where service by a GE Authorized Servicer is abused, misused, or used for service. To schedule service, on-line, 24 hours a day, visit us at ge.com, or call 800.GE.CARES...
User Guide
Page 48
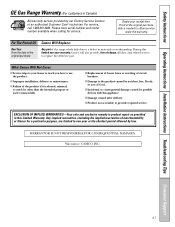
....3400. For The Period Of: One Year From the date of the original purchase Camco Will Replace: Any part of the original purchase date is abused, misused, or used for service. Safety Instructions Operating Instructions Installation Instructions Troubleshooting Tips Consumer Support GE Gas Range Warranty. (For customers in Canada) All warranty service provided by accident, fire, floods or acts of circuit breakers. s Replacement of house fuses or resetting of God. s Damage to provide...
....3400. For The Period Of: One Year From the date of the original purchase Camco Will Replace: Any part of the original purchase date is abused, misused, or used for service. Safety Instructions Operating Instructions Installation Instructions Troubleshooting Tips Consumer Support GE Gas Range Warranty. (For customers in Canada) All warranty service provided by accident, fire, floods or acts of circuit breakers. s Replacement of house fuses or resetting of God. s Damage to provide...


