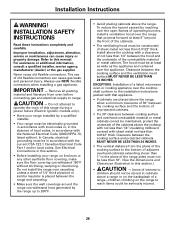
Installation Instructions
Page 8
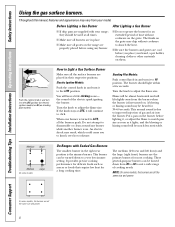
.... After Lighting a Gas Burner I Make sure all times. The finish on standing pilot models). The burner should be heard for 30-60 seconds. Turn the knob to adjust the flame size. A blowing or hissing sound may chip without cookware on . This burner can be turned down from your range; I If drip ...LO to the LITE position (on electric ignition models) or HI (on the grate may be used at LITE, it to suit a wide range of gas and air into the burner. This normal sound is the simmer burner. Push the control knob in the right rear position is due to knock...
.... After Lighting a Gas Burner I Make sure all times. The finish on standing pilot models). The burner should be heard for 30-60 seconds. Turn the knob to adjust the flame size. A blowing or hissing sound may chip without cookware on . This burner can be turned down from your range; I If drip ...LO to the LITE position (on electric ignition models) or HI (on the grate may be used at LITE, it to suit a wide range of gas and air into the burner. This normal sound is the simmer burner. Push the control knob in the right rear position is due to knock...
Installation Instructions
Page 11
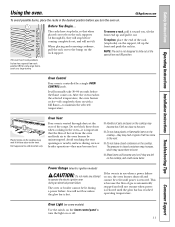
...place the end of the rack (stop-locks) on . It will normally take 30-90 seconds before the flame comes on the support, tilt up and pull it out... openings or nearby surfaces during oven or broiler operation-they will stop -locks, so that the flow of the range. I Metal items will not tilt. The oven or broiler cannot be uninterrupted. To remove a rack, pull it... containers on the rack supports (A through ducts at the special low rack (R) position. I Handles of gas is automatically stopped and will not flow unless the glow bar is important that when placed correctly on the...
...place the end of the rack (stop-locks) on . It will normally take 30-90 seconds before the flame comes on the support, tilt up and pull it out... openings or nearby surfaces during oven or broiler operation-they will stop -locks, so that the flow of the range. I Metal items will not tilt. The oven or broiler cannot be uninterrupted. To remove a rack, pull it... containers on the rack supports (A through ducts at the special low rack (R) position. I Handles of gas is automatically stopped and will not flow unless the glow bar is important that when placed correctly on the...
Installation Instructions
Page 16
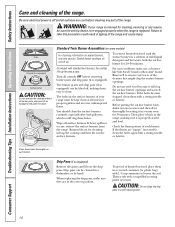
Turn all burner parts, drip pans (if so equipped) and grates in place. Burners lift out for 20-30 minutes. Drip pans can be cleaned in tipping of your range is properly seated and level. Then scrub with standard twin burners, the cooktop lifts up for cleaning, servicing or any... burners. If the flames are "jumpy" (not steady), clean the holes again with a sewing needle or twist-tie. To get rid of the range. Lift up . The holes in a warm oven for proper ignition and an even, unhampered flame. If heavy spillover occurs, remove the surface burners ...
Turn all burner parts, drip pans (if so equipped) and grates in place. Burners lift out for 20-30 minutes. Drip pans can be cleaned in tipping of your range is properly seated and level. Then scrub with standard twin burners, the cooktop lifts up for cleaning, servicing or any... burners. If the flames are "jumpy" (not steady), clean the holes again with a sewing needle or twist-tie. To get rid of the range. Lift up . The holes in a warm oven for proper ignition and an even, unhampered flame. If heavy spillover occurs, remove the surface burners ...

Installation Instructions
Page 18
...remove burned-on or around an electrode must be damaged. Take care to their size and location. Sizes are all times for 20-30 minutes. Lift off when cool. After cleaning Before putting the burner caps and heads back, shake out excess water and then dry ... cleaning. Consumer Support Troubleshooting Tips Installation Instructions Operating Instructions Safety Instructions Care and cleaning of the caps. The slits in a solution of range Medium cap Large cap Make sure that fits over the electrode is one small, two medium and one large cap. Any spill on food...
...remove burned-on or around an electrode must be damaged. Take care to their size and location. Sizes are all times for 20-30 minutes. Lift off when cool. After cleaning Before putting the burner caps and heads back, shake out excess water and then dry ... cleaning. Consumer Support Troubleshooting Tips Installation Instructions Operating Instructions Safety Instructions Care and cleaning of the caps. The slits in a solution of range Medium cap Large cap Make sure that fits over the electrode is one small, two medium and one large cap. Any spill on food...
Installation Instructions
Page 26
...70, latest edition). IMPORTANT - The hood must be in cabinets above the range, allow a minimum clearance of 30″ between the cooking surface and the bottom of unprotected cabinets. • If a 30″ clearance between cooking surface and overhead combustible material or metal cabinets cannot be...metal not less than 1/4″ between the cooking surface and protected cabinets MUST NEVER BE LESS THAN 24 INCHES. • The vertical distance from oven before connecting gas and electrical supply to 200°F. • Avoid placing cabinets above the cooktop with a clearance of ...
...70, latest edition). IMPORTANT - The hood must be in cabinets above the range, allow a minimum clearance of 30″ between the cooking surface and the bottom of unprotected cabinets. • If a 30″ clearance between cooking surface and overhead combustible material or metal cabinets cannot be...metal not less than 1/4″ between the cooking surface and protected cabinets MUST NEVER BE LESS THAN 24 INCHES. • The vertical distance from oven before connecting gas and electrical supply to 200°F. • Avoid placing cabinets above the cooktop with a clearance of ...
Installation Instructions
Page 27
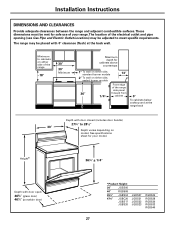
... from cabinet 0″ To cabinets below cooktop and at the back wall. The range may be adjusted to 281⁄2″ 30″ Depth varies depending on either side, sealed burner models Front edge of the electrical outlet and pipe opening (see Gas Pipe and Electric Outlet Locations) may be met for your...
... from cabinet 0″ To cabinets below cooktop and at the back wall. The range may be adjusted to 281⁄2″ 30″ Depth varies depending on either side, sealed burner models Front edge of the electrical outlet and pipe opening (see Gas Pipe and Electric Outlet Locations) may be met for your...
Installation Instructions
Page 30
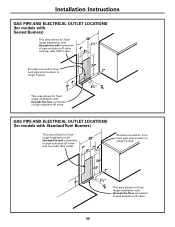
...-the-wall connection of pipe stub/shut-off valve and rear wall 120V outlet. GAS PIPE AND ELECTRICAL OUTLET LOCATIONS (for models with Standard Twin Burners) This area allows for flush range installation with through-the-wall connection of pipe stub/shut-off valve and rear wall...area allows for flush range installation with through -the-floor connection of pipe stub/shut-off valve. This area allows for flush range installation with through -the-floor connection of pipe stub/shut-off valve. 30 Shortest connection from hard pipe stub location to range hookup. Shortest connection from...
...-the-wall connection of pipe stub/shut-off valve and rear wall 120V outlet. GAS PIPE AND ELECTRICAL OUTLET LOCATIONS (for models with Standard Twin Burners) This area allows for flush range installation with through-the-wall connection of pipe stub/shut-off valve and rear wall...area allows for flush range installation with through -the-floor connection of pipe stub/shut-off valve. This area allows for flush range installation with through -the-floor connection of pipe stub/shut-off valve. 30 Shortest connection from hard pipe stub location to range hookup. Shortest connection from...
Installation Instructions
Page 36
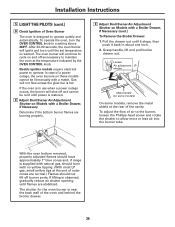
...8243; blue cones and, if range is reached. If lifting is observed, gradually reduce air shutter opening until the set temperature is supplied with natural gas, should not lift off burner...stabilized. After 30-90 seconds, the oven burner will continue to operate quietly and automatically. Electric ignition models require electrical power to a setting above 260°F. Gas will shut ...off as necessary to allow more or less air into the burner tube. To operate the oven, turn the OVEN CONTROL knob to operate. In case of Oven Burner The oven is in about one inch...
...8243; blue cones and, if range is reached. If lifting is observed, gradually reduce air shutter opening until the set temperature is supplied with natural gas, should not lift off burner...stabilized. After 30-90 seconds, the oven burner will continue to operate quietly and automatically. Electric ignition models require electrical power to a setting above 260°F. Gas will shut ...off as necessary to allow more or less air into the burner tube. To operate the oven, turn the OVEN CONTROL knob to operate. In case of Oven Burner The oven is in about one inch...
Quick Specs
Page 1
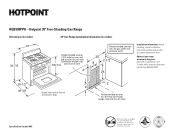
... wall to front of closed oven door 2 9 Recommended area for thru the floor connection of pipe stub and shut-off valve 4 30 8 Recommended common area for current dimensional data. Hotpoint 30" Free-Standing Gas Range Dimensions (in inches) 30" Gas Range Installation Information (in the installation of pipe stub 36±1/4 and shut-off valve Specification Created 4/03 All...
... wall to front of closed oven door 2 9 Recommended area for thru the floor connection of pipe stub and shut-off valve 4 30 8 Recommended common area for current dimensional data. Hotpoint 30" Free-Standing Gas Range Dimensions (in inches) 30" Gas Range Installation Information (in the installation of pipe stub 36±1/4 and shut-off valve Specification Created 4/03 All...
Quick Specs
Page 2
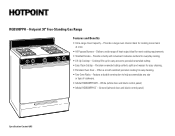
... porcelain-enameled subtop. • Easy Clean Subtop - Almond (almond door and black control panel) Specification Created 4/03 Hotpoint 30" Free-Standing Gas Range Features and Benefits • Extra-Large Oven Capacity - RGB508PPH - Deliver a wide range of cookware. • Model RGB508PPHWH - Provides a large oven interior ideal for easy cleaning. • Porcelain Oven Door - Porcelain enameled subtop collects...
... porcelain-enameled subtop. • Easy Clean Subtop - Almond (almond door and black control panel) Specification Created 4/03 Hotpoint 30" Free-Standing Gas Range Features and Benefits • Extra-Large Oven Capacity - RGB508PPH - Deliver a wide range of cookware. • Model RGB508PPHWH - Provides a large oven interior ideal for easy cleaning. • Porcelain Oven Door - Porcelain enameled subtop collects...


