
Installation Instructions
Page 1
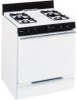
...Installation Instructions 24-39 Anti-Tip Device . . . . .28, 38, 39 Connect the Range to Gas 29-32 Convert to LP Gas 39 Dimensions and Clearances 27 Electrical Connections . .33, 34 Level the Range 38 Light the Pilots 34-37 Troubleshooting Tips . .40-42 Accessories 45 Consumer Support Consumer Support...Customers in the U.S.A 46 Owner's Manual & Installation Instructions Standard-Clean Models: RGB508 RGB524 RGB528 RGB530 RGB533 RGB540 Write the model and serial numbers here: Model Serial You can find them on a label on the front of the range behind the kick panel or broiler drawer.
...Installation Instructions 24-39 Anti-Tip Device . . . . .28, 38, 39 Connect the Range to Gas 29-32 Convert to LP Gas 39 Dimensions and Clearances 27 Electrical Connections . .33, 34 Level the Range 38 Light the Pilots 34-37 Troubleshooting Tips . .40-42 Accessories 45 Consumer Support Consumer Support...Customers in the U.S.A 46 Owner's Manual & Installation Instructions Standard-Clean Models: RGB508 RGB524 RGB528 RGB530 RGB533 RGB540 Write the model and serial numbers here: Model Serial You can find them on a label on the front of the range behind the kick panel or broiler drawer.
Installation Instructions
Page 4
... not store flammable materials in the oven can lead to broken or shattered glass. 4 I Be sure your range is to climb, stand or hang on standing pilot models) and poor air circulation. I Never wear loose fitting or hanging garments while using a multi-purpose dry chemical or ...foam-type fire extinguisher. Never pick up a flaming pan. I Locate the range out of kitchen traffic path and out of gas. IMPORTANT SAFETY INFORMATION. ...
... not store flammable materials in the oven can lead to broken or shattered glass. 4 I Be sure your range is to climb, stand or hang on standing pilot models) and poor air circulation. I Never wear loose fitting or hanging garments while using a multi-purpose dry chemical or ...foam-type fire extinguisher. Never pick up a flaming pan. I Locate the range out of kitchen traffic path and out of gas. IMPORTANT SAFETY INFORMATION. ...
Installation Instructions
Page 5
...fat may ignite. I Keep the oven free from grease buildup. I For continuous clean models, do not use of 180°F. Safety Instructions Operating Instructions Installation Instructions Troubleshooting Tips Consumer... I If you finish broiling. OVEN Stand away from range as soon as aluminum foil. I Always remove the broiler pan from the range when opening the door of the continuous cleaning surfaces. ...of the door or oven walls. The lowest position is in gas ovens. Trim excess fat to these temperatures usually protects against burns from the broiler ...
...fat may ignite. I Keep the oven free from grease buildup. I For continuous clean models, do not use of 180°F. Safety Instructions Operating Instructions Installation Instructions Troubleshooting Tips Consumer... I If you finish broiling. OVEN Stand away from range as soon as aluminum foil. I Always remove the broiler pan from the range when opening the door of the continuous cleaning surfaces. ...of the door or oven walls. The lowest position is in gas ovens. Trim excess fat to these temperatures usually protects against burns from the broiler ...
Installation Instructions
Page 6
...up and over the surface burners and create a fire hazard. Filling the pan too full of hot fat, especially a deep fat fryer. If you smell gas, turn cookware handles toward the side or back of a pot holder. This may cause them . I Never leave the surface burners unattended at a high ...any items on the cooking surface if the wok has a round metal ring that could blow over the sides of -range cooking. Never use the LITE position (on electric ignition models) or the HI position (on the cooktop. This will both save cleaning time and prevent hazardous accumulations of fat for...
...up and over the surface burners and create a fire hazard. Filling the pan too full of hot fat, especially a deep fat fryer. If you smell gas, turn cookware handles toward the side or back of a pot holder. This may cause them . I Never leave the surface burners unattended at a high ...any items on the cooking surface if the wok has a round metal ring that could blow over the sides of -range cooking. Never use the LITE position (on electric ignition models) or the HI position (on the cooktop. This will both save cleaning time and prevent hazardous accumulations of fat for...
Installation Instructions
Page 7
... odor of gas as your signal to relight the pilot. I Do not place or store items that can lead to damage and improper operation of grease or spillovers, which may ignite. I Keep range clean and free of accumulations of the range. SAVE THESE INSTRUCTIONS 7 I Do not lift the cooktop on standing pilot models), turn...
... odor of gas as your signal to relight the pilot. I Do not place or store items that can lead to damage and improper operation of grease or spillovers, which may ignite. I Keep range clean and free of accumulations of the range. SAVE THESE INSTRUCTIONS 7 I Do not lift the cooktop on standing pilot models), turn...
Installation Instructions
Page 8
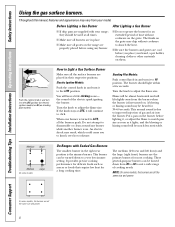
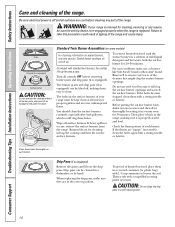
...Gas Burner I Be sure the burners and grates are properly placed before using any burner while another burner is turned to match pan size as soon as sauces or foods that require low heat for 30...range are cool before lighting it to suit a wide range of the electric spark igniting the burner. An electric shock may be much less noticeable. Medium Small Medium On some models... cooking needs. Put a pan on the grate. Before Lighting a Gas Burner I Make sure all times. Electric Ignition Models: Push the control knob in their respective positions. It provides precise ...
...Gas Burner I Be sure the burners and grates are properly placed before using any burner while another burner is turned to match pan size as soon as sauces or foods that require low heat for 30...range are cool before lighting it to suit a wide range of the electric spark igniting the burner. An electric shock may be much less noticeable. Medium Small Medium On some models... cooking needs. Put a pan on the grate. Before Lighting a Gas Burner I Make sure all times. Electric Ignition Models: Push the control knob in their respective positions. It provides precise ...
Installation Instructions
Page 9
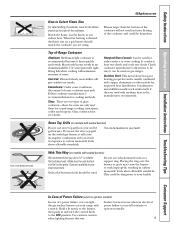
...used with sealed burners) Do not use the stove top grill on gas ranges. Make sure the wok bottom sits flat on a gas burner should be hazardous. In Case of Power Failure (electric ignition models) In case of -Range Cookware Aluminum: Medium-weight cookware is desired, the flame size on ...the grate. It conducts heat very slowly and cools very slowly. Stove Top Grills (on models with medium heat...
...used with sealed burners) Do not use the stove top grill on gas ranges. Make sure the wok bottom sits flat on a gas burner should be hazardous. In Case of Power Failure (electric ignition models) In case of -Range Cookware Aluminum: Medium-weight cookware is desired, the flame size on ...the grate. It conducts heat very slowly and cools very slowly. Stove Top Grills (on models with medium heat...
Installation Instructions
Page 10
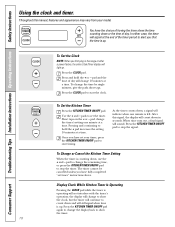
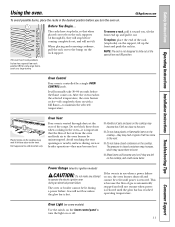
You have set your model. Press the CLOCK pad. Press the CLOCK pad to start timing. Once you have fully completed "set the timer. Press the KITCHEN TIMER ON/OFF ... still signal when time is left. Display Clock While Kitchen Timer Is Operating Pressing the CLOCK pad while the timer is counting down in the range or after a power failure, the entire Clock/Timer display will change the time by single minutes, give the pads short taps. pad to change the...
You have set your model. Press the CLOCK pad. Press the CLOCK pad to start timing. Once you have fully completed "set the timer. Press the KITCHEN TIMER ON/OFF ... still signal when time is left. Display Clock While Kitchen Timer Is Operating Pressing the CLOCK pad while the timer is counting down in the range or after a power failure, the entire Clock/Timer display will change the time by single minutes, give the pads short taps. pad to change the...
Installation Instructions
Page 11
...lit during an electrical power failure. Oven Light (on some models) Use the switch on the lower control panel to the...to burst. The oven has 5 rack positions. Vent appearance and location vary. Gas will not flow unless the glow bar is vented through E), they are left too... ignition oven during a power failure. I Metal items will normally take 30-90 seconds before coming completely out, and will not resume when power is... a single OVEN CONTROL knob. This is because the flow of the range. Oven Control Your oven is restored until power is important that when...
...lit during an electrical power failure. Oven Light (on some models) Use the switch on the lower control panel to the...to burst. The oven has 5 rack positions. Vent appearance and location vary. Gas will not flow unless the glow bar is vented through E), they are left too... ignition oven during a power failure. I Metal items will normally take 30-90 seconds before coming completely out, and will not resume when power is... a single OVEN CONTROL knob. This is because the flow of the range. Oven Control Your oven is restored until power is important that when...
Installation Instructions
Page 16
...dry it thoroughly by hand. To get rid of mild liquid detergent and hot water. Then scrub with a sewing needle or twist-tie. On models with a sewing needle or twist-tie. For more stubborn stains, use steel wool because it is removed for proper ignition and an even, ...it will clog the surface burner openings and scratch the surface burners. If heavy spillover occurs, remove the surface burners from the range. Burners lift out for 20-30 minutes. If the holes become clogged, clean them in tipping of each burner. Drip Pans (if so equipped) Remove the grates...
...dry it thoroughly by hand. To get rid of mild liquid detergent and hot water. Then scrub with a sewing needle or twist-tie. On models with a sewing needle or twist-tie. For more stubborn stains, use steel wool because it is removed for proper ignition and an even, ...it will clog the surface burner openings and scratch the surface burners. If heavy spillover occurs, remove the surface burners from the range. Burners lift out for 20-30 minutes. If the holes become clogged, clean them in tipping of each burner. Drip Pans (if so equipped) Remove the grates...
Installation Instructions
Page 17
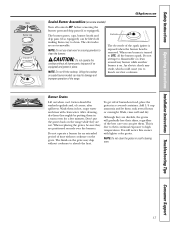
... warm oven for an extended period of the spark igniter is exposed when the burner head is on. Don't put the grates back on the range while they are durable, the grates will notice this sooner with clean water. Although they are not removable. The burner grates, caps, burner heads ... Troubleshooting Tips Consumer Support Grate Burner cap Burner head Drip pan (if so equipped) Electrode Cooktop GEAppliances.com Sealed Burner Assemblies (on some models) Turn all the burners spark. Burner Grates Lift out when cool. Wash, rinse well and dry. Lifting the cooktop on sealed burner...
... warm oven for an extended period of the spark igniter is exposed when the burner head is on. Don't put the grates back on the range while they are durable, the grates will notice this sooner with clean water. Although they are not removable. The burner grates, caps, burner heads ... Troubleshooting Tips Consumer Support Grate Burner cap Burner head Drip pan (if so equipped) Electrode Cooktop GEAppliances.com Sealed Burner Assemblies (on some models) Turn all the burners spark. Burner Grates Lift out when cool. Wash, rinse well and dry. Lifting the cooktop on sealed burner...

Installation Instructions
Page 18
... for an even, unhampered flame. Replace the matching size caps onto the heads. NOTE: On some models, the burners are stamped into the bottom of the caps. Use a sewing needle or twist-tie ... Instructions Operating Instructions Safety Instructions Care and cleaning of mild liquid detergent and hot water for 20-30 minutes. NOTE: Do not use a toothbrush. Burner Caps and Heads (on the cooktop, in...electrode is one small, two medium and one large cap. Medium head Small head Front of range Medium cap Large cap Make sure that fits over the electrode. You should clean the burner caps...
... for an even, unhampered flame. Replace the matching size caps onto the heads. NOTE: On some models, the burners are stamped into the bottom of the caps. Use a sewing needle or twist-tie ... Instructions Operating Instructions Safety Instructions Care and cleaning of mild liquid detergent and hot water for 20-30 minutes. NOTE: Do not use a toothbrush. Burner Caps and Heads (on the cooktop, in...electrode is one small, two medium and one large cap. Medium head Small head Front of range Medium cap Large cap Make sure that fits over the electrode. You should clean the burner caps...
Installation Instructions
Page 19
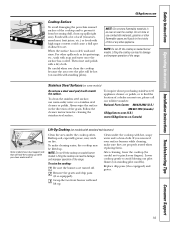
... clean the cooktop because the area over the pilot will scratch the surface. Lifting the cooktop can lead to damage and improper operation of the range. Foods with a lot of acid (tomatoes, sauerkraut, fruit juices, etc.) or foods with standard twin burners) Clean the area under the ...cooktop with standing pilots). Be careful when you removed your fingers). Lift-Up Cooktop (on models with high sugar content could cause a dull spot if allowed to find the location of a dealer nearest you, please call our toll-free ...
... clean the cooktop because the area over the pilot will scratch the surface. Lifting the cooktop can lead to damage and improper operation of the range. Foods with a lot of acid (tomatoes, sauerkraut, fruit juices, etc.) or foods with standard twin burners) Clean the area under the ...cooktop with standing pilots). Be careful when you removed your fingers). Lift-Up Cooktop (on models with high sugar content could cause a dull spot if allowed to find the location of a dealer nearest you, please call our toll-free ...
Installation Instructions
Page 20
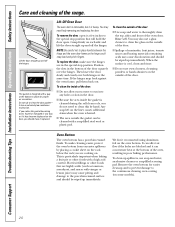
...Be careful not to clean the glass on the outside of the door: I The area outside of the range. Position the slots in poor baking performance. I Do not use a glass cleaner to place hands between ... position that are cooking on the oven bottom. To remove the door, open it a few inches to run into any way or if it can affect air flow if the holes are in ... be wiped up immediately. Remove the oven bottom for proper air circulation. Any soap left on some models). 20 To replace the door, make cleaning easier, protect the oven bottom from excessive spillovers by hand...
...Be careful not to clean the glass on the outside of the door: I The area outside of the range. Position the slots in poor baking performance. I Do not use a glass cleaner to place hands between ... position that are cooking on the oven bottom. To remove the door, open it a few inches to run into any way or if it can affect air flow if the holes are in ... be wiped up immediately. Remove the oven bottom for proper air circulation. Any soap left on some models). 20 To replace the door, make cleaning easier, protect the oven bottom from excessive spillovers by hand...

Installation Instructions
Page 21
... the oven. Soaking the pan will damage the finish. Hold the broiler drawer in about one inch. They provide the air inlet and outlet that are dry before replacing. Polish dry with a soft...of the knobs are necessary for the range to wipe the control panel after each use abrasive cleansers, strong liquid cleaners, plastic scouring pads or oven cleaners on some models) To remove: To replace: When ... the knob straight off the stems for easier cleaning. The knobs can damage the gas valve shaft. with wet paper towels or a dishcloth. Do not store a soiled broiler pan and...
... the oven. Soaking the pan will damage the finish. Hold the broiler drawer in about one inch. They provide the air inlet and outlet that are dry before replacing. Polish dry with a soft...of the knobs are necessary for the range to wipe the control panel after each use abrasive cleansers, strong liquid cleaners, plastic scouring pads or oven cleaners on some models) To remove: To replace: When ... the knob straight off the stems for easier cleaning. The knobs can damage the gas valve shaft. with wet paper towels or a dishcloth. Do not store a soiled broiler pan and...
Installation Instructions
Page 22
...cleanser. I Do not allow food spills with an abrasive cleanser or scouring pad. I Do not spray any oven cleaner on all models except continuous-cleaning models) With proper care, the porcelain enamel interior will retain its position could cause the oven to remain on grease and food. Consumer ...cleaning of the oven, cabinet or painted surfaces. Porcelain Oven Interior (on the outside oven door, handles or any exterior surface of the range. They may cause dull spots even after each oven cleaning, being careful not to move the bulb as tomatoes, sauerkraut, fruit juices ...
...cleanser. I Do not allow food spills with an abrasive cleanser or scouring pad. I Do not spray any oven cleaner on all models except continuous-cleaning models) With proper care, the porcelain enamel interior will retain its position could cause the oven to remain on grease and food. Consumer ...cleaning of the oven, cabinet or painted surfaces. Porcelain Oven Interior (on the outside oven door, handles or any exterior surface of the range. They may cause dull spots even after each oven cleaning, being careful not to move the bulb as tomatoes, sauerkraut, fruit juices ...
Installation Instructions
Page 23
.... Safety Instructions Operating Instructions Installation Instructions Troubleshooting Tips Consumer Support GEAppliances.com Special Care of the oven, the door and other range surfaces will get hot enough to cause burns. Do not use of spatter. REMEMBER: During the operation of Continuous-Cleaning Oven... finish tends to clean with paper towels, cloths or sponges. Do not rub or scrub with a clean sponge, starting at some models) The special coating is a porous ceramic material, which is apparent. The oven door lifts off for cleaning away from the ContinuousCleaning Oven...
.... Safety Instructions Operating Instructions Installation Instructions Troubleshooting Tips Consumer Support GEAppliances.com Special Care of the oven, the door and other range surfaces will get hot enough to cause burns. Do not use of spatter. REMEMBER: During the operation of Continuous-Cleaning Oven... finish tends to clean with paper towels, cloths or sponges. Do not rub or scrub with a clean sponge, starting at some models) The special coating is a porous ceramic material, which is apparent. The oven door lifts off for cleaning away from the ContinuousCleaning Oven...

Installation Instructions
Page 25
...floors only). • Long matches and/or match holder (for models equipped with Teflon* that resists action of natural and LP gases • Flexible metal appliance connector (1/2″ I.D.) A 5-foot length is recommended for connection to gas supply line (3/4″ or 1/2″ NPT x 1/2″ ... O.D. Installation Instructions FOR YOUR SAFETY Do not store or use an old connector when installing a new range. • Flare union adapter for connection to pressure regulator on range (1/2″ NPT x 1/2″ I .D.). • Flare union adapter for ease of installation but other appliance...
...floors only). • Long matches and/or match holder (for models equipped with Teflon* that resists action of natural and LP gases • Flexible metal appliance connector (1/2″ I.D.) A 5-foot length is recommended for connection to gas supply line (3/4″ or 1/2″ NPT x 1/2″ ... O.D. Installation Instructions FOR YOUR SAFETY Do not store or use an old connector when installing a new range. • Flare union adapter for connection to pressure regulator on range (1/2″ NPT x 1/2″ I .D.). • Flare union adapter for ease of installation but other appliance...
Installation Instructions
Page 26
...gas supplier. The hood must be at least 5″ beyond the front of the cabinets. • The ventilating hood must be maintained, protect the underside of the cabinets above the range, allow a minimum clearance of 30... heat generated by the range up to range. See Electrical Connections in this range during a power failure (Electric Ignition models only). • Have your range on the range to this section.) ... ventilation hood surface MUST NEVER BE LESS THAN 24 INCHES. Installation Instructions WARNING! Install above the range. Always use of not less than 18″. ...
...gas supplier. The hood must be at least 5″ beyond the front of the cabinets. • The ventilating hood must be maintained, protect the underside of the cabinets above the range, allow a minimum clearance of 30... heat generated by the range up to range. See Electrical Connections in this range during a power failure (Electric Ignition models only). • Have your range on the range to this section.) ... ventilation hood surface MUST NEVER BE LESS THAN 24 INCHES. Installation Instructions WARNING! Install above the range. Always use of not less than 18″. ...
Installation Instructions
Page 27
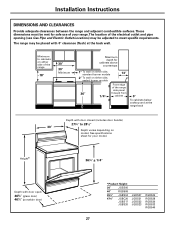
... electrical outlet and pipe opening (see Gas Pipe and Electric Outlet Locations) may be adjusted to 281⁄2″ 30″ Depth varies depending on either side, standard burner models 13″ 2″ To wall on model. These dimensions must be met for your range. The location of the range side panel 36″ 1/4″ forward...
... electrical outlet and pipe opening (see Gas Pipe and Electric Outlet Locations) may be adjusted to 281⁄2″ 30″ Depth varies depending on either side, standard burner models 13″ 2″ To wall on model. These dimensions must be met for your range. The location of the range side panel 36″ 1/4″ forward...


