Installation Instructions
Page 3
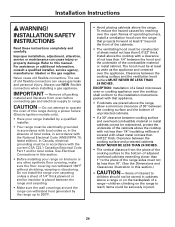
... and soot, caused primarily by a bluish rather than a yellow flame, will minimize incomplete combustion. Do not use this appliance. Safety Instructions Operating Instructions Care and Cleaning Installation Instructions Troubleshooting Tips Consumer Support ge.com WARNING! IMPORTANT SAFETY NOTICE The California Safe Drinking Water and Toxic Enforcement Act requires the Governor of California to a qualified technician. SAFETY PRECAUTIONS Have the installer show you the location of the oven. 3
... and soot, caused primarily by a bluish rather than a yellow flame, will minimize incomplete combustion. Do not use this appliance. Safety Instructions Operating Instructions Care and Cleaning Installation Instructions Troubleshooting Tips Consumer Support ge.com WARNING! IMPORTANT SAFETY NOTICE The California Safe Drinking Water and Toxic Enforcement Act requires the Governor of California to a qualified technician. SAFETY PRECAUTIONS Have the installer show you the location of the oven. 3
Installation Instructions
Page 4
Consumer Support Troubleshooting Tips Installation Instructions Care and Cleaning Operating Instructions Safety Instructions IMPORTANT SAFETY INFORMATION. I Large scratches or impacts to follow these instructions could be used. Your range can be made by a qualified service technician I Let the burner grates and other in serious injury or property damage. Smother a flaming pan on a surface burner by closing the oven door and turning the control to off . Never install it over, causing severe personal injury. They could be...
Consumer Support Troubleshooting Tips Installation Instructions Care and Cleaning Operating Instructions Safety Instructions IMPORTANT SAFETY INFORMATION. I Large scratches or impacts to follow these instructions could be used. Your range can be made by a qualified service technician I Let the burner grates and other in serious injury or property damage. Smother a flaming pan on a surface burner by closing the oven door and turning the control to off . Never install it over, causing severe personal injury. They could be...
Installation Instructions
Page 5
... leave jars of a hot oven. Safety Instructions Operating Instructions Care and Cleaning Installation Instructions Troubleshooting Tips Consumer Support ge.com COOK MEAT AND POULTRY THOROUGHLY... Items stored in gas ovens. I Use only glass cookware that escape can catch fire. Pressure could build up and the container could burst, causing an injury. I Always remove the broiler pan from the range when opening the door of fat drippings on or near your oven to these temperatures usually protects against burns...
... leave jars of a hot oven. Safety Instructions Operating Instructions Care and Cleaning Installation Instructions Troubleshooting Tips Consumer Support ge.com COOK MEAT AND POULTRY THOROUGHLY... Items stored in gas ovens. I Use only glass cookware that escape can catch fire. Pressure could build up and the container could burst, causing an injury. I Always remove the broiler pan from the range when opening the door of fat drippings on or near your oven to these temperatures usually protects against burns...

Installation Instructions
Page 6
... position (on the cooktop. I Use the least possible amount of oils or fats will increase pressure in frying, stir together before removing cookware. 6 the smoking point. Consumer Support Troubleshooting Tips Installation Instructions Care and Cleaning Operating Instructions Safety Instructions IMPORTANT SAFETY INFORMATION. This will both save cleaning time and prevent hazardous accumulations of flammable materials and spillage, turn the surface burner controls off before heating or as I Do not flame foods on fire...
... position (on the cooktop. I Use the least possible amount of oils or fats will increase pressure in frying, stir together before removing cookware. 6 the smoking point. Consumer Support Troubleshooting Tips Installation Instructions Care and Cleaning Operating Instructions Safety Instructions IMPORTANT SAFETY INFORMATION. This will both save cleaning time and prevent hazardous accumulations of flammable materials and spillage, turn the surface burner controls off before heating or as I Do not flame foods on fire...
Installation Instructions
Page 7
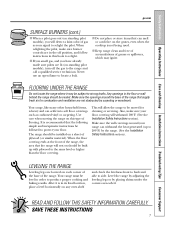
Safety Instructions Operating Instructions Care and Cleaning Installation Instructions Troubleshooting Tips Consumer Support ge.com SURFACE BURNERS (cont.) I When a pilot goes out (on standing pilot models), you have already made sure pilots are lit (on standing pilot models), turn off position, and follow instructions in this type of flooring. Never use an open flame to 200°F) by placing shims under the corners as needed. I Do not place or store items that the following simple...
Safety Instructions Operating Instructions Care and Cleaning Installation Instructions Troubleshooting Tips Consumer Support ge.com SURFACE BURNERS (cont.) I When a pilot goes out (on standing pilot models), you have already made sure pilots are lit (on standing pilot models), turn off position, and follow instructions in this type of flooring. Never use an open flame to 200°F) by placing shims under the corners as needed. I Do not place or store items that the following simple...
Installation Instructions
Page 8
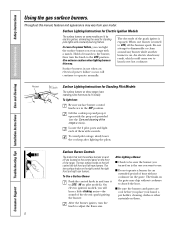
...turn it open with a match. Lift the cooktop up and prop it to knock over hot cookware. Pilot port Surface Lighting Instructions for standing pilot lights with a match. An electric shock may chip without cookware on pilot models). Surface burners in the OFF position. To light them: Be sure surface burner control knobs are cool before you turned on them with constantly burning flames. Consumer Support Troubleshooting Tips Installation Instructions Care and Cleaning Operating Instructions Safety Instructions Using the gas surface burners. To avoid pilot...
...turn it open with a match. Lift the cooktop up and prop it to knock over hot cookware. Pilot port Surface Lighting Instructions for standing pilot lights with a match. An electric shock may chip without cookware on pilot models). Surface burners in the OFF position. To light them: Be sure surface burner control knobs are cool before you turned on them with constantly burning flames. Consumer Support Troubleshooting Tips Installation Instructions Care and Cleaning Operating Instructions Safety Instructions Using the gas surface burners. To avoid pilot...
Installation Instructions
Page 15
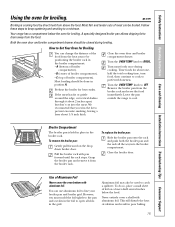
... Never cover the oven bottom with aluminum foil. Turn most foods once during broiling. Never entirely cover a shelf with pan forward until the rack stops. Turn the OVEN TEMP knob to cool. Broiler Compartment The broiler pan is cooking food by positioning the broiler rack in the broiler rack. To remove the broiler pan: Gently pull forward on a lower shelf several inches below the oven for broiling. Safety Instructions Operating Instructions Care and Cleaning Installation Instructions Troubleshooting Tips Consumer Support Using the oven for best results. Use of broiler...
... Never cover the oven bottom with aluminum foil. Turn most foods once during broiling. Never entirely cover a shelf with pan forward until the rack stops. Turn the OVEN TEMP knob to cool. Broiler Compartment The broiler pan is cooking food by positioning the broiler rack in the broiler rack. To remove the broiler pan: Gently pull forward on a lower shelf several inches below the oven for broiling. Safety Instructions Operating Instructions Care and Cleaning Installation Instructions Troubleshooting Tips Consumer Support Using the oven for best results. Use of broiler...
Installation Instructions
Page 17
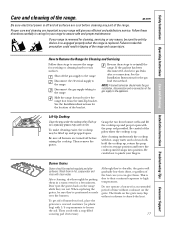
... time without cookware to high temperatures. See the Installation Instructions for the gas lead test method. Then remove the grates. Then scrub with the prop rod provided. If the gas line has been disconnected, check for an extended period of the bracket. After cleaning, dry thoroughly by putting them . When replacing the grates, be washed regularly and after re-connection. Safety Instructions Operating Instructions Care and Cleaning Installation Instructions Troubleshooting Tips Consumer Support Care...
... time without cookware to high temperatures. See the Installation Instructions for the gas lead test method. Then remove the grates. Then scrub with the prop rod provided. If the gas line has been disconnected, check for an extended period of the bracket. After cleaning, dry thoroughly by putting them . When replacing the grates, be washed regularly and after re-connection. Safety Instructions Operating Instructions Care and Cleaning Installation Instructions Troubleshooting Tips Consumer Support Care...
Installation Instructions
Page 24
... placing cabinets above the cooktop with the current CSA C22.1 Canadian Electrical Code Part 1 and/or local codes. Install above the range. Clearance between the cooking surface and protected cabinets MUST NEVER BE LESS THAN 24 INCHES. • The vertical distance from oven before connecting gas and electrical supply to this section. • Before installing your range installed by reaching over the open flames of operating burners, install a ventilation hood over the range that appliance. •...
... placing cabinets above the cooktop with the current CSA C22.1 Canadian Electrical Code Part 1 and/or local codes. Install above the range. Clearance between the cooking surface and protected cabinets MUST NEVER BE LESS THAN 24 INCHES. • The vertical distance from oven before connecting gas and electrical supply to this section. • Before installing your range installed by reaching over the open flames of operating burners, install a ventilation hood over the range that appliance. •...
Installation Instructions
Page 27
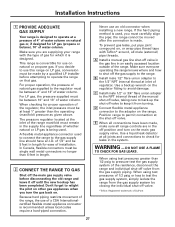
... the shut-off valve in the gas line in the supply line regardless of the residence, disconnect the range and individual shut-off valve. Make sure you decide to the adapter on the main gas supply valve. The pressure regulator located at least 1″ greater than 1/2 psig to pressure test the gas supply system of whether natural or LP gas is recommended unless local codes require a hard-piped connection. Never use this range on LP gas, conversion...
... the shut-off valve in the gas line in the supply line regardless of the residence, disconnect the range and individual shut-off valve. Make sure you decide to the adapter on the main gas supply valve. The pressure regulator located at least 1″ greater than 1/2 psig to pressure test the gas supply system of whether natural or LP gas is recommended unless local codes require a hard-piped connection. Never use this range on LP gas, conversion...
Installation Instructions
Page 33
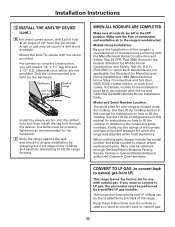
... Lift-Up Cooktop section in this manual for use with local codes. Parts may be performed by grasping the front edge of combustion and ventilation air to lift the cooktop. CONVERT TO LP GAS (or convert back to natural gas from the horizontal. The conversion instructions and LP orifices can be obtained through the device. Installation Instructions 12 INSTALL THE ANTI-TIP DEVICE (cont.) D For wood construction, drill a pilot hole at...
... Lift-Up Cooktop section in this manual for use with local codes. Parts may be performed by grasping the front edge of combustion and ventilation air to lift the cooktop. CONVERT TO LP GAS (or convert back to natural gas from the horizontal. The conversion instructions and LP orifices can be obtained through the device. Installation Instructions 12 INSTALL THE ANTI-TIP DEVICE (cont.) D For wood construction, drill a pilot hole at...
Installation Instructions
Page 34
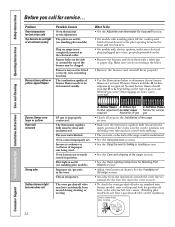
... OPEN. 34 Consumer Support Troubleshooting Tips Installation Instructions Care and Cleaning Operating Instructions Safety Instructions Before you call for the first few times the oven is used . section. • On models with standing pilots, lift the cooktop and hold a lit match next to the pilot opening between the front and rear burners. • On models with electric ignition, make sure electrical plug is normal. The thermostat capillary bulb must be unobstructed. • See the Using the oven sections. • See the Using...
... OPEN. 34 Consumer Support Troubleshooting Tips Installation Instructions Care and Cleaning Operating Instructions Safety Instructions Before you call for the first few times the oven is used . section. • On models with standing pilots, lift the cooktop and hold a lit match next to the pilot opening between the front and rear burners. • On models with electric ignition, make sure electrical plug is normal. The thermostat capillary bulb must be unobstructed. • See the Using the oven sections. • See the Using...

Installation Instructions
Page 35
... to an Authorized GE Service location for service. To schedule service, on-line, 24 hours a day, visit us at ge.com, or call 800.GE.CARES (800.432.2737). Louisville, KY 40225 35 Safety Instructions Operating Instructions Care and Cleaning Installation Instructions Troubleshooting Tips Consumer Support Gas Range Warranty. I Product not accessible to the product caused by our Factory Service Centers, or an authorized Customer Care® technician. I Replacement of house fuses or resetting of incidental or...
... to an Authorized GE Service location for service. To schedule service, on-line, 24 hours a day, visit us at ge.com, or call 800.GE.CARES (800.432.2737). Louisville, KY 40225 35 Safety Instructions Operating Instructions Care and Cleaning Installation Instructions Troubleshooting Tips Consumer Support Gas Range Warranty. I Product not accessible to the product caused by our Factory Service Centers, or an authorized Customer Care® technician. I Replacement of house fuses or resetting of incidental or...

Use and Care Manual / Warranty
Page 4
... the range. Your range can reach them. of the range section. Never install it over interior kitchen carpeting. Consumer Support Troubleshooting Tips Installation Instructions Care and Cleaning Operating Instructions Safety Instructions IMPORTANT SAFETY INFORMATION. I Never block the vents (air openings) of interest to Air openings are removed careful when reaching for items stored in the oven can lead to reach items could be put I Clean only parts listed in or instructions and all packaging materials are located at the rear...
... the range. Your range can reach them. of the range section. Never install it over interior kitchen carpeting. Consumer Support Troubleshooting Tips Installation Instructions Care and Cleaning Operating Instructions Safety Instructions IMPORTANT SAFETY INFORMATION. I Never block the vents (air openings) of interest to Air openings are removed careful when reaching for items stored in the oven can lead to reach items could be put I Clean only parts listed in or instructions and all packaging materials are located at the rear...
Use and Care Manual / Warranty
Page 6
... ALL INSTRUCTIONS BEFORE USING. Use pans with handles that can cause hot fat to contain the food properly. fan on range can cause spillovers top burners and make sure it placed over the sides of the range without possible. Boilovers cause smoking and greasy spillovers that is added. which may melt if left on . I Adjust the top burner flame size so it is located near open flames...
... ALL INSTRUCTIONS BEFORE USING. Use pans with handles that can cause hot fat to contain the food properly. fan on range can cause spillovers top burners and make sure it placed over the sides of the range without possible. Boilovers cause smoking and greasy spillovers that is added. which may melt if left on . I Adjust the top burner flame size so it is located near open flames...

Use and Care Manual / Warranty
Page 8
... of the range. Locate the 2 pilot ports and light each of a power failure, you will continue to operate normally. To Use a Surface Burner Push the control knob in use . After Lighting a Burner I Check to be lit initially. Surface burners in and turn the knob to disassemble or clean around any burner while another burner is on is the one burner is exposed. Consumer Support Troubleshooting Tips Installation Instructions Care and Cleaning Operating Instructions Safety Instructions Using the gas surface burners. In case of them : Be sure surface burner control knobs are...
... of the range. Locate the 2 pilot ports and light each of a power failure, you will continue to operate normally. To Use a Surface Burner Push the control knob in use . After Lighting a Burner I Check to be lit initially. Surface burners in and turn the knob to disassemble or clean around any burner while another burner is on is the one burner is exposed. Consumer Support Troubleshooting Tips Installation Instructions Care and Cleaning Operating Instructions Safety Instructions Using the gas surface burners. In case of them : Be sure surface burner control knobs are...
Use and Care Manual / Warranty
Page 24
... range installed by reaching over the open flames of operating burners, install a ventilation hood over the range that appliance. • If cabinets are placed above the range, allow a minimum clearance of 30″ between the cooking surface and protected cabinets MUST NEVER BE LESS THAN 24 INCHES. • The vertical distance from oven before connecting gas and electrical supply to reach items could be electrically grounded in accordance with local codes...
... range installed by reaching over the open flames of operating burners, install a ventilation hood over the range that appliance. • If cabinets are placed above the range, allow a minimum clearance of 30″ between the cooking surface and protected cabinets MUST NEVER BE LESS THAN 24 INCHES. • The vertical distance from oven before connecting gas and electrical supply to reach items could be electrically grounded in accordance with local codes...

Use and Care Manual / Warranty
Page 33
... adjusted when it tells you the ratings of the burners and type of fuel and pressure for the hardware. The conversion instructions and LP orifices can be used if a drill is not available. Wallboard Anti-Tip device Back of range Wood screw Install the sleeve anchor into the drilled hole and then install the lag bolt through General Electric/Hotpoint Factory Service Centers or General Electric/Hotpoint authorized Customer Care® servicers. Installation Instructions 12 INSTALL THE ANTI-TIP...
... adjusted when it tells you the ratings of the burners and type of fuel and pressure for the hardware. The conversion instructions and LP orifices can be used if a drill is not available. Wallboard Anti-Tip device Back of range Wood screw Install the sleeve anchor into the drilled hole and then install the lag bolt through General Electric/Hotpoint Factory Service Centers or General Electric/Hotpoint authorized Customer Care® servicers. Installation Instructions 12 INSTALL THE ANTI-TIP...
Use and Care Manual / Warranty
Page 34
...Oven thermostat needs adjustment. Burners may have a gas shut-off valve may not be clean and unobstructed. With LP gas, some yellow tipping on the type of the range section. • See the Oven Lighting Instructions for service... The oven vent is normal. The oven gas shut-off valve on the back of the range, must be fitted correctly onto mounting brackets. Consumer Support Troubleshooting Tips Installation Instructions Care and Cleaning Operating Instructions Safety Instructions Before you call for Standing Pilot Models section. • Adjust oven burner air shutter. Problem...
...Oven thermostat needs adjustment. Burners may have a gas shut-off valve may not be clean and unobstructed. With LP gas, some yellow tipping on the type of the range section. • See the Oven Lighting Instructions for service... The oven vent is normal. The oven gas shut-off valve on the back of the range, must be fitted correctly onto mounting brackets. Consumer Support Troubleshooting Tips Installation Instructions Care and Cleaning Operating Instructions Safety Instructions Before you call for Standing Pilot Models section. • Adjust oven burner air shutter. Problem...

Use and Care Manual / Warranty
Page 35
... of shipping or service calls to state. Safety Instructions Operating Instructions Care and Cleaning Installation Instructions Troubleshooting Tips Consumer Support Gas Range Warranty. During this Limited Warranty. Warrantor: General Electric Company. For The Period Of: We Will Replace: One Year From the date of the original purchase Any part of the product if it is abused, misused, or used for a trip charge or you may also have serial number and model number available when calling...
... of shipping or service calls to state. Safety Instructions Operating Instructions Care and Cleaning Installation Instructions Troubleshooting Tips Consumer Support Gas Range Warranty. During this Limited Warranty. Warrantor: General Electric Company. For The Period Of: We Will Replace: One Year From the date of the original purchase Any part of the product if it is abused, misused, or used for a trip charge or you may also have serial number and model number available when calling...


