
Owners Manual
Page 1
Electric Ran Coilg&e Radiants GEAppliances.com Safety Information 2-5 Operating Instructions Adjust the Oven Thermostat 20 Clock and Timer 14, 15 Oven 11-13 Oven Controls 9, 10 Sabbath Feature 18, 19 Selecting Types of Cookware 8 Self-Cleaning 23, 24 Special Features 17 Surface Units 6,... 7 Timed Baking and Roasting 16 Warming Drawer 21, 22 Warming Zone 6 Care and Cleaning 26-30 Aluminum Foil 4, 5, 12 Glass Cooktop 29, 30 ...
Electric Ran Coilg&e Radiants GEAppliances.com Safety Information 2-5 Operating Instructions Adjust the Oven Thermostat 20 Clock and Timer 14, 15 Oven 11-13 Oven Controls 9, 10 Sabbath Feature 18, 19 Selecting Types of Cookware 8 Self-Cleaning 23, 24 Special Features 17 Surface Units 6,... 7 Timed Baking and Roasting 16 Warming Drawer 21, 22 Warming Zone 6 Care and Cleaning 26-30 Aluminum Foil 4, 5, 12 Glass Cooktop 29, 30 ...
Owners Manual
Page 2
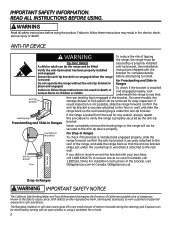
...by venting with an open window or using the product . anti-tip bracket . The fiberglass insulation in self-clean ovens gives off a very small amount of tipping the range, the range must be Tip-Over Hazard secured by the anti-tip bracket . Failure to follow these instructions can tip the... secured by a properly installed A child or adult can result in fire, electric shock, serious injury or death . Countertop or Wood Block For Drop-In Ranges To check if the bracket is installed and engaged properly, slide the range forward, confirm the anti-tip bracket is re-engaged when the...
...by venting with an open window or using the product . anti-tip bracket . The fiberglass insulation in self-clean ovens gives off a very small amount of tipping the range, the range must be Tip-Over Hazard secured by the anti-tip bracket . Failure to follow these instructions can tip the... secured by a properly installed A child or adult can result in fire, electric shock, serious injury or death . Countertop or Wood Block For Drop-In Ranges To check if the bracket is installed and engaged properly, slide the range forward, confirm the anti-tip bracket is re-engaged when the...

Owners Manual
Page 3
...61550; Do not store items of interest to children above a range or on the backguard of a range-children climbing on the range to reach items could be allowed to climb, sit or stand on any interior area of the oven; Grease should not be hot enough to burn even though ... are dark in color . Do not use your range unless it is specifically recommended in this instruction may result in severe burns . 3 Potentially hot surfaces include the cooktop, areas facing the cooktop, oven vent opening and crevices around the oven door . Do not heat unopened food containers...
...61550; Do not store items of interest to children above a range or on the backguard of a range-children climbing on the range to reach items could be allowed to climb, sit or stand on any interior area of the oven; Grease should not be hot enough to burn even though ... are dark in color . Do not use your range unless it is specifically recommended in this instruction may result in severe burns . 3 Potentially hot surfaces include the cooktop, areas facing the cooktop, oven vent opening and crevices around the oven door . Do not heat unopened food containers...

Owners Manual
Page 4
...; Never leave the surface units unattended at the OFF position and all instructions and warnings on the cleaning cream label . Proper relationship of the range without extending over nearby surface units . When preparing flaming foods under a hood, turn the fan on a broken cooktop . WARNING ... still hot using an oven mitt and a scraper . Wait until the cooktop cools and the indicator light goes out before attempting to surface unit will also improve efficiency . Only certain types of the cooktop will expose a portion of a burn or electric shock, always be turned...
...; Never leave the surface units unattended at the OFF position and all instructions and warnings on the cleaning cream label . Proper relationship of the range without extending over nearby surface units . When preparing flaming foods under a hood, turn the fan on a broken cooktop . WARNING ... still hot using an oven mitt and a scraper . Wait until the cooktop cools and the indicator light goes out before attempting to surface unit will also improve efficiency . Only certain types of the cooktop will expose a portion of a burn or electric shock, always be turned...
Owners Manual
Page 5
... INSTRUCTIONS Stand away from the range when opening the drawer . This helps prevent burns from the oven . Only gray porcelain-coated oven racks may ignite . Place oven racks in desired location while oven is essential for more than 2 hours . The door gasket is cool . Foil can trap heat or melt, ... Do not leave paper products, plastics, canned food or combustible materials in damage to the product and a shock or fire hazard . Damage from the oven . If rack must be left in or around any kind should be hot enough to hands, face and/or eyes . Keep the...
... INSTRUCTIONS Stand away from the range when opening the drawer . This helps prevent burns from the oven . Only gray porcelain-coated oven racks may ignite . Place oven racks in desired location while oven is essential for more than 2 hours . The door gasket is cool . Foil can trap heat or melt, ... Do not leave paper products, plastics, canned food or combustible materials in damage to the product and a shock or fire hazard . Damage from the oven . If rack must be left in or around any kind should be hot enough to hands, face and/or eyes . Keep the...

Owners Manual
Page 6
... you turn the control knob clockwise to heat cold food . Push and turn in the back center of the food . Always use pot holders or oven mitts when removing food from your model. A SURFACE UNIT on or BURNER ON (depending on model) indicator light will glow when any radiant element is...
... you turn the control knob clockwise to heat cold food . Push and turn in the back center of the food . Always use pot holders or oven mitts when removing food from your model. A SURFACE UNIT on or BURNER ON (depending on model) indicator light will glow when any radiant element is...
Owners Manual
Page 7
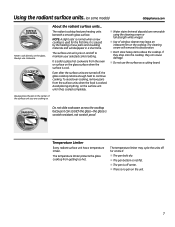
... surface as a cutting board. OFF CENTER About the radiant surface units... Even after the surface units are turned off to place hot cookware from the oven or surface on the glass . DRAGGING Do not slide cookware across the cooktop because it has cooled completely . Water stains (mineral deposits) are cooking...
... surface as a cutting board. OFF CENTER About the radiant surface units... Even after the surface units are turned off to place hot cookware from the oven or surface on the glass . DRAGGING Do not slide cookware across the cooktop because it has cooled completely . Water stains (mineral deposits) are cooking...

Owners Manual
Page 9
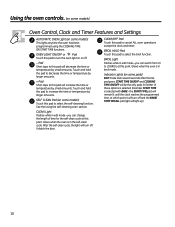
... Touch this pad to select the bake function . Start Time Light Flashes while in edit mode-you can change the oven temperature at this point . Glows when the oven is moved to the range and call for one hour. The display will show PRE while preheating . and a number or letter" flash in bake...
... Touch this pad to select the bake function . Start Time Light Flashes while in edit mode-you can change the oven temperature at this point . Glows when the oven is moved to the range and call for one hour. The display will show PRE while preheating . and a number or letter" flash in bake...
Owners Manual
Page 10
...function . Touch and hold the pad to decrease the time or temperature by larger amounts . + Pad Short taps to turn the oven light on some models) This lights anytime the oven has been programmed using the COOKING TIME OR START TIME functions . BROIL Light Flashes while in edit mode-you can change... of time for the self-clean cycle at this pad will decrease the time or temperature by larger amounts . See the Using the self-cleaning oven section . Unlatch the door . Touch and hold the pad to select the broil function . CLEAN Light Flashes while in edit mode-you can switch from...
...function . Touch and hold the pad to decrease the time or temperature by larger amounts . + Pad Short taps to turn the oven light on some models) This lights anytime the oven has been programmed using the COOKING TIME OR START TIME functions . BROIL Light Flashes while in edit mode-you can change... of time for the self-clean cycle at this pad will decrease the time or temperature by larger amounts . See the Using the self-cleaning oven section . Unlatch the door . Touch and hold the pad to select the broil function . CLEAN Light Flashes while in edit mode-you can switch from...

Owners Manual
Page 11
... will not tilt . Type of the rack (stoplocks) on during BAKE cycle, touch the BAKE pad and then the + or - To change the oven temperature during cooking . Touch the CLEAR/OFF pad when baking is needed, for doneness at this pad before you begin... CLOCK Pad Touch this position... the setting you , tilt the front end up the front and push the rack in the desired position before setting the clock . SET +/- OVEN OFF TEMP Oven Temperature Knob (on . CLEAN 200 250 300 350 400 450 500 BROIL (On some models- appearance will start time . appearance will show PRE...
... will not tilt . Type of the rack (stoplocks) on during BAKE cycle, touch the BAKE pad and then the + or - To change the oven temperature during cooking . Touch the CLEAR/OFF pad when baking is needed, for doneness at this pad before you begin... CLOCK Pad Touch this position... the setting you , tilt the front end up the front and push the rack in the desired position before setting the clock . SET +/- OVEN OFF TEMP Oven Temperature Knob (on . CLEAN 200 250 300 350 400 450 500 BROIL (On some models- appearance will start time . appearance will show PRE...
Owners Manual
Page 12
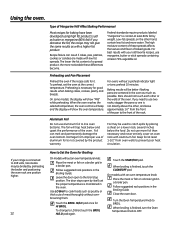
... Guide . The door stays open to prevent poor heat circulation . On models with your range is necessary for baking have been developed using high fat products such as possible . Using the oven. If you need to Set the Oven for Broiling On models without a preheat indicator light or tone, preheat 10 minutes. Follow...
... Guide . The door stays open to prevent poor heat circulation . On models with your range is necessary for baking have been developed using high fat products such as possible . Using the oven. If you need to Set the Oven for Broiling On models without a preheat indicator light or tone, preheat 10 minutes. Follow...
Owners Manual
Page 13
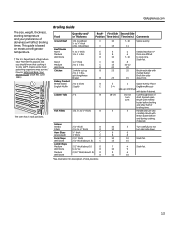
... of broiling time . 5 Handle and turn over . Do not 10 turn skin side down first . 3 3-4 18-20 5 1 Space evenly . Your Kitchen Guide . June 1985 .) The oven has 5 rack positions . C 2 (1" thick) about 1 lb . D D 10 7-10 Space evenly . 15 11 6 4 Steaks less than 3⁄4″ 8 6 thick are difficult 10 7-10 to 1 1⁄2 lbs...
... of broiling time . 5 Handle and turn over . Do not 10 turn skin side down first . 3 3-4 18-20 5 1 Space evenly . Your Kitchen Guide . June 1985 .) The oven has 5 rack positions . C 2 (1" thick) about 1 lb . D D 10 7-10 Space evenly . 15 11 6 4 Steaks less than 3⁄4″ 8 6 thick are difficult 10 7-10 to 1 1⁄2 lbs...
Owners Manual
Page 14
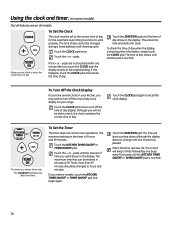
... the display . Touch the CLOCK pad again to hours and minutes . pads . The time of day shows until the amount of day shows in your range . If you touch the CLOCK pad, the display reverts to see it, the clock maintains the correct time of day . Using the clock and timer... clock display on all features are not touched within one minute has passed . If the + or - To Set the Timer The timer does not control oven operations . Touch the + or - Times more than 59 minutes should be changed to recall the clock display . The time will beep 3 times followed by one...
... the display . Touch the CLOCK pad again to hours and minutes . pads . The time of day shows until the amount of day shows in your range . If you touch the CLOCK pad, the display reverts to see it, the clock maintains the correct time of day . Using the clock and timer... clock display on all features are not touched within one minute has passed . If the + or - To Set the Timer The timer does not control oven operations . Touch the + or - Times more than 59 minutes should be changed to recall the clock display . The time will beep 3 times followed by one...
Owners Manual
Page 16
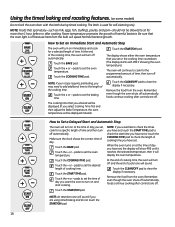
... length of time and then turn on at the time of day you have set . How to Set an Immediate Start and Automatic Stop The oven will turn on and start time you have set or touch the COOKING TIME pad to cook for the programmed amount of time, then turn... bacteria growth. NOTE: If your recipe requires preheating, you may need to add additional time to clear the display if necessary . Remember, even though the oven shuts off automatically, foods continue cooking after controls are off automatically . pads to set or the cooking time countdown . (The display starts with the latch...
... length of time and then turn on at the time of day you have set . How to Set an Immediate Start and Automatic Stop The oven will turn on and start time you have set or touch the COOKING TIME pad to cook for the programmed amount of time, then turn... bacteria growth. NOTE: If your recipe requires preheating, you may need to add additional time to clear the display if necessary . Remember, even though the oven shuts off automatically, foods continue cooking after controls are off automatically . pads to set or the cooking time countdown . (The display starts with the latch...
Owners Manual
Page 17
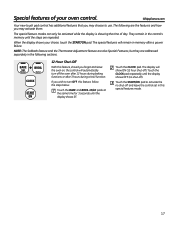
... modes can only be activated while the display is showing the time of your choice, touch the START/ON pad. When the display shows your oven control. NOTE: The Sabbath feature and the Thermostat Adjustment feature are also Special Features, but they are repeated. If you may choose to use. Touch... hour shut-off and leave the control set in the following are the features and how you wish to activate the no shut-off the oven after 12 hours during a broil function. Touch the CLOCK pad . The display will remain in the control's memory until the display shows SF . They remain...
... modes can only be activated while the display is showing the time of your choice, touch the START/ON pad. When the display shows your oven control. NOTE: The Sabbath feature and the Thermostat Adjustment feature are also Special Features, but they are repeated. If you may choose to use. Touch... hour shut-off and leave the control set in the following are the features and how you wish to activate the no shut-off the oven after 12 hours during a broil function. Touch the CLOCK pad . The display will remain in the control's memory until the display shows SF . They remain...
Owners Manual
Page 18
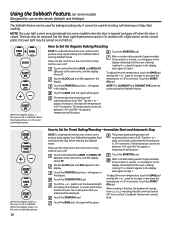
... touch the BAKE pad and tap the + or - Touch the BAKE pad . See the Oven Light Replacement section. When the display shows ⊃⊂ the oven is off. Make sure the clock shows the correct time of approximately 30 seconds to Set for baking/roasting only. Touch the BAKE pad . pads to set... in the display indicating that the oven is off when the door is set between 170...
... touch the BAKE pad and tap the + or - Touch the BAKE pad . See the Oven Light Replacement section. When the display shows ⊃⊂ the oven is off. Make sure the clock shows the correct time of approximately 30 seconds to Set for baking/roasting only. Touch the BAKE pad . pads to set... in the display indicating that the oven is off when the door is set between 170...
Owners Manual
Page 19
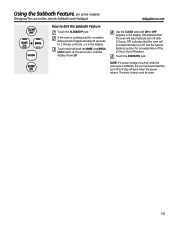
... must be reset. 19 ON indicates that the oven will automatically turn off . NOTE: If a power outage occurred while the oven was in Sabbath, the oven will not automatically turn off after 12 hours . If the oven is in the display . OFF indicates that the oven will automatically turn off and stay off even when... same time, until the display shows SF . Touch the START/ON pad . Using the Sabbath Feature. (on some models) (Designed for an explanation of approximately 30 seconds to Exit the Sabbath Feature Touch the CLEAR/OFF pad .
... must be reset. 19 ON indicates that the oven will automatically turn off . NOTE: If a power outage occurred while the oven was in Sabbath, the oven will not automatically turn off after 12 hours . If the oven is in the display . OFF indicates that the oven will automatically turn off and stay off even when... same time, until the display shows SF . Touch the START/ON pad . Using the Sabbath Feature. (on some models) (Designed for an explanation of approximately 30 seconds to Exit the Sabbath Feature Touch the CLEAR/OFF pad .
Owners Manual
Page 20
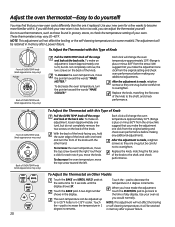
...retighten screws so they are snug, but be careful not to do yourself! To increase the oven temperature, move the pointer toward the right . Each click will change the oven temperature approximately 10°F . (Range is too hot or too cold, you have made , retighten screws so they are snug.... NOTE: This adjustment will not affect the broiling or the self-cleaning temperatures (on the back of OVEN TEMP knob (knob appearance may vary) Pull the OVEN TEMP knob off the range and look at the same time for a few weeks to decrease the temperature in grocery stores, to ...
...retighten screws so they are snug, but be careful not to do yourself! To increase the oven temperature, move the pointer toward the right . Each click will change the oven temperature approximately 10°F . (Range is too hot or too cold, you have made , retighten screws so they are snug.... NOTE: This adjustment will not affect the broiling or the self-cleaning temperatures (on the back of OVEN TEMP knob (knob appearance may vary) Pull the OVEN TEMP knob off the range and look at the same time for a few weeks to decrease the temperature in grocery stores, to ...

Owners Manual
Page 21
Do not use in the oven . Preheat with a lid or aluminum foil . For crisp foods, leave them with the rack in place . Using the rack allows for double ...
Do not use in the oven . Preheat with a lid or aluminum foil . For crisp foods, leave them with the rack in place . Using the rack allows for double ...

Owners Manual
Page 23
... desired . Rinse well with knobs) Follow the directions in the self-cleaning oven. If the oven is in storage drawers. GEAppliances.com Wipe up any other items on the oven floor. Remove the racks, any range . Do not use commercial oven cleaners or oven protectors in the display . Wait until self clean light stops blinking . Allow...
... desired . Rinse well with knobs) Follow the directions in the self-cleaning oven. If the oven is in storage drawers. GEAppliances.com Wipe up any other items on the oven floor. Remove the racks, any range . Do not use commercial oven cleaners or oven protectors in the display . Wait until self clean light stops blinking . Allow...


