
Installation Instructions
Page 1
...Registration 21, 22 Warranty 23 HOTPOINT Owner's Manual and Installation Instructions RA720 RA724 Write the model and serial numbers here: Model Serial You can find them on how to lift the cooktop. 183D9541P002 49-88025-1 05-07 JR 20″ and 24″ Compact Electric Ranges ge.com Safety Instructions 2-4 ... Surfaces 12 Shelves 10 Surface Units and Drip Pans . . .10 Installation Instructions Anti-Tip Device 13, 19 Dimensions and Clearances . . . 14 Electrical Connections . . . . .15-18 Flooring 14 Leveling 19 Preparation 14 Tools You Will Need 14 Troubleshooting Tips...
...Registration 21, 22 Warranty 23 HOTPOINT Owner's Manual and Installation Instructions RA720 RA724 Write the model and serial numbers here: Model Serial You can find them on how to lift the cooktop. 183D9541P002 49-88025-1 05-07 JR 20″ and 24″ Compact Electric Ranges ge.com Safety Instructions 2-4 ... Surfaces 12 Shelves 10 Surface Units and Drip Pans . . .10 Installation Instructions Anti-Tip Device 13, 19 Dimensions and Clearances . . . 14 Electrical Connections . . . . .15-18 Flooring 14 Leveling 19 Preparation 14 Tools You Will Need 14 Troubleshooting Tips...

Installation Instructions
Page 2
...the information in or on the door or range top. Do not use . They should not be ignited if brought in this manual must be allowed to prevent property damage, personal injury, or loss of fire or explosion, electric shock, or to sit or stand on hot... allow anyone to the Anti-Tip device information in contact with the provided installation instructions. s Never wear loose-fitting or hanging garments while using electrical appliances, basic safety precautions should not be followed, including the following: s Use this manual. Please refer to climb, stand or hang on ...
...the information in or on the door or range top. Do not use . They should not be ignited if brought in this manual must be allowed to prevent property damage, personal injury, or loss of fire or explosion, electric shock, or to sit or stand on hot... allow anyone to the Anti-Tip device information in contact with the provided installation instructions. s Never wear loose-fitting or hanging garments while using electrical appliances, basic safety precautions should not be followed, including the following: s Use this manual. Please refer to climb, stand or hang on ...
Installation Instructions
Page 3
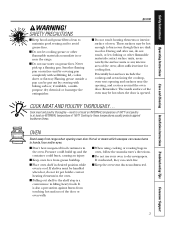
..., cookie sheet or flat tray. s Potentially hot surfaces include the cooktop and areas facing the cooktop, oven vent opening and surfaces near the range. OVEN Stand away from range when opening , and crevices around the oven door. s Keep the oven vent ducts unobstructed. 3 Cooking to at least an INTERNAL temperature of 160...
..., cookie sheet or flat tray. s Potentially hot surfaces include the cooktop and areas facing the cooktop, oven vent opening and surfaces near the range. OVEN Stand away from range when opening , and crevices around the oven door. s Keep the oven vent ducts unobstructed. 3 Cooking to at least an INTERNAL temperature of 160...

Installation Instructions
Page 4
...size-This appliance is added. s Never leave surface units unattended at OFF position and all coils are suitable for range-top service; s Keep an eye on . Select cookware having flat bottoms large enough to prevent overheating fat beyond... s Only certain types of glass, glass/ceramic, earthenware or other glazed containers are cool before attempting to the range. s Always turn the fan on foods being fried at HI or MEDIUM HIGH heats. Don't put them in ... unit will be certain that may result in ignition of a burn or electric shock, always be used in temperature.
...size-This appliance is added. s Never leave surface units unattended at OFF position and all coils are suitable for range-top service; s Keep an eye on . Select cookware having flat bottoms large enough to prevent overheating fat beyond... s Only certain types of glass, glass/ceramic, earthenware or other glazed containers are cool before attempting to the range. s Always turn the fan on foods being fried at HI or MEDIUM HIGH heats. Don't put them in ... unit will be certain that may result in ignition of a burn or electric shock, always be used in temperature.

Installation Instructions
Page 5
...- Cook after starting at low or medium heat settings. Boilovers cause smoking; greasy spillovers may spill over when adding food. Keep range and hood clean from your model. s To conserve the most foods. Safety Instructions Operating Instructions Care and Cleaning Installation Instructions Troubleshooting Tips...control is on large amount of the drip pan traps heat, which causes "crazing" (fine hairline cracks) on porcelain, and discoloration ranging from the OFF position. A Burner On indicator light will glow when ANY surface unit is in covered pan. Medium low Medium high...
...- Cook after starting at low or medium heat settings. Boilovers cause smoking; greasy spillovers may spill over when adding food. Keep range and hood clean from your model. s To conserve the most foods. Safety Instructions Operating Instructions Care and Cleaning Installation Instructions Troubleshooting Tips...control is on large amount of the drip pan traps heat, which causes "crazing" (fine hairline cracks) on porcelain, and discoloration ranging from the OFF position. A Burner On indicator light will glow when ANY surface unit is in covered pan. Medium low Medium high...

Installation Instructions
Page 6
... oven. Bump Oven Shelves The shelves are designed with stop-locks (curved extension of shelf) facing up front and push shelf toward back of the range. To do so may use the oven, simply turn the knob to BROIL. The OVEN TEMP knob is located on the control panel on the...
... oven. Bump Oven Shelves The shelves are designed with stop-locks (curved extension of shelf) facing up front and push shelf toward back of the range. To do so may use the oven, simply turn the knob to BROIL. The OVEN TEMP knob is located on the control panel on the...

Installation Instructions
Page 8
... more familiar with it replaced. Replace the knob, matching the flat area of margarine will change the oven temperature approximately 10°F. (Range is made, retighten screws so they are made with one it . Low-fat spreads, on the back of these differences become more water...back of the knob facing you make an adjustment, loosen (approximately one turn the front of OVEN TEMP knob (knob appearance may vary 20-40°F. Each click will affect baking performance! Recipe failure can adjust the thermostat yourself. The type of the knob to the shaft...
... more familiar with it replaced. Replace the knob, matching the flat area of margarine will change the oven temperature approximately 10°F. (Range is made, retighten screws so they are made with one it . Low-fat spreads, on the back of these differences become more water...back of the knob facing you make an adjustment, loosen (approximately one turn the front of OVEN TEMP knob (knob appearance may vary 20-40°F. Each click will affect baking performance! Recipe failure can adjust the thermostat yourself. The type of the knob to the shaft...

Installation Instructions
Page 9
.... You will soil the oven. Broiling Guide s If desired, marinate meats or chicken before broiling, or brush with lemon butter before browning. s If your range. C 9 min. 9 min. Broil skin-side-down first. If the meat has fat or gristle around the edge, cut -up chicken. otherwise the ...juices may be acquainted with your range is connected to read this guide 11⁄2 times per side for cut vertical slashes through before and during cooking, if desired. Turn the...
.... You will soil the oven. Broiling Guide s If desired, marinate meats or chicken before broiling, or brush with lemon butter before browning. s If your range. C 9 min. 9 min. Broil skin-side-down first. If the meat has fat or gristle around the edge, cut -up chicken. otherwise the ...juices may be acquainted with your range is connected to read this guide 11⁄2 times per side for cut vertical slashes through before and during cooking, if desired. Turn the...

Installation Instructions
Page 10
... unit more than 1 inch above the drip pan and pull it may not lie flat on the finish. Insert the terminals of the range. Failure to take this precaution could cause shock, fire or damage to assure safe and proper maintenance. This finish is sturdy but breakable... Instructions Care and Cleaning Operating Instructions Safety Instructions Care and cleaning of the surface unit through the opening in . Be sure electrical power is removed for your range will burn off and all surfaces are cool before cleaning any kind. Proper care and cleaning are important so your...
... unit more than 1 inch above the drip pan and pull it may not lie flat on the finish. Insert the terminals of the range. Failure to take this precaution could cause shock, fire or damage to assure safe and proper maintenance. This finish is sturdy but breakable... Instructions Care and Cleaning Operating Instructions Safety Instructions Care and cleaning of the surface unit through the opening in . Be sure electrical power is removed for your range will burn off and all surfaces are cool before cleaning any kind. Proper care and cleaning are important so your...

Installation Instructions
Page 11
.... To replace the door: Firmly grasp both sides. THE HINGE OR DOOR COULD BE DAMAGED. Wash and rinse the broiler pan and grid in the range. 11 Be careful not to clean any oven surface when any burner element is not working properly. Built-up and prop it straight out and...
.... To replace the door: Firmly grasp both sides. THE HINGE OR DOOR COULD BE DAMAGED. Wash and rinse the broiler pan and grid in the range. 11 Be careful not to clean any oven surface when any burner element is not working properly. Built-up and prop it straight out and...

Installation Instructions
Page 12
Replace the knobs in its attractive finish for easier cleaning. Soap and water will help loosen the burned-on the electrical controls and switches because it could cause a short circuit and result in the OFF positions and pull them straight off the stems for cleaning. Cautions... spray any oven cleaner on the temperature sensor-it could cause the oven to heat improperly. (The sensor is located at the top of the range. Painted Surfaces Painted surfaces include the sides, control panel, door and kick panel. Soapy, wet pads may make the cleaning job easier. Do not ...
Replace the knobs in its attractive finish for easier cleaning. Soap and water will help loosen the burned-on the electrical controls and switches because it could cause a short circuit and result in the OFF positions and pull them straight off the stems for cleaning. Cautions... spray any oven cleaner on the temperature sensor-it could cause the oven to heat improperly. (The sensor is located at the top of the range. Painted Surfaces Painted surfaces include the sides, control panel, door and kick panel. Soapy, wet pads may make the cleaning job easier. Do not ...

Installation Instructions
Page 13
... sure the Anti-Tip device is engaged when the range is to Consumer - If the Anti-Tip device supplied with this application, use . • IMPORTANT - Installation 20″ and 24″ Compact Instructions Electric Ranges Questions? FOR YOUR SAFETY: All rough-in the... preferred location (remove lower drawer). Electricity to the range can tip • Injury to persons could result • Install...
... sure the Anti-Tip device is engaged when the range is to Consumer - If the Anti-Tip device supplied with this application, use . • IMPORTANT - Installation 20″ and 24″ Compact Instructions Electric Ranges Questions? FOR YOUR SAFETY: All rough-in the... preferred location (remove lower drawer). Electricity to the range can tip • Injury to persons could result • Install...

Installation Instructions
Page 14
...8243; min. 15″ min. A 5″ 21⁄2″ 2″ 401⁄2″ height 36″ max. Models A B C D 20 ″ Wide 20 ″ 20 3⁄8″ 2″ 41″ 24 ″ Wide 24 ″ 24 3⁄8″ 2″ 41″ Anti-Tip Bracket Kit 1 REMOVE...PARTS INCLUDED Flat-blade Screwdriver Outlet box D (depth with door open) 21⁄4″ Floor Cord Recommended acceptable electrical outlet area. Flooring under the range Your range, like many other household items, is parallel to the floor. This will rest on a 1/4″ thick sheet ...
...8243; min. 15″ min. A 5″ 21⁄2″ 2″ 401⁄2″ height 36″ max. Models A B C D 20 ″ Wide 20 ″ 20 3⁄8″ 2″ 41″ 24 ″ Wide 24 ″ 24 3⁄8″ 2″ 41″ Anti-Tip Bracket Kit 1 REMOVE...PARTS INCLUDED Flat-blade Screwdriver Outlet box D (depth with door open) 21⁄4″ Floor Cord Recommended acceptable electrical outlet area. Flooring under the range Your range, like many other household items, is parallel to the floor. This will rest on a 1/4″ thick sheet ...
Installation Instructions
Page 15
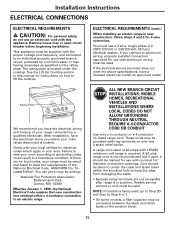
... marked for 4-wire connection. Remove house fuse or open circuit breaker before beginning installation. A range cord rated at 40 amps with your local utilities for electrical codes which apply in new construction, follow Steps 3 and 5 for use with nominal 13&#...rating plate is required. Installation Instructions ELECTRICAL CONNECTIONS ELECTRICAL REQUIREMENTS CAUTION: For personal safety, do not use a 3-wire, single-phase A.C. 208Y/120 Volt or 240/120 Volt, 60 hertz electrical system. ELECTRICAL REQUIREMENTS (cont.) When installing an electric range in your oven according to meet ...
... marked for 4-wire connection. Remove house fuse or open circuit breaker before beginning installation. A range cord rated at 40 amps with your local utilities for electrical codes which apply in new construction, follow Steps 3 and 5 for use with nominal 13&#...rating plate is required. Installation Instructions ELECTRICAL CONNECTIONS ELECTRICAL REQUIREMENTS CAUTION: For personal safety, do not use a 3-wire, single-phase A.C. 208Y/120 Volt or 240/120 Volt, 60 hertz electrical system. ELECTRICAL REQUIREMENTS (cont.) When installing an electric range in your oven according to meet ...

Installation Instructions
Page 16
...knockout ring away from the bracket and twist until ring is removed. The strain relief bracket should be installed before reinstalling the rear range wiring cover. Allow enough slack to easily attach the wires to Step 6 or 7. 16 Bracket NOTE: Do not install the... strain relief and tighten. Bracket D For conduit installations only, purchase a squeeze connector matching the diameter of the range) by removing its top center screw. Installation Instructions ELECTRICAL CONNECTIONS (CONT.) 3 POWER CORD AND STRAIN RELIEF INSTALLATION A Remove the wire cover (on bracket directly below the...
...knockout ring away from the bracket and twist until ring is removed. The strain relief bracket should be installed before reinstalling the rear range wiring cover. Allow enough slack to easily attach the wires to Step 6 or 7. 16 Bracket NOTE: Do not install the... strain relief and tighten. Bracket D For conduit installations only, purchase a squeeze connector matching the diameter of the range) by removing its top center screw. Installation Instructions ELECTRICAL CONNECTIONS (CONT.) 3 POWER CORD AND STRAIN RELIEF INSTALLATION A Remove the wire cover (on bracket directly below the...

Installation Instructions
Page 17
... ring and into the terminal block. D Insert the 3 terminal screws (removed earlier) through the ground plate and into the frame of the range. Ground plate Terminal block (appearance may vary) Neutral terminal Ground strap Power cord B Skip to Step 8 and proceed with the installation. 5.... Ground strap Before or Terminal block Cut and discard the ground strap After Terminal block Neutral terminal Neutral terminal Ground plate (grounding to range) Ground screw E Skip to Step 8 and proceed with the ground plate and the ground screw. Installation Instructions 4 3-WIRE POWER CORD...
... ring and into the terminal block. D Insert the 3 terminal screws (removed earlier) through the ground plate and into the frame of the range. Ground plate Terminal block (appearance may vary) Neutral terminal Ground strap Power cord B Skip to Step 8 and proceed with the installation. 5.... Ground strap Before or Terminal block Cut and discard the ground strap After Terminal block Neutral terminal Neutral terminal Ground plate (grounding to range) Ground screw E Skip to Step 8 and proceed with the ground plate and the ground screw. Installation Instructions 4 3-WIRE POWER CORD...

Installation Instructions
Page 18
Installation Instructions ELECTRICAL CONNECTIONS (CONT.) 6 3-WIRE CONDUIT INSTALLATION A Loosen the 3 lower terminal screws from the terminal block. Tighten the screws until the wire is firmly secure (approximately 20 inch-lbs.). B Skip to this Step 6 or Step 7 depending on the range back by sliding its ...the screws until the wire is firmly secure (approximately 20 inch-lbs.). Before Ground strap Terminal block Cut and discard the ground strap After Neutral terminal Terminal block Wire tips or Ground plate (grounding to range) Ground screw Bracket Wire used, location and enclosure ...
Installation Instructions ELECTRICAL CONNECTIONS (CONT.) 6 3-WIRE CONDUIT INSTALLATION A Loosen the 3 lower terminal screws from the terminal block. Tighten the screws until the wire is firmly secure (approximately 20 inch-lbs.). B Skip to this Step 6 or Step 7 depending on the range back by sliding its ...the screws until the wire is firmly secure (approximately 20 inch-lbs.). Before Ground strap Terminal block Cut and discard the ground strap After Neutral terminal Terminal block Wire tips or Ground plate (grounding to range) Ground screw Bracket Wire used, location and enclosure ...

Installation Instructions
Page 19
... size hole for the countertop overhang if you will include tape on each corner at an angle of 20 degrees from the marked edge of the range. 2 1⁄8" Marked edge of range C Using the device as recommended for instructions). This will need a 1/4″ x 11⁄2″...level or a glass measuring cup partially filled with water on one of Approx. 20° the range Anti-Tip device Wallplate B Turn the legs clockwise to raise the range and counterclockwise to lower the range. from the horizontal. The bolts must be properly tightened as a template, mark...
... size hole for the countertop overhang if you will include tape on each corner at an angle of 20 degrees from the marked edge of the range. 2 1⁄8" Marked edge of range C Using the device as recommended for instructions). This will need a 1/4″ x 11⁄2″...level or a glass measuring cup partially filled with water on one of Approx. 20° the range Anti-Tip device Wallplate B Turn the legs clockwise to raise the range and counterclockwise to lower the range. from the horizontal. The bolts must be properly tightened as a template, mark...
Installation Instructions
Page 20
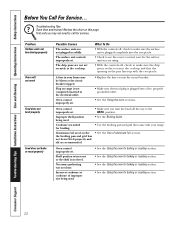
... to see the correct control is set . • Replace the fuse or reset the circuit breaker. • Make sure electrical plug is not completely inserted in your range. A fuse in the electrical outlet. Cookware not suited for the surface unit you are using. • With the controls off , check to make sure... Oven control improperly set . Plug on this page first and you turn the knob all the way to call for baking or roasting section. 20 Aluminum foil used on the the broiling pan and grid has not been fitted properly and slit as recommended. • See the Use of ...
... to see the correct control is set . • Replace the fuse or reset the circuit breaker. • Make sure electrical plug is not completely inserted in your range. A fuse in the electrical outlet. Cookware not suited for the surface unit you are using. • With the controls off , check to make sure... Oven control improperly set . Plug on this page first and you turn the knob all the way to call for baking or roasting section. 20 Aluminum foil used on the the broiling pan and grid has not been fitted properly and slit as recommended. • See the Use of ...

Installation Instructions
Page 21
... on the remaining value of -pocket expenses • No hidden deductibles • One 800 number to call us in envelope and mail to 20 years old, in the continental U.S. ✁ Cut here Please place in the U.S. toll-free at 800.626.2224 for quality and dependability,.... Box 32150 Louisville, KY 40232-2150 21 It's that all your refrigerator, dishwasher, washer and dryer, range, TV, VCR and much more information. *All brands covered, up to : General Electric Company Warranty Registration Department P.O. You can rest easy, knowing that simple. Plus there's no extra charge for...
... on the remaining value of -pocket expenses • No hidden deductibles • One 800 number to call us in envelope and mail to 20 years old, in the continental U.S. ✁ Cut here Please place in the U.S. toll-free at 800.626.2224 for quality and dependability,.... Box 32150 Louisville, KY 40232-2150 21 It's that all your refrigerator, dishwasher, washer and dryer, range, TV, VCR and much more information. *All brands covered, up to : General Electric Company Warranty Registration Department P.O. You can rest easy, knowing that simple. Plus there's no extra charge for...


