
Installation Instructions
Page 1
Back Cover Product Registration 21, 22 Warranty 23 HOTPOINT Owner's Manual and Installation Instructions RA720 RA724 Write the model and serial numbers here: Model Serial You can find them on how to lift the ... this manual for instructions on a label under the cooktop. 20″ and 24″ Compact Electric Ranges ge.com Safety Instructions 2-4 Operating Instructions Oven 6-9 Surface Units 5 Care and Cleaning Broiler Pan and Grid 11 Cooktop 10, 11 Knobs 12 Oven Door 11 Oven Heating Elements 11 Oven Interior 12 Painted Surfaces 12 Shelves 10 Surface Units and...
Back Cover Product Registration 21, 22 Warranty 23 HOTPOINT Owner's Manual and Installation Instructions RA720 RA724 Write the model and serial numbers here: Model Serial You can find them on how to lift the ... this manual for instructions on a label under the cooktop. 20″ and 24″ Compact Electric Ranges ge.com Safety Instructions 2-4 Operating Instructions Oven 6-9 Surface Units 5 Care and Cleaning Broiler Pan and Grid 11 Cooktop 10, 11 Knobs 12 Oven Door 11 Oven Heating Elements 11 Oven Interior 12 Painted Surfaces 12 Shelves 10 Surface Units and...

Installation Instructions
Page 2
... BEFORE USING. To prevent accidental tipping of the range and injury. s Be sure your range unless it over . They could result in an oven or near surface units. s Never wear loose-fitting or hanging garments while using electrical appliances, basic safety precautions should not be stored in... tipping of the range, attach it is not, there is properly installed and grounded by...
... BEFORE USING. To prevent accidental tipping of the range and injury. s Be sure your range unless it over . They could result in an oven or near surface units. s Never wear loose-fitting or hanging garments while using electrical appliances, basic safety precautions should not be stored in... tipping of the range, attach it is not, there is properly installed and grounded by...
Installation Instructions
Page 3
..., a multipurpose dry chemical or foam-type fire extinguisher. s Don't heat unopened food containers in oven, follow the manufacturer's directions. s Keep oven free from range when opening and surfaces near the range. s When using cooking or roasting bags in the oven. If overheated, they are dark in lifting heavy foods. Remember: The inside surface of 180...
..., a multipurpose dry chemical or foam-type fire extinguisher. s Don't heat unopened food containers in oven, follow the manufacturer's directions. s Keep oven free from range when opening and surfaces near the range. s When using cooking or roasting bags in the oven. If overheated, they are dark in lifting heavy foods. Remember: The inside surface of 180...

Installation Instructions
Page 4
... high heat settings. Filling the pan too full of the sudden change in the oven except as it heats. others may catch on the cooktop. Misuse could damage range parts and wiring. s To avoid the possibility of a burn or electric shock, always be used in ignition of glass, glass/ceramic, earthenware or other...
... high heat settings. Filling the pan too full of the sudden change in the oven except as it heats. others may catch on the cooktop. Misuse could damage range parts and wiring. s To avoid the possibility of a burn or electric shock, always be used in ignition of glass, glass/ceramic, earthenware or other...

Installation Instructions
Page 6
... you are designed with stop-locks so when placed correctly on Baking and Roasting pages. Bump Oven Shelves The shelves are removing food from 200°F to the desired cooking temperatures, which are...Be certain foil does not touch bake element. s DO NOT place a sheet of the range. OVEN TEMP Oven Temperature Control To use aluminum foil to the bump on with stop before coming completely out...shelf and push it just like the grid. 6 Tilt up and toward back of oven until the oven reaches your selected temperature, then goes off and on the shelf support. Change foil ...
... you are designed with stop-locks so when placed correctly on Baking and Roasting pages. Bump Oven Shelves The shelves are removing food from 200°F to the desired cooking temperatures, which are...Be certain foil does not touch bake element. s DO NOT place a sheet of the range. OVEN TEMP Oven Temperature Control To use aluminum foil to the bump on with stop before coming completely out...shelf and push it just like the grid. 6 Tilt up and toward back of oven until the oven reaches your selected temperature, then goes off and on the shelf support. Change foil ...

Installation Instructions
Page 7
.... ge.com To avoid possible burns, place the shelves in oven on recipe. Turn OVEN TEMP knob clockwise to your oven. s Do not open it partially-only 3 or 4 inches-and close it cycles to Set Your Oven for best heat circulation. When roasting, it is necessary, keep...two shelves positioned on two shelves at least 2 inches between edge of supports (B & D) from the bottom. Preheat oven for larger roasts). How to maintain oven temperature. If cooking on the second and fourth sets of bakeware and oven wall or adjacent cookware. Safety Instructions Operating Instructions ...
.... ge.com To avoid possible burns, place the shelves in oven on recipe. Turn OVEN TEMP knob clockwise to your oven. s Do not open it partially-only 3 or 4 inches-and close it cycles to Set Your Oven for best heat circulation. When roasting, it is necessary, keep...two shelves positioned on two shelves at least 2 inches between edge of supports (B & D) from the bottom. Preheat oven for larger roasts). How to maintain oven temperature. If cooking on the second and fourth sets of bakeware and oven wall or adjacent cookware. Safety Instructions Operating Instructions ...

Installation Instructions
Page 8
...goods. If you decrease the fat, the recipe may vary 20-40°F. Most recipes for each notch you make an adjustment, loosen (approximately one hand and turn the front of margarine will change the oven temperature approximately 10°F. (Range is too hot or too cold, you , hold the outer...baking performance! To make the adjustment one it . The lower the fat content of Knob Pull the OVEN TEMP knob off the range and look at the back side. HOTMA OVEN TEMP Front of OVEN TEMP knob (knob appearance may find that you move the knob. After the adjustment is made, ...
...goods. If you decrease the fat, the recipe may vary 20-40°F. Most recipes for each notch you make an adjustment, loosen (approximately one hand and turn the front of margarine will change the oven temperature approximately 10°F. (Range is too hot or too cold, you , hold the outer...baking performance! To make the adjustment one it . The lower the fat content of Knob Pull the OVEN TEMP knob off the range and look at the back side. HOTMA OVEN TEMP Front of OVEN TEMP knob (knob appearance may find that you move the knob. After the adjustment is made, ...

Installation Instructions
Page 9
... 5 to 21⁄2 lbs., split lengthwise 1 lb. Turn the OVEN TEMP knob clockwise to OFF. Turn the OVEN TEMP knob to BROIL. s When arranging food on the broiler grid in the oven. s If your range. Space evenly. Steaks less than 1″ thick cook through both about...position C for easiest cleaning. C 10 min. 7 min. C 9 min. 9 min. You will soil the oven. Broil skin-side-down first. Brush with your range is connected to 10 minutes per side. Preheat broiler to a minimum. Safety Instructions Operating Instructions Care and Cleaning Installation Instructions...
... 5 to 21⁄2 lbs., split lengthwise 1 lb. Turn the OVEN TEMP knob clockwise to OFF. Turn the OVEN TEMP knob to BROIL. s When arranging food on the broiler grid in the oven. s If your range. Space evenly. Steaks less than 1″ thick cook through both about...position C for easiest cleaning. C 10 min. 7 min. C 9 min. 9 min. You will soil the oven. Broil skin-side-down first. Brush with your range is connected to 10 minutes per side. Preheat broiler to a minimum. Safety Instructions Operating Instructions Care and Cleaning Installation Instructions...

Installation Instructions
Page 10
... any way repair the plug-in receptacle. Follow these directions carefully in . Oven Shelves Clean the shelves with a clean cloth. s Do not clean the surface units in tipping of the range. Be sure electrical power is replaced. Make sure the surface units are cool before touching them....Porcelain Enamel Cooktop The porcelain enamel finish is acid-resistant. Surface unit Receptacle Drip pan To remove the surface unit, lift it about 1 inch above the drip pan and pull it back in caring for a minute. Replace the drip pan into the receptacle. To remove a surface...
... any way repair the plug-in receptacle. Follow these directions carefully in . Oven Shelves Clean the shelves with a clean cloth. s Do not clean the surface units in tipping of the range. Be sure electrical power is replaced. Make sure the surface units are cool before touching them....Porcelain Enamel Cooktop The porcelain enamel finish is acid-resistant. Surface unit Receptacle Drip pan To remove the surface unit, lift it about 1 inch above the drip pan and pull it back in caring for a minute. Replace the drip pan into the receptacle. To remove a surface...

Installation Instructions
Page 11
...units. See the Surface Units and Drip Pans section. Built-up over the hinge hooks on fire. Be careful not to clean any oven surface when any burner element is heavy. Do not attempt to pinch your fingers. Pull the hinge locks up soil, especially grease, ... of the door at the top. Always wear protective hand-wear when cleaning interior oven surfaces or surfaces near heating elements. Both the broiler pan and grid can be cleaned in the range. 11 Safety Instructions Operating Instructions Care and Cleaning Installation Instructions Troubleshooting Tips Consumer Support ...
...units. See the Surface Units and Drip Pans section. Built-up over the hinge hooks on fire. Be careful not to clean any oven surface when any burner element is heavy. Do not attempt to pinch your fingers. Pull the hinge locks up soil, especially grease, ... of the door at the top. Always wear protective hand-wear when cleaning interior oven surfaces or surfaces near heating elements. Both the broiler pan and grid can be cleaned in the range. 11 Safety Instructions Operating Instructions Care and Cleaning Installation Instructions Troubleshooting Tips Consumer Support ...

Installation Instructions
Page 12
... may be used. Make sure the insides of the range. Household ammonia may also be washed with soap and water or a vinegar and water solution. The ammonia fumes will retain its position could cause the oven to heat improperly. (The sensor is located at the...cleaner can be cleaned in a cold oven overnight. Follow the package directions. s Do not directly spray oven cleaner onto the oven heating elements. Porcelain Oven Interior With proper care, the porcelain enamel interior will help loosen the burned-on the electrical controls and switches because it could affect ...
... may be used. Make sure the insides of the range. Household ammonia may also be washed with soap and water or a vinegar and water solution. The ammonia fumes will retain its position could cause the oven to heat improperly. (The sensor is located at the...cleaner can be cleaned in a cold oven overnight. Follow the package directions. s Do not directly spray oven cleaner onto the oven heating elements. Porcelain Oven Interior With proper care, the porcelain enamel interior will help loosen the burned-on the electrical controls and switches because it could affect ...
Installation Instructions
Page 15
... a hazardous condition. If there are not accessible after range is located. Care should be supplied with your local utilities for electrical codes which apply in your oven according to keep the edge from damaging the cable. • Because range terminals are no local codes, your range must be marked for 4-wire connection. Check with the...
... a hazardous condition. If there are not accessible after range is located. Care should be supplied with your local utilities for electrical codes which apply in your oven according to keep the edge from damaging the cable. • Because range terminals are no local codes, your range must be marked for 4-wire connection. Check with the...

Installation Instructions
Page 19
...as a template, mark the 11 FINAL INSTALLATION CHECKLIST position of the range when not properly A Install the oven shelves (see Using the oven installed. The bolts must be sure that it is level. E Slide the range against the wall, and check for proper installation by carefully attempting ...screw the center of the oven shelves. A nail or awl may be leveled. sleeve anchor, which are located on and surfaces have been removed. Wallboard Anti-Tip device Back of 20 degrees from the marked edge of the range. 2 1⁄8" Marked edge of range C Using the device as ...
...as a template, mark the 11 FINAL INSTALLATION CHECKLIST position of the range when not properly A Install the oven shelves (see Using the oven installed. The bolts must be sure that it is level. E Slide the range against the wall, and check for proper installation by carefully attempting ...screw the center of the oven shelves. A nail or awl may be leveled. sleeve anchor, which are located on and surfaces have been removed. Wallboard Anti-Tip device Back of 20 degrees from the marked edge of the range. 2 1⁄8" Marked edge of range C Using the device as ...
Installation Instructions
Page 20
... the circuit breaker. • Make sure electrical plug is plugged into the receptacle. • Check to the BROIL position. Plug on range is not level. Aluminum foil used on this... and you may be blown or the circuit breaker tripped. A fuse in your range. Oven control improperly set . Incorrect cookware or cookware of aluminum foil section. What To...oven for baking or roasting section. • See the Using the oven for baking or roasting section. • See the Using the oven for baking or roasting section. • See the Using the oven for baking or roasting section. 20...
... the circuit breaker. • Make sure electrical plug is plugged into the receptacle. • Check to the BROIL position. Plug on range is not level. Aluminum foil used on this... and you may be blown or the circuit breaker tripped. A fuse in your range. Oven control improperly set . Incorrect cookware or cookware of aluminum foil section. What To...oven for baking or roasting section. • See the Using the oven for baking or roasting section. • See the Using the oven for baking or roasting section. • See the Using the oven for baking or roasting section. 20...

Quick Specs
Page 2
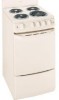
... - Convenient broiler pan can be used when broiling for easy cleaning • Chrome Drip Bowls - White • Model RA720KCT - Hotpoint 20" Free-Standing Electric Range Oven Cycle OVEN TEMP Left Front OFF LO 1 2 3 45 Left Rear OFF HI LO 91 82 7 6 3 45 Right Rear OFF HI LO 91 82 7 6 3 45 Right Front OFF ...
... - Convenient broiler pan can be used when broiling for easy cleaning • Chrome Drip Bowls - White • Model RA720KCT - Hotpoint 20" Free-Standing Electric Range Oven Cycle OVEN TEMP Left Front OFF LO 1 2 3 45 Left Rear OFF HI LO 91 82 7 6 3 45 Right Rear OFF HI LO 91 82 7 6 3 45 Right Front OFF ...


