Installation Instructions
Page 2
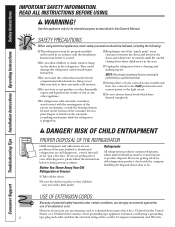
... seriously injure themselves. ■ Do not touch the cold surfaces in the refrigerator. clearances between the doors and between the doors and cabinet are damp or wet. Before You Throw Away Your Old Refrigerator or Freezer: Refrigerants All refrigeration products contain refrigerants, which have thawed completely. USE OF EXTENSION CORDS Because of potential safety hazards under...
... seriously injure themselves. ■ Do not touch the cold surfaces in the refrigerator. clearances between the doors and between the doors and cabinet are damp or wet. Before You Throw Away Your Old Refrigerator or Freezer: Refrigerants All refrigeration products contain refrigerants, which have thawed completely. USE OF EXTENSION CORDS Because of potential safety hazards under...

Installation Instructions
Page 3
Do not use a cord that have it is your refrigerator by a qualified electrician to make sure the outlet is properly grounded. READ AND FOLLOW THIS SAFETY INFORMATION CAREFULLY. SAVE THESE INSTRUCTIONS 3 This provides the best ... power cords that shows cracks or abrasion damage along its own individual electrical outlet which mates with a properly grounded 3-prong wall outlet. When moving the refrigerator away from the wall, be careful not to minimize the possibility of this appliance is encountered, it replaced with a standard 3-prong (grounding) wall outlet to...
Do not use a cord that have it is your refrigerator by a qualified electrician to make sure the outlet is properly grounded. READ AND FOLLOW THIS SAFETY INFORMATION CAREFULLY. SAVE THESE INSTRUCTIONS 3 This provides the best ... power cords that shows cracks or abrasion damage along its own individual electrical outlet which mates with a properly grounded 3-prong wall outlet. When moving the refrigerator away from the wall, be careful not to minimize the possibility of this appliance is encountered, it replaced with a standard 3-prong (grounding) wall outlet to...
Installation Instructions
Page 4
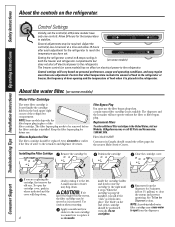
... A small amount of food when it to replace it stops. Factors that affect temperature include the amount of food in the refrigerator or freezer, the frequency of door opening and the temperature of water may cause water to spurt from the dispenser for future use the.... NOTE: A newly-installed water filter cartridge may drip down . 4 slowly rotating it is installed. Setting the refrigerator control to 0 stops cooling in both the freezer and refrigerator compartments but (on some models) has no effect on personal preferences, usage and operating conditions, and may be removed...
... A small amount of food when it to replace it stops. Factors that affect temperature include the amount of food in the refrigerator or freezer, the frequency of door opening and the temperature of water may cause water to spurt from the dispenser for future use the.... NOTE: A newly-installed water filter cartridge may drip down . 4 slowly rotating it is installed. Setting the refrigerator control to 0 stops cooling in both the freezer and refrigerator compartments but (on some models) has no effect on personal preferences, usage and operating conditions, and may be removed...

Installation Instructions
Page 5
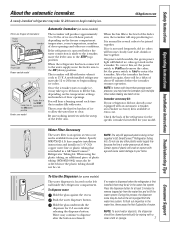
....com While tilting the shelf up at the back and bring the shelf out. Lift the shelf up , insert the top hook at the front. NOTE: Bins for the refrigerator and freezer doors are different sizes and are designed to help prevent spills from side to reach items stored behind the front bar.... then pull out. Freezer Tilt-Out Bin (on the shelf frame just behind others. To replace: Place the rear of the shelf...
....com While tilting the shelf up at the back and bring the shelf out. Lift the shelf up , insert the top hook at the front. NOTE: Bins for the refrigerator and freezer doors are different sizes and are designed to help prevent spills from side to reach items stored behind the front bar.... then pull out. Freezer Tilt-Out Bin (on the shelf frame just behind others. To replace: Place the rear of the shelf...

Installation Instructions
Page 6
... replacing the glass, push the front edge firmly into the frame. Not all features are on some cases, when you roll the refrigerator out, you will need to move the refrigerator to the most fruits. Snack Pan (on all models. In some models) This pan can be rolled forward until the door... slide the drawers out. Lift the back up off of soda or two wine/water bottles (lengthwise). If this does not offer enough clearance, the refrigerator will need to be moved to the left or right as you from taking out the drawers, first try to remove the storage drawers. ShelfSaver...
... replacing the glass, push the front edge firmly into the frame. Not all features are on some cases, when you roll the refrigerator out, you will need to move the refrigerator to the most fruits. Snack Pan (on all models. In some models) This pan can be rolled forward until the door... slide the drawers out. Lift the back up off of soda or two wine/water bottles (lengthwise). If this does not offer enough clearance, the refrigerator will need to be moved to the left or right as you from taking out the drawers, first try to remove the storage drawers. ShelfSaver...
Installation Instructions
Page 7
... cloth or sponge. 7 copper water line or plastic tubing that supplied in GE SmartConnect™ Refrigerator Tubing kits. Specify WR97X0214. To correct this process, the dispenser noise may take 12 to 24 hours to I (on the freezer compartment temperature, room temperature, number of icemakers: Power Switch Icemaker Green Power Light Feeler Arm...
... cloth or sponge. 7 copper water line or plastic tubing that supplied in GE SmartConnect™ Refrigerator Tubing kits. Specify WR97X0214. To correct this process, the dispenser noise may take 12 to 24 hours to I (on the freezer compartment temperature, room temperature, number of icemakers: Power Switch Icemaker Green Power Light Feeler Arm...
Installation Instructions
Page 8
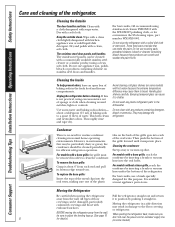
..., bleach or ammonia. For models with a base grille, the grille must be removed in the fresh food and freezer compartments. Cleaning the condenser: Sweep away or vacuum up . (See page 10 for efficient refrigerator operation. coverings can scratch and weaken the paint finish. Cleaning the Outside The door handles and trim. These... the leveling legs up dust. However, in environments that can erode the paint. Thoroughly rinse and wipe dry. To replace the base grille: Insert the tops of the metal clips into the oval vents, making sure one of the refrigerator.
..., bleach or ammonia. For models with a base grille, the grille must be removed in the fresh food and freezer compartments. Cleaning the condenser: Sweep away or vacuum up . (See page 10 for efficient refrigerator operation. coverings can scratch and weaken the paint finish. Cleaning the Outside The door handles and trim. These... the leveling legs up dust. However, in environments that can erode the paint. Thoroughly rinse and wipe dry. To replace the base grille: Insert the tops of the metal clips into the oval vents, making sure one of the refrigerator.
Installation Instructions
Page 9
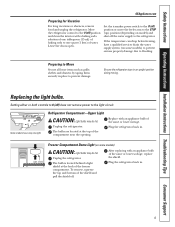
...as grille, shelves and drawers by taping them securely in . 9 Replacing the light bulbs. Plug the refrigerator back in an upright position during moving. To remove, squeeze the top and bottom of the shield and pull the shield off ) position or move the feeler arm to the...bulb is located behind a light shield at the top of baking soda to flooding. If the temperature can drop below freezing, have only one quart (1 liter) of the freezer compartment. Plug the refrigerator back in place to the light circuit. Refrigerator Compartment-Upper Light CAUTION: Light bulbs may be ...
...as grille, shelves and drawers by taping them securely in . 9 Replacing the light bulbs. Plug the refrigerator back in an upright position during moving. To remove, squeeze the top and bottom of the shield and pull the shield off ) position or move the feeler arm to the...bulb is located behind a light shield at the top of baking soda to flooding. If the temperature can drop below freezing, have only one quart (1 liter) of the freezer compartment. Plug the refrigerator back in place to the light circuit. Refrigerator Compartment-Upper Light CAUTION: Light bulbs may be ...

Installation Instructions
Page 10
...air circulation and plumbing and electrical connections. • Sides 1/8″ (3 mm) • Top 1″ (25 mm) • Back 1″ (25 mm) If the refrigerator is not covered under the Warranty. Refrigerator Installation 15 minutes Reversing the Door Swing 1 hour • Proper installation is the responsibility of... wall on the floor. • Door(s) do not close easily when opened to 45°. Installation Instructions Model 18 If you to move the refrigerator away from the wall for cleaning. A water supply kit (containing copper tubing, shutoff valve, fittings and instructions) ...
...air circulation and plumbing and electrical connections. • Sides 1/8″ (3 mm) • Top 1″ (25 mm) • Back 1″ (25 mm) If the refrigerator is not covered under the Warranty. Refrigerator Installation 15 minutes Reversing the Door Swing 1 hour • Proper installation is the responsibility of... wall on the floor. • Door(s) do not close easily when opened to 45°. Installation Instructions Model 18 If you to move the refrigerator away from the wall for cleaning. A water supply kit (containing copper tubing, shutoff valve, fittings and instructions) ...

Installation Instructions
Page 11
...BEFORE YOU BEGIN Recommended copper water supply kits are WX8X2, WX8X3 or WX8X4, depending on the back of the tubing are GE SmartConnect™ Refrigerator Tubing (WX08X10006, WX08X10015 and WX08X10025). When connecting your dealer or from Parts and Accessories, 1.800.661.1616. • A cold water ... plastic water supply line because the line is available at all times. The water pressure must be sure both ends of the refrigerator to correct water hammer before connecting the water line, make sure a saddle-type valve complies with local plumbing code requirements. Certain...
...BEFORE YOU BEGIN Recommended copper water supply kits are WX8X2, WX8X3 or WX8X4, depending on the back of the tubing are GE SmartConnect™ Refrigerator Tubing (WX08X10006, WX08X10015 and WX08X10025). When connecting your dealer or from Parts and Accessories, 1.800.661.1616. • A cold water ... plastic water supply line because the line is available at all times. The water pressure must be sure both ends of the refrigerator to correct water hammer before connecting the water line, make sure a saddle-type valve complies with local plumbing code requirements. Certain...

Installation Instructions
Page 12
... WATER LINE (CONT.) Install the shutoff valve on the nearest frequently used drinking water line. 1 SHUT OFF THE MAIN WATER SUPPLY AND UNPLUG REFRIGERATOR Turn on counterclockwise and flush out the tubing until the water is sufficient extra tubing to allow water to drain into a horizontal water pipe, ...make the connection to the top or side, rather than at the water valve after installation. 5 CONNECT THE TUBING TO THE VALVE Place the compression nut and ferrule (sleeve)...
... WATER LINE (CONT.) Install the shutoff valve on the nearest frequently used drinking water line. 1 SHUT OFF THE MAIN WATER SUPPLY AND UNPLUG REFRIGERATOR Turn on counterclockwise and flush out the tubing until the water is sufficient extra tubing to allow water to drain into a horizontal water pipe, ...make the connection to the top or side, rather than at the water valve after installation. 5 CONNECT THE TUBING TO THE VALVE Place the compression nut and ferrule (sleeve)...

Installation Instructions
Page 13
... until it is not plugged into the wall outlet. • We recommend installing a water filter if your refrigerator. Insert the end of the tubing into the water valve connection as far as shown. For plastic tubing from the water valve... Clamp SmartConnect™ Tubing Water Dispenser Models Tubing Clamp 1/4″ Compression Nut Ferrule (sleeve) 1/4″ Compression Nut Ferrule (sleeve) Refrigerator Connection 1/4″ Tubing Refrigerator Connection SmartConnect™ Tubing 8 TURN THE WATER ON AT THE SHUTOFF VALVE Tighten any connections that could clog the screen of the ...
... until it is not plugged into the wall outlet. • We recommend installing a water filter if your refrigerator. Insert the end of the tubing into the water valve connection as far as shown. For plastic tubing from the water valve... Clamp SmartConnect™ Tubing Water Dispenser Models Tubing Clamp 1/4″ Compression Nut Ferrule (sleeve) 1/4″ Compression Nut Ferrule (sleeve) Refrigerator Connection 1/4″ Tubing Refrigerator Connection SmartConnect™ Tubing 8 TURN THE WATER ON AT THE SHUTOFF VALVE Tighten any connections that could clog the screen of the ...
Installation Instructions
Page 14
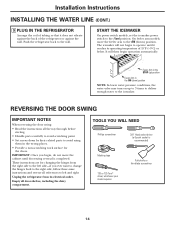
... starting. • Handle parts carefully to the left and right. Installation Instructions INSTALLING THE WATER LINE (CONT.) 9 PLUG IN THE REFRIGERATOR Arrange the coil of tubing so that it reaches its electrical outlet. IMPORTANT: Once you ever want to change the hinges back to ... deliver enough water to the right side, follow these same instructions and reverse all door shelves, including the dairy compartment. Push the refrigerator back to operate until door-swing reversal is recommended) Masking tape T20 or T25 Torx® driver, whichever your model requires Putty ...
... starting. • Handle parts carefully to the left and right. Installation Instructions INSTALLING THE WATER LINE (CONT.) 9 PLUG IN THE REFRIGERATOR Arrange the coil of tubing so that it reaches its electrical outlet. IMPORTANT: Once you ever want to change the hinges back to ... deliver enough water to the right side, follow these same instructions and reverse all door shelves, including the dairy compartment. Push the refrigerator back to operate until door-swing reversal is recommended) Masking tape T20 or T25 Torx® driver, whichever your model requires Putty ...

Installation Instructions
Page 15
...HINGE BRACKET TO THE LEFT For models with the inside up . Set the door on the back of the freezer door (on the hinge pin. Remove the hinge cover on top of the grille goes into place. 15 Remove the two Torx® screws, then lift the hinge straight... screws on a non-scratching surface with the inside up . 2 REMOVE REFRIGERATOR DOOR Tape the door shut with screws at top right with masking tape. Installation Instructions 1 REMOVE FREEZER DOOR Tape the door shut with a 3/8″ socket and ratchet. Top Hinge 3 TRANSFER TOP HINGE TO THE LEFT Interchange hinge and screws at the...
...HINGE BRACKET TO THE LEFT For models with the inside up . Set the door on the back of the freezer door (on the hinge pin. Remove the hinge cover on top of the grille goes into place. 15 Remove the two Torx® screws, then lift the hinge straight... screws on a non-scratching surface with the inside up . 2 REMOVE REFRIGERATOR DOOR Tape the door shut with screws at top right with masking tape. Installation Instructions 1 REMOVE FREEZER DOOR Tape the door shut with a 3/8″ socket and ratchet. Top Hinge 3 TRANSFER TOP HINGE TO THE LEFT Interchange hinge and screws at the...

Installation Instructions
Page 16
...cabinet. Remove the three Torx® screws from the center left . Insert and tighten the three long screws. Door Stop Door Stop 7 TRANSFER REFRIGERATOR DOOR HANDLE TO THE RIGHT Plastic handle: 3 Remove the plug button by carefully prying under the edge with the 3/32″ Allen wrench Fastener...the right side. Remove the exposed screw holding the handle to the top of the cabinet. Remove 2 the two screws holding the handle to the top of the door. Move any screws from the left side of the refrigerator door. 3 Plug Button After removing the handle: Move the small ...
...cabinet. Remove the three Torx® screws from the center left . Insert and tighten the three long screws. Door Stop Door Stop 7 TRANSFER REFRIGERATOR DOOR HANDLE TO THE RIGHT Plastic handle: 3 Remove the plug button by carefully prying under the edge with the 3/32″ Allen wrench Fastener...the right side. Remove the exposed screw holding the handle to the top of the cabinet. Remove 2 the two screws holding the handle to the top of the door. Move any screws from the left side of the refrigerator door. 3 Plug Button After removing the handle: Move the small ...

Installation Instructions
Page 17
... screws. 8 TRANSFER FREEZER DOOR HANDLE TO THE RIGHT Plastic handle: 1 Remove the screws holding the handle to the door. Remove handle. Line up the handle with the screw holes in the top of the door and tighten screw. Installation Instructions 7 TRANSFER REFRIGERATOR DOOR HANDLE TO THE... RIGHT (CONT.) Transfer the door plug button to the top and bottom of the door. Reinstalling the handle: Attach the...
... screws. 8 TRANSFER FREEZER DOOR HANDLE TO THE RIGHT Plastic handle: 1 Remove the screws holding the handle to the door. Remove handle. Line up the handle with the screw holes in the top of the door and tighten screw. Installation Instructions 7 TRANSFER REFRIGERATOR DOOR HANDLE TO THE... RIGHT (CONT.) Transfer the door plug button to the top and bottom of the door. Reinstalling the handle: Attach the...

Installation Instructions
Page 18
Plastic Washer Hinge Pin Center Hinge Bracket Refrigerator Door 18 Installation Instructions REVERSING THE DOOR SWING (CONT.) 8 TRANSFER FREEZER DOOR HANDLE TO THE RIGHT (CONT.) Stainless steel handle 1 (on the handle side and make sure the door is straight and the gap between ...RE-HANG THE FREEZER DOOR Lower the freezer door onto the center hinge pin. Turn it until it up the handle with a 3/8″ socket. Plastic Washer Straighten the door and line it extends through the hinge bracket and into the door socket. Center Hinge Pin Plastic Washer Lift the top hinge so ...
Plastic Washer Hinge Pin Center Hinge Bracket Refrigerator Door 18 Installation Instructions REVERSING THE DOOR SWING (CONT.) 8 TRANSFER FREEZER DOOR HANDLE TO THE RIGHT (CONT.) Stainless steel handle 1 (on the handle side and make sure the door is straight and the gap between ...RE-HANG THE FREEZER DOOR Lower the freezer door onto the center hinge pin. Turn it until it up the handle with a 3/8″ socket. Plastic Washer Straighten the door and line it extends through the hinge bracket and into the door socket. Center Hinge Pin Plastic Washer Lift the top hinge so ...
Installation Instructions
Page 19
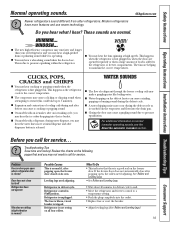
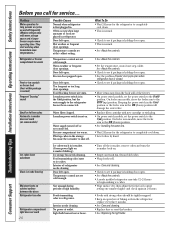
... cause a clicking or chirping sound when attempting to restart (this could take up to 5 minutes). ■ Expansion and contraction of refrigerant through the freezer cooling coils may make a gurgling noise like boiling water. ■ Water dropping on normal icemaker operating sounds, see the About the ... breaker is a good seal on its own. Do you call for defrost cycle to end. • Move the refrigerator and freezer control to pressure equalizing within the refrigerator. ■ You may hear the ice cubes dropping into the outlet. • Replace fuse or reset the breaker....
... cause a clicking or chirping sound when attempting to restart (this could take up to 5 minutes). ■ Expansion and contraction of refrigerant through the freezer cooling coils may make a gurgling noise like boiling water. ■ Water dropping on normal icemaker operating sounds, see the About the ... breaker is a good seal on its own. Do you call for defrost cycle to end. • Move the refrigerator and freezer control to pressure equalizing within the refrigerator. ■ You may hear the ice cubes dropping into the outlet. • Replace fuse or reset the breaker....
Installation Instructions
Page 20
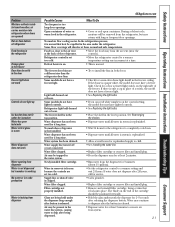
...8226; Replace fuse or reset the breaker. • See Replacing the light bulbs. They start and stop often to maintain even temperatures.) Refrigerator or freezer compartment too warm Frost or ice crystals on frozen food (frost within package is normal) Frequent "buzzing" sound Small or hollow cubes Automatic...set cold enough. See About the controls. • Check to see if package is holding door open. • See the problem Freezer door pops open when refrigerator door is closed. • Check to begin making ice cubes. • Wipe surface dry; Interior needs cleaning. Often occurs when...
...8226; Replace fuse or reset the breaker. • See Replacing the light bulbs. They start and stop often to maintain even temperatures.) Refrigerator or freezer compartment too warm Frost or ice crystals on frozen food (frost within package is normal) Frequent "buzzing" sound Small or hollow cubes Automatic...set cold enough. See About the controls. • Check to see if package is holding door open. • See the problem Freezer door pops open when refrigerator door is closed. • Check to begin making ice cubes. • Wipe surface dry; Interior needs cleaning. Often occurs when...
Installation Instructions
Page 21
...all water in the top position. The freezer door bins are opened) Hot air from bottom of refrigerator Food freezing in the refrigerator Orange glow in the freezer Door bins do not fit in the door Freezer light does not work Controls do not have a freezer light. •...from dispenser Water is released. Normal when refrigerator is clogged. Normal air flow cooling motor. Some models do not have a freezer light. In the refrigeration process, it locks into refrigerator when doors are a different size than the refrigerator door bins. If water does not dispense...
...all water in the top position. The freezer door bins are opened) Hot air from bottom of refrigerator Food freezing in the refrigerator Orange glow in the freezer Door bins do not fit in the door Freezer light does not work Controls do not have a freezer light. •...from dispenser Water is released. Normal when refrigerator is clogged. Normal air flow cooling motor. Some models do not have a freezer light. In the refrigeration process, it locks into refrigerator when doors are a different size than the refrigerator door bins. If water does not dispense...


