Installation Instructions
Page 2
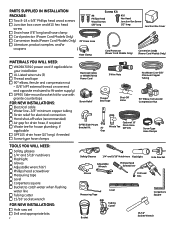
...cover and #10 hex head screw ■ Drain hose (78" long) and hose clamp ■ Cord protector (Power Cord Models Only) ■ Conversion leads (Power Cord Models Only) ■ Literature, product samples, and/or coupons Screw Kit #8 Phillips Head Wood Screws 5/8" long #10 Hex Head... Screw 1��/�2" long Junction Box Cover 78" Drain Hose Drain Hose Hose Clamp Cord Protector (Power Cord Models Only) Conversion Leads (Power Cord Models Only) MATERIALS YOU WILL NEED: Conversion Leads ■ WX09X70910 power cord if applicable to your installation ■ UL ...
...cover and #10 hex head screw ■ Drain hose (78" long) and hose clamp ■ Cord protector (Power Cord Models Only) ■ Conversion leads (Power Cord Models Only) ■ Literature, product samples, and/or coupons Screw Kit #8 Phillips Head Wood Screws 5/8" long #10 Hex Head... Screw 1��/�2" long Junction Box Cover 78" Drain Hose Drain Hose Hose Clamp Cord Protector (Power Cord Models Only) Conversion Leads (Power Cord Models Only) MATERIALS YOU WILL NEED: Conversion Leads ■ WX09X70910 power cord if applicable to your installation ■ UL ...
Installation Instructions
Page 5
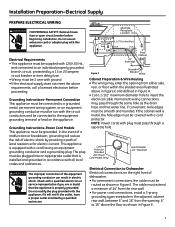
...may enter the opening , 6" to insert the electrical cable. The cable must be supplied with 120V, 60 Hz., a#n28d2cForennnchected to Dishwasher Electrical connection is installed and grounded in Figure E. Hole (Max.) 24" from Wall 3" from either side, rear, or floor .... Metal Cabinet Wall Cord Protector (Provided with this appliance. Do not use an extension cord or adapter plug with Power Cord Models Only) Hole Diameter 1-1/2" Maximum Electrical Connection to an individual properly grounded branch circuit, protected by a qualified technician. 18" Receptacle...
...may enter the opening , 6" to insert the electrical cable. The cable must be supplied with 120V, 60 Hz., a#n28d2cForennnchected to Dishwasher Electrical connection is installed and grounded in Figure E. Hole (Max.) 24" from Wall 3" from either side, rear, or floor .... Metal Cabinet Wall Cord Protector (Provided with this appliance. Do not use an extension cord or adapter plug with Power Cord Models Only) Hole Diameter 1-1/2" Maximum Electrical Connection to an individual properly grounded branch circuit, protected by a qualified technician. 18" Receptacle...
Installation Instructions
Page 7
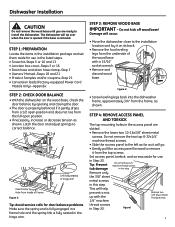
...and 21 • Product Samples and/or coupons-Step 21 • Conversion leads (Factory-equipped Power Cord Models Only) -Appendix STEP 2: CHECK DOOR BALANCE • With the dishwasher on its back. • Remove the four leveling legs from the top screws. Damage will help prevent a...tub damage Remove only the 3/8" sheet metal screws in this step Slide panepl tuolltfhoerwleaftrdantodrtehmenovgeently Toekick This will occur. • Move the dishwasher close to the installation location and lay it from the underside of Frame Figure G Tip: Avoid service calls for use in the...
...and 21 • Product Samples and/or coupons-Step 21 • Conversion leads (Factory-equipped Power Cord Models Only) -Appendix STEP 2: CHECK DOOR BALANCE • With the dishwasher on its back. • Remove the four leveling legs from the top screws. Damage will help prevent a...tub damage Remove only the 3/8" sheet metal screws in this step Slide panepl tuolltfhoerwleaftrdantodrtehmenovgeently Toekick This will occur. • Move the dishwasher close to the installation location and lay it from the underside of Frame Figure G Tip: Avoid service calls for use in the...
Installation Instructions
Page 14
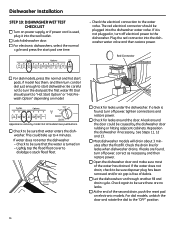
... and make sure most of debris. ■ Let the dishwasher run through another fill and drain cycle. Cycles Pots Heavy Normal Hot Hi-Temp Heated Reset & Pans Wash Wash Start Wash Dry Cycle on model. Check to start dishwasher. Flood Float Cover ■ Check for leaks when dishwasher drains. A leak around the door. See Steps 11, 12 and 13...
... and make sure most of debris. ■ Let the dishwasher run through another fill and drain cycle. Cycles Pots Heavy Normal Hot Hi-Temp Heated Reset & Pans Wash Wash Start Wash Dry Cycle on model. Check to start dishwasher. Flood Float Cover ■ Check for leaks when dishwasher drains. A leak around the door. See Steps 11, 12 and 13...
Use and Care Manual / Warranty
Page 1
... Care and Cleaning 12 Control Panels 6 Control Settings 4-5 Dial Cycles 7 Flashing Display Lights 8 Loading the Dishwasher Racks 10 Loading Place Settings 11 Optional Accessories 12 Using the Dishwasher 8, 9 Troubleshooting Tips . . . 13, 14 Consumer Support... Consumer Support . . . . . Back Cover Warranty 15 Owner's Manual ADW1000 Series GHDA300 Series GSD1000 Series GSD2000 Series GSD3000 Series GSD4000 Series GSM2000 Series HDA1000 Series HDA2000 Series HDA3000 Series Write the model and serial numbers here: Model...
... Care and Cleaning 12 Control Panels 6 Control Settings 4-5 Dial Cycles 7 Flashing Display Lights 8 Loading the Dishwasher Racks 10 Loading Place Settings 11 Optional Accessories 12 Using the Dishwasher 8, 9 Troubleshooting Tips . . . 13, 14 Consumer Support... Consumer Support . . . . . Back Cover Warranty 15 Owner's Manual ADW1000 Series GHDA300 Series GSD1000 Series GSD2000 Series GSD3000 Series GSD4000 Series GSM2000 Series HDA1000 Series HDA2000 Series HDA3000 Series Write the model and serial numbers here: Model...
Use and Care Manual / Warranty
Page 4
... temperature in all pads become inoperative. Option may be turned ON or OFF during the wash cycle. (on some models. LOCK (electronic models only) When the LOCK pad is saved. Children cannot accidentally start dishwasher cycle. DELAY HOURS Delays the start of a wash cycle for fast drying. Do not touch START/RESET more than one time to start...
... temperature in all pads become inoperative. Option may be turned ON or OFF during the wash cycle. (on some models. LOCK (electronic models only) When the LOCK pad is saved. Children cannot accidentally start dishwasher cycle. DELAY HOURS Delays the start of a wash cycle for fast drying. Do not touch START/RESET more than one time to start...
Use and Care Manual / Warranty
Page 5
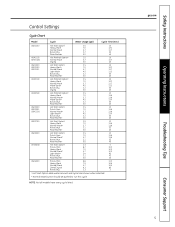
... Troubleshooting Tips Consumer Support 5 NOTE: Not all models have every cycle listed. Safety Instructions Operating Instructions Control Settings Cycle Chart Model Cycle Water Usage (gal.) Cycle Time (min.) GSD1100 Hot Start Option1 2.5 10 Heavy Wash 7.0 120 Normal Wash 5.7 117 Rinse Only 2.2 53 Plate Warmer 0.0 40 HDA1100 Hot PreWash Option1 2.5 10 ADW1100 Normal Wash 5.7 117 Drying 0.0 40 GSD1300 Hot Start...
... Troubleshooting Tips Consumer Support 5 NOTE: Not all models have every cycle listed. Safety Instructions Operating Instructions Control Settings Cycle Chart Model Cycle Water Usage (gal.) Cycle Time (min.) GSD1100 Hot Start Option1 2.5 10 Heavy Wash 7.0 120 Normal Wash 5.7 117 Rinse Only 2.2 53 Plate Warmer 0.0 40 HDA1100 Hot PreWash Option1 2.5 10 ADW1100 Normal Wash 5.7 117 Drying 0.0 40 GSD1300 Hot Start...
Use and Care Manual / Warranty
Page 6
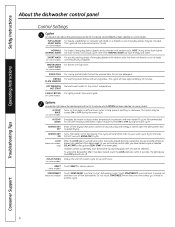
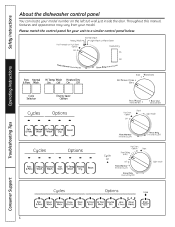
Please match the control panel for your model. Throughout this manual, features and appearance may vary from your unit to a similar control panel below. 6 Troubleshooting Tips Consumer Support Safety Instructions Operating Instructions About the dishwasher control panel You can locate your model number on the left tub wall just inside the door.
Please match the control panel for your model. Throughout this manual, features and appearance may vary from your unit to a similar control panel below. 6 Troubleshooting Tips Consumer Support Safety Instructions Operating Instructions About the dishwasher control panel You can locate your model number on the left tub wall just inside the door.
Use and Care Manual / Warranty
Page 7
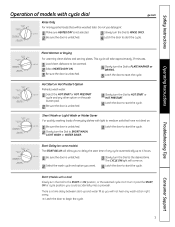
...turn the Dial to HOT START or HOT PRESTART. 4 Latch the door to start the cycle. Don't turn the Dial to the desired time. Start (Models with light to medium soils that will not hear any wash action right away. There is a time delay between start-up to 6 hours. 1 Be... Slowly turn the Dial to the START or ON position, or the selected cycle. The CYCLE ON light will take approximately 39 minutes. 1 Load clean dishware to be washed later. Safety Instructions Operating Instructions Operation of models with cycle dial ge.com Rinse Only For rinsing partial loads that have not dried on....
...turn the Dial to HOT START or HOT PRESTART. 4 Latch the door to start the cycle. Don't turn the Dial to the desired time. Start (Models with light to medium soils that will not hear any wash action right away. There is a time delay between start-up to 6 hours. 1 Be... Slowly turn the Dial to the START or ON position, or the selected cycle. The CYCLE ON light will take approximately 39 minutes. 1 Load clean dishware to be washed later. Safety Instructions Operating Instructions Operation of models with cycle dial ge.com Rinse Only For rinsing partial loads that have not dried on....
Use and Care Manual / Warranty
Page 8
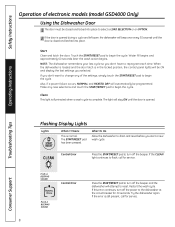
...models (model GSD4000 Only) Using the Dishwasher Door 1 The door must be closed and latched into place to select a LOAD SELECTION or an OPTION. 2 If the door is opened . Operating Instructions Troubleshooting Tips Flashing Display Lights Lights START RESET What It Means This is complete. Restart the wash cycle.... Water fill begins and approximately 60 seconds later the wash action begins. When the dishwasher is loaded and the door latch is in the locked position, the control panel...
...models (model GSD4000 Only) Using the Dishwasher Door 1 The door must be closed and latched into place to select a LOAD SELECTION or an OPTION. 2 If the door is opened . Operating Instructions Troubleshooting Tips Flashing Display Lights Lights START RESET What It Means This is complete. Restart the wash cycle.... Water fill begins and approximately 60 seconds later the wash action begins. When the dishwasher is loaded and the door latch is in the locked position, the control panel...
Use and Care Manual / Warranty
Page 10
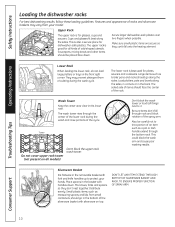
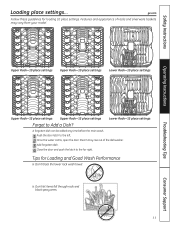
... best used for dishwasher-safe plastics. Make sure small plastic items are secure so they don't nest together. Load platters, pots and bowls along the sides. Do not cover upper rack tower (not present on top. Don't block the wash tower or load tall things next to protect your model. They may vary... items don't fall onto the heating element. Mix knives, forks and spoons so they can't fall through the center of the lower rack during the wash cycle. DON'T LET ANY ITEM EXTEND THROUGH BOTTOM OF SILVERWARE BASKET AND RACK, TO ENSURE PROPER FUNCTION OF SPRAY ARM.
... best used for dishwasher-safe plastics. Make sure small plastic items are secure so they don't nest together. Load platters, pots and bowls along the sides. Do not cover upper rack tower (not present on top. Don't block the wash tower or load tall things next to protect your model. They may vary... items don't fall onto the heating element. Mix knives, forks and spoons so they can't fall through the center of the lower rack during the wash cycle. DON'T LET ANY ITEM EXTEND THROUGH BOTTOM OF SILVERWARE BASKET AND RACK, TO ENSURE PROPER FUNCTION OF SPRAY ARM.
Use and Care Manual / Warranty
Page 11
...settings Forget to the left. 2 Once the water calms, open the door. I Don't block the lower rack wash tower. A forgotten dish can be added any time before the main wash. 1 Push the door latch to Add a Dish? Tips for loading 10 place settings. ge.com Follow these guidelines... for Loading and Good Wash Performance I Don't let items fall through rack and block spray arms. 11 Consumer Support Steam may rise out of racks and silverware baskets may vary from your model. Features and appearance of the dishwasher. 3 Add forgotten dish. 4 Close the door...
...settings Forget to the left. 2 Once the water calms, open the door. I Don't block the lower rack wash tower. A forgotten dish can be added any time before the main wash. 1 Push the door latch to Add a Dish? Tips for loading 10 place settings. ge.com Follow these guidelines... for Loading and Good Wash Performance I Don't let items fall through rack and block spray arms. 11 Consumer Support Steam may rise out of racks and silverware baskets may vary from your model. Features and appearance of the dishwasher. 3 Add forgotten dish. 4 Close the door...
Use and Care Manual / Warranty
Page 12
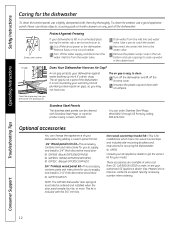
...Check the air gap any part of the dishwasher. This kit is not covered by your model. Call 800.626.2002 to order, or see your dishwasher by calling 800.626.2002. Specify accessory number when ordering. Never use a sponge to the dishwasher. Sump cover screws Protect Against Freezing If ...your dishwasher is for installations which have one. ...
...Check the air gap any part of the dishwasher. This kit is not covered by your model. Call 800.626.2002 to order, or see your dishwasher by calling 800.626.2002. Specify accessory number when ordering. Never use a sponge to the dishwasher. Sump cover screws Protect Against Freezing If ...your dishwasher is for installations which have one. ...
Use and Care Manual / Warranty
Page 13
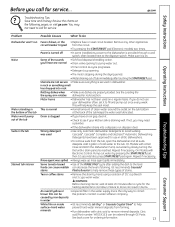
... to help remove these types of staining. On Models with citric acid to fill and pump out once every week. Some tomato-based • Use of the RINSE ONLY cycle after touching the START/RESET pad. minerals • Run dishwasher with Electronic Control: Pump out water by slowly turning...help keep the seal moist. you have been approved for ordering information. 13 Consumer Support Drain is draining well. On Models with a Dial: Close and latch the dishwasher. Make sure it to remove mineral deposits. See back cover for use your kitchen sink is clogged • If...
... to help remove these types of staining. On Models with citric acid to fill and pump out once every week. Some tomato-based • Use of the RINSE ONLY cycle after touching the START/RESET pad. minerals • Run dishwasher with Electronic Control: Pump out water by slowly turning...help keep the seal moist. you have been approved for ordering information. 13 Consumer Support Drain is draining well. On Models with a Dial: Close and latch the dishwasher. Make sure it to remove mineral deposits. See back cover for use your kitchen sink is clogged • If...
Use and Care Manual / Warranty
Page 15
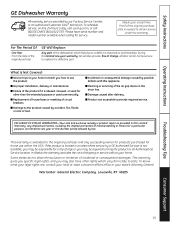
...accessible to obtain service under the warranty. This warranty gives you specific legal rights, and you may also have serial number and model number available when calling for other rights which fails due to your receipt here. To know what your legal rights are limited to... state. Louisville, KY 40225 Troubleshooting Tips Consumer Support 15 Safety Instructions Operating Instructions GE Dishwasher Warranty All warranty service provided by possible defects with this Limited Warranty. To schedule service, on-line, 24 hours a day, visit...
...accessible to obtain service under the warranty. This warranty gives you specific legal rights, and you may also have serial number and model number available when calling for other rights which fails due to your receipt here. To know what your legal rights are limited to... state. Louisville, KY 40225 Troubleshooting Tips Consumer Support 15 Safety Instructions Operating Instructions GE Dishwasher Warranty All warranty service provided by possible defects with this Limited Warranty. To schedule service, on-line, 24 hours a day, visit...

