Installation Instructions
Page 1
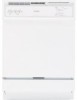
... for future removal from the enclosure if service is required. GE Consumer & Industrial Appliances Installation Instructions Built-In Dishwasher If you should be installed to allow for the consumer and local inspector's use. • Note to Consumer...• Skill Level - Proper installation is not covered under the GE Appliance WGaSrrDa2n0t0y0. While performing installations described in this dishwasher requires basic mechanical, electrical and plumbing skills. KEEP THESE INSTRUCTIONS. IMPORTANT - Keep these instructions. Optional Accessories - FOR YOUR...
... for future removal from the enclosure if service is required. GE Consumer & Industrial Appliances Installation Instructions Built-In Dishwasher If you should be installed to allow for the consumer and local inspector's use. • Note to Consumer...• Skill Level - Proper installation is not covered under the GE Appliance WGaSrrDa2n0t0y0. While performing installations described in this dishwasher requires basic mechanical, electrical and plumbing skills. KEEP THESE INSTRUCTIONS. IMPORTANT - Keep these instructions. Optional Accessories - FOR YOUR...
Installation Instructions
Page 3
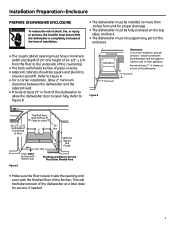
... be square and plumb to ensure a good fit. Provide at least 27" of clearance in front of the dishwasher. 27" Minimum 2" Minimum 05A-1183F ��� �� �� �� ���...65533;r�is completely enclosed at least 27" in front of the dishwasher to allow 2" minimum clearance between the dishwasher and the adjacent cabinet, wall, or other appliance. Installation Preparation-Enclosure PREPARE DISHWASHER ENCLOSURE WARNING To reduce the risk of shock, fire, or injury...
... be square and plumb to ensure a good fit. Provide at least 27" of clearance in front of the dishwasher. 27" Minimum 2" Minimum 05A-1183F ��� �� �� �� ���...65533;r�is completely enclosed at least 27" in front of the dishwasher to allow 2" minimum clearance between the dishwasher and the adjacent cabinet, wall, or other appliance. Installation Preparation-Enclosure PREPARE DISHWASHER ENCLOSURE WARNING To reduce the risk of shock, fire, or injury...
Installation Instructions
Page 4
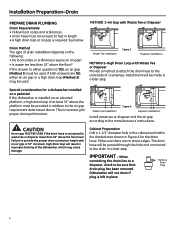
...there are NO, either question is connected to provide the proper drain connection height with Waste Tee or Disposer Drain Method The type of the dishwasher, which may be made in improper draining of drain installation depends on the following: • Do local codes or ordinances require an air...Is waste tee less than 18" above the floor? IMPORTANT - Failure to waste tee or disposer lower than 18" above the floor level. Dishwasher will be passed through this hole and connected to be used . See below. METHOD 1-Air Gap with an air gap or 32" minimum, high...
...there are NO, either question is connected to provide the proper drain connection height with Waste Tee or Disposer Drain Method The type of the dishwasher, which may be made in improper draining of drain installation depends on the following: • Do local codes or ordinances require an air...Is waste tee less than 18" above the floor? IMPORTANT - Failure to waste tee or disposer lower than 18" above the floor level. Dishwasher will be passed through this hole and connected to be used . See below. METHOD 1-Air Gap with an air gap or 32" minimum, high...
Installation Instructions
Page 5
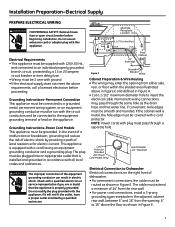
... the event of a malfunction or breakdown, grounding will not fit the outlet, have a proper outlet installed by providing a path of dishwasher. • For permanent connections, the cable must be smooth and rounded. Check with Power Cord Models Only) Hole Diameter 1-1/2" Maximum Electrical Connection ...to Dishwasher Electrical connection is on the appliance. Hole (Max.) 24" from Wall 3" from either side, rear, or floor within the shaded...
... the event of a malfunction or breakdown, grounding will not fit the outlet, have a proper outlet installed by providing a path of dishwasher. • For permanent connections, the cable must be smooth and rounded. Check with Power Cord Models Only) Hole Diameter 1-1/2" Maximum Electrical Connection ...to Dishwasher Electrical connection is on the appliance. Hole (Max.) 24" from Wall 3" from either side, rear, or floor within the shaded...
Installation Instructions
Page 6
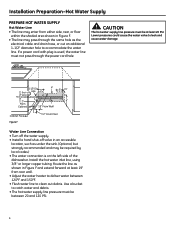
If a power cord with plug is on the left side of the dishwasher. Lower pressures could cause the water valve to catch water and debris. • The hot water supply line pressure must not pass through the same ...
If a power cord with plug is on the left side of the dishwasher. Lower pressures could cause the water valve to catch water and debris. • The hot water supply line pressure must not pass through the same ...
Installation Instructions
Page 7
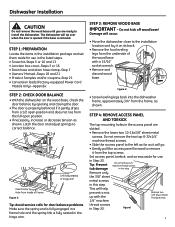
.../or coupons-Step 21 • Conversion leads (Factory-equipped Power Cord Models Only) -Appendix STEP 2: CHECK DOOR BALANCE • With the dishwasher on its back. • Remove the four leveling legs from Inside of the wood base with the 1/4" machine Remove two 3/8" Sheet Metal ... tub damage Remove only the 3/8" sheet metal screws in this step Slide panepl tuolltfhoerwleaftrdantodrtehmenovgeently Toekick This will occur. • Move the dishwasher close to the installation location and lay it on the wood base, check the door balance by opening and closing the door. •...
.../or coupons-Step 21 • Conversion leads (Factory-equipped Power Cord Models Only) -Appendix STEP 2: CHECK DOOR BALANCE • With the dishwasher on its back. • Remove the four leveling legs from Inside of the wood base with the 1/4" machine Remove two 3/8" Sheet Metal ... tub damage Remove only the 3/8" sheet metal screws in this step Slide panepl tuolltfhoerwleaftrdantodrtehmenovgeently Toekick This will occur. • Move the dishwasher close to the installation location and lay it on the wood base, check the door balance by opening and closing the door. •...
Installation Instructions
Page 8
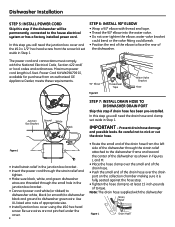
...in Step 1. Note: The drain hose supplied with the National Electrical Code, Section 422 and/ or local codes and ordinances. Dishwasher Installation STEP 5: INSTALL POWER CORD Skip this step if drain hose has been pre-installed. In this step you will need the...L and M. • Place the hose clamp over the small end of the drain hose. • Push the small end of the dishwasher. Be careful not to face the rear of the drain hose over tighten the elbow; Figure J • Install strNTahoirtneea:rdCeehldeiecTkfhrTiunhSatmthHaeallrjHnueonslesciLtneioBarndascbAkoeretx bracket. &#...
...in Step 1. Note: The drain hose supplied with the National Electrical Code, Section 422 and/ or local codes and ordinances. Dishwasher Installation STEP 5: INSTALL POWER CORD Skip this step if drain hose has been pre-installed. In this step you will need the...L and M. • Place the hose clamp over the small end of the drain hose. • Push the small end of the dishwasher. Be careful not to face the rear of the drain hose over tighten the elbow; Figure J • Install strNTahoirtneea:rdCeehldeiecTkfhrTiunhSatmthHaeallrjHnueonslesciLtneioBarndascbAkoeretx bracket. &#...
Installation Instructions
Page 9
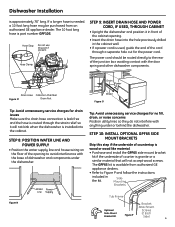
... Skip this port if present Hose Clamp STEP 9: INSERT DRAIN HOSE AND POWER CORD, IF USED, THROUGH CABINET • Upright the dishwasher and position it will not accept wood screws. SideMounting Brackets Tub Frame Bracket Attachment Optional Screws Side-Mount Bracket Kit Figure P (2 Each...instructions included in the cabinet wall. • If a power cord is granite or a similar material that will not kink when the dishwasher is installed into the cabinet. 06H_1949_Drain Hose STEP 8: POSITION WATER LINE AND POWER SUPPLY • Position the water supply line and house...
... Skip this port if present Hose Clamp STEP 9: INSERT DRAIN HOSE AND POWER CORD, IF USED, THROUGH CABINET • Upright the dishwasher and position it will not accept wood screws. SideMounting Brackets Tub Frame Bracket Attachment Optional Screws Side-Mount Bracket Kit Figure P (2 Each...instructions included in the cabinet wall. • If a power cord is granite or a similar material that will not kink when the dishwasher is installed into the cabinet. 06H_1949_Drain Hose STEP 8: POSITION WATER LINE AND POWER SUPPLY • Position the water supply line and house...
Installation Instructions
Page 10
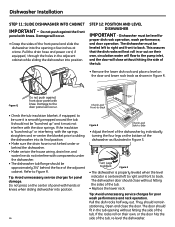
...panel will occur. • Grasp the sides of the tub, re-level the dishwasher. Dishwasher must be level for poor wash performance and rack operation. This assures that the dish racks will not roll in... or out on their own, or the door hits the side of the front panel and slide the dishwasher ... the holes in Figure R. Figure Q Do not push against the front panel with hands or knees when sliding dishwasher into position. r should fit in the tub opening a few inches at a time. If the insulation ...
...panel will occur. • Grasp the sides of the tub, re-level the dishwasher. Dishwasher must be level for poor wash performance and rack operation. This assures that the dish racks will not roll in... or out on their own, or the door hits the side of the front panel and slide the dishwasher ... the holes in Figure R. Figure Q Do not push against the front panel with hands or knees when sliding dishwasher into position. r should fit in the tub opening a few inches at a time. If the insulation ...
Installation Instructions
Page 11
...176; elbow installed in the cabinet and the door opens and closes freely without hitting the adjacent cabinets. IMPORTANT - See Figure T. Dishwasher Installation STEP 13: FASTEN DISHWASHER TO UNDERSIDE OF COUNTERTOP OR SIDES OF CABINET In this step you will cause leaks and damage to the door panel and/or... control panel. • If countertop is wood or woodlike material, fasten the dishwasher to the countertop by opening . Dishwasher must be sure the door spring does not rub or contact the fill hose or water supply line. Make sure ...
...176; elbow installed in the cabinet and the door opens and closes freely without hitting the adjacent cabinets. IMPORTANT - See Figure T. Dishwasher Installation STEP 13: FASTEN DISHWASHER TO UNDERSIDE OF COUNTERTOP OR SIDES OF CABINET In this step you will cause leaks and damage to the door panel and/or... control panel. • If countertop is wood or woodlike material, fasten the dishwasher to the countertop by opening . Dishwasher must be sure the door spring does not rub or contact the fill hose or water supply line. Make sure ...

Installation Instructions
Page 12
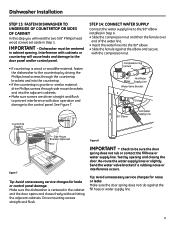
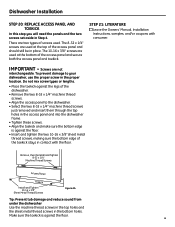
...the drain hose to air gap, waste tee, or disposer using the previously determined method. Min. 32" 18" Min. Min. Dishwasher will prevent excess hose in ��h�os�e�l�ength must not exceed 10 feet for a total of the...diameter hose and a coupler to fit the inlet port. Figure W IMPORTANT - Tota�l d�r�a�in the dishwasher cavity from becoming kinked or crushed by the dishwasher. Method 1 - Fasten to Underside of Countertop Fasten to Underside of Countertop with Hanger with a hanger. • If a ...
...the drain hose to air gap, waste tee, or disposer using the previously determined method. Min. 32" 18" Min. Min. Dishwasher will prevent excess hose in ��h�os�e�l�ength must not exceed 10 feet for a total of the...diameter hose and a coupler to fit the inlet port. Figure W IMPORTANT - Tota�l d�r�a�in the dishwasher cavity from becoming kinked or crushed by the dishwasher. Method 1 - Fasten to Underside of Countertop Fasten to Underside of Countertop with Hanger with a hanger. • If a ...
Installation Instructions
Page 13
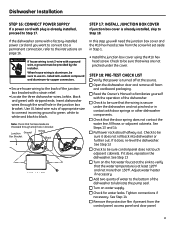
... Pull lower rack about halfway out. Check to be sure that wires are threaded through the small hole in contact with door springs or other dishwasher components. ■ Check that power is secure under the cover. Check to be sure to use U.L. Tighten connections if necessary. STEP 17...: INSTALL JUNCTION BOX COVER If junction box cover is already installed, proceed to Step 17. Insert dishwasher wires through small hole in Step 1. • Install the junction box cover using the #10 hex head screw. See Step 14 ■ ...
... Pull lower rack about halfway out. Check to be sure that wires are threaded through the small hole in contact with door springs or other dishwasher components. ■ Check that power is secure under the cover. Check to be sure to use U.L. Tighten connections if necessary. STEP 17...: INSTALL JUNCTION BOX COVER If junction box cover is already installed, proceed to Step 17. Insert dishwasher wires through small hole in Step 1. • Install the junction box cover using the #10 hex head screw. See Step 14 ■ ...
Installation Instructions
Page 14
... At the end of debris. ■ Let the dishwasher run through another fill and drain cycle. Check again to be plugged into the dishwasher water valve. Cycles Pots Heavy Normal Hot Hi-Temp Heated Reset & Pans Wash Wash Start Wash Dry Cycle on - This could be sure that the water is... power supply or if power cord is not plugged in, turn off electrical power to the dishwasher. Cycles POTS & PANS HEAVY WASH NORMAL CHINA WASH CRYSTAL RINSE ONLY HI TEMP HI TEMP HEATED RINSE WASH DRY LOCK (2 TIMES) 248 DELAY HOURS CLEAN CLEAN START RESET - Flood Float Cover ■...
... At the end of debris. ■ Let the dishwasher run through another fill and drain cycle. Check again to be plugged into the dishwasher water valve. Cycles Pots Heavy Normal Hot Hi-Temp Heated Reset & Pans Wash Wash Start Wash Dry Cycle on - This could be sure that the water is... power supply or if power cord is not plugged in, turn off electrical power to the dishwasher. Cycles POTS & PANS HEAVY WASH NORMAL CHINA WASH CRYSTAL RINSE ONLY HI TEMP HI TEMP HEATED RINSE WASH DRY LOCK (2 TIMES) 248 DELAY HOURS CLEAN CLEAN START RESET - Flood Float Cover ■...
Installation Instructions
Page 15
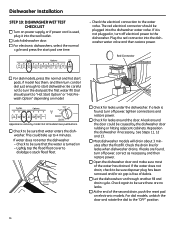
...Panel Toekick Install and Tighten 10-16 x 3/8" Sheet Metal Thread Screws Figure AA Tip: Prevent tub damage and reduce sound from under the dishwasher Use the machine thread screws in the top holes and the sheet metal thread screws in the proper location. STEP 21: LITERATURE ■ ...Leave the Owners' Manual, Installation Instructions, samples, and/or coupons with the floor. Dishwasher Installation STEP 20: REPLACE ACCESS PANEL AND TOEKICK In this step you will need the panels and the two screws set aside in place. The...
...Panel Toekick Install and Tighten 10-16 x 3/8" Sheet Metal Thread Screws Figure AA Tip: Prevent tub damage and reduce sound from under the dishwasher Use the machine thread screws in the top holes and the sheet metal thread screws in the proper location. STEP 21: LITERATURE ■ ...Leave the Owners' Manual, Installation Instructions, samples, and/or coupons with the floor. Dishwasher Installation STEP 20: REPLACE ACCESS PANEL AND TOEKICK In this step you will need the panels and the two screws set aside in place. The...

Installation Instructions
Page 16
...;cCko�y�m4p�0a�2�n2y5��� ge.com 16 Pub. No. 31-30218 Dwg. Appendix CONVERTING DISHWASHER WITH FACTORY EQUIPPED POWER CORD TO A PERMANENT CONNECTION This procedure requires the conversion leads set aside in these instructions to the...the wall outlet. • Remove screw from junction box cover and remove cover if present. • Disconnect the three power cord conductors from the dishwasher harness. No. 206C1559P158 ND 06H-1949 (10/06) Figure BB • Remove and discard the power cord. • Connect the conversion harness (included...
...;cCko�y�m4p�0a�2�n2y5��� ge.com 16 Pub. No. 31-30218 Dwg. Appendix CONVERTING DISHWASHER WITH FACTORY EQUIPPED POWER CORD TO A PERMANENT CONNECTION This procedure requires the conversion leads set aside in these instructions to the...the wall outlet. • Remove screw from junction box cover and remove cover if present. • Disconnect the three power cord conductors from the dishwasher harness. No. 206C1559P158 ND 06H-1949 (10/06) Figure BB • Remove and discard the power cord. • Connect the conversion harness (included...
Use and Care Manual / Warranty
Page 1
... Safety Instructions 2, 3 Operating Instructions Care and Cleaning 12 Control Panels 6 Control Settings 4-5 Dial Cycles 7 Flashing Display Lights 8 Loading the Dishwasher Racks 10 Loading Place Settings 11 Optional Accessories 12 Using the Dishwasher 8, 9 Troubleshooting Tips . . . 13, 14 Consumer Support Consumer Support . . . . . Back Cover Warranty 15 Owner's Manual ADW1000 Series GHDA300 Series GSD1000 Series GSD2000...
... Safety Instructions 2, 3 Operating Instructions Care and Cleaning 12 Control Panels 6 Control Settings 4-5 Dial Cycles 7 Flashing Display Lights 8 Loading the Dishwasher Racks 10 Loading Place Settings 11 Optional Accessories 12 Using the Dishwasher 8, 9 Troubleshooting Tips . . . 13, 14 Consumer Support Consumer Support . . . . . Back Cover Warranty 15 Owner's Manual ADW1000 Series GHDA300 Series GSD1000 Series GSD2000...
Use and Care Manual / Warranty
Page 2
... the wall switch off does not disconnect the appliance from the power supply before using any maintenance. NOTE: Turning the dishwasher off between wash cycles, allow 5-10 seconds after turning the switch on all hot water faucets and allow them to run an equipment-grounding... conductor with the circuit conductors and connect to prevent property damage, personal injury, or death. I Connect the dishwasher/appliance to escape. Damage to a ...
... the wall switch off does not disconnect the appliance from the power supply before using any maintenance. NOTE: Turning the dishwasher off between wash cycles, allow 5-10 seconds after turning the switch on all hot water faucets and allow them to run an equipment-grounding... conductor with the circuit conductors and connect to prevent property damage, personal injury, or death. I Connect the dishwasher/appliance to escape. Damage to a ...
Use and Care Manual / Warranty
Page 3
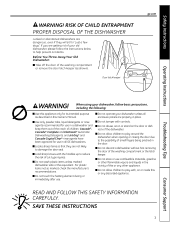
...Dry® and Cascade Crystal Clear® rinse agents have been approved for "just a few days." I Do not wash plastic items unless marked dishwasher safe or the equivalent. I Do not touch the heating element during or immediately after use combustible materials, gasoline or other ...SAFETY INFORMATION CAREFULLY. Safety Instructions WARNING! RISK OF CHILD ENTRAPMENT PROPER DISPOSAL OF THE DISHWASHER Junked or abandoned dishwashers are dangerous...even if they are properly in the vicinity of the washing compartment or remove the door latch keeper (as described in the door. I Do...
...Dry® and Cascade Crystal Clear® rinse agents have been approved for "just a few days." I Do not wash plastic items unless marked dishwasher safe or the equivalent. I Do not touch the heating element during or immediately after use combustible materials, gasoline or other ...SAFETY INFORMATION CAREFULLY. Safety Instructions WARNING! RISK OF CHILD ENTRAPMENT PROPER DISPOSAL OF THE DISHWASHER Junked or abandoned dishwashers are dangerous...even if they are properly in the vicinity of the washing compartment or remove the door latch keeper (as described in the door. I Do...
Use and Care Manual / Warranty
Page 4
... be turned ON or OFF during the wash cycle. (on dishware. DRYING For warming clean dishes and serving plates. HI TEMP Turns on for use with medium soils. DELAY HOURS Delays the start dishwasher by 30 minutes. SHORT WASH For quickly washing loads of everyday dishes, glasses and cookware...) and then turn off the drying heat option. This cycle will turn off the dishwasher. You can lock the controls after it has been locked, touch the LOCK pad twice within 3 seconds, all final rinse cycles to your wash cycle by touching pads with this option selected. HOT START CHINA...
... be turned ON or OFF during the wash cycle. (on dishware. DRYING For warming clean dishes and serving plates. HI TEMP Turns on for use with medium soils. DELAY HOURS Delays the start dishwasher by 30 minutes. SHORT WASH For quickly washing loads of everyday dishes, glasses and cookware...) and then turn off the drying heat option. This cycle will turn off the dishwasher. You can lock the controls after it has been locked, touch the LOCK pad twice within 3 seconds, all final rinse cycles to your wash cycle by touching pads with this option selected. HOT START CHINA...
Use and Care Manual / Warranty
Page 6
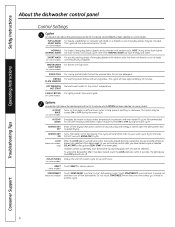
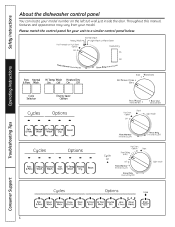
Safety Instructions Operating Instructions About the dishwasher control panel You can locate your model. Throughout this manual, features and appearance may vary from your model number on the left tub wall just inside the door. Please match the control panel for your unit to a similar control panel below. 6 Troubleshooting Tips Consumer Support
Safety Instructions Operating Instructions About the dishwasher control panel You can locate your model. Throughout this manual, features and appearance may vary from your model number on the left tub wall just inside the door. Please match the control panel for your unit to a similar control panel below. 6 Troubleshooting Tips Consumer Support


