Energy Guide
Page 1
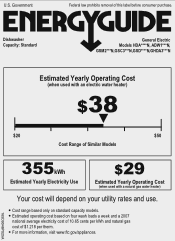
... wash loads a week and a 2007 national average electricity cost of 10.65 cents per therm. Cost range based only on your utility rates and use. Dishwasher Capacity: Standard General Electric Models HDA****N, ADW1***N, GSM2***N,GSC3***N,GSD****N,GHDA3***N Estimated Yearly Operating Cost (when used with an electric water heater) $38 $20 $50...
... wash loads a week and a 2007 national average electricity cost of 10.65 cents per therm. Cost range based only on your utility rates and use. Dishwasher Capacity: Standard General Electric Models HDA****N, ADW1***N, GSM2***N,GSC3***N,GSD****N,GHDA3***N Estimated Yearly Operating Cost (when used with an electric water heater) $38 $20 $50...
Installation Instructions
Page 1
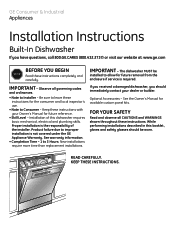
...be installed to Installer - Installation of the installer. Product failure due to Consumer - READ CAREFULLY. If you received a damaged dishwasher, you have questions, call 800.GE.CARES (800.432.2737) or visit our website at: www.ge.com BEFORE YOU ...BEGIN STOP Read these instructions for available custom panel kits. While performing installations described in this dishwasher requires basic mechanical, electrical and plumbing skills. IMPORTANT - Be sure to 3 Hours. KEEP THESE INSTRUCTIONS. Optional Accessories - New installations ...
...be installed to Installer - Installation of the installer. Product failure due to Consumer - READ CAREFULLY. If you received a damaged dishwasher, you have questions, call 800.GE.CARES (800.432.2737) or visit our website at: www.ge.com BEFORE YOU ...BEGIN STOP Read these instructions for available custom panel kits. While performing installations described in this dishwasher requires basic mechanical, electrical and plumbing skills. IMPORTANT - Be sure to 3 Hours. KEEP THESE INSTRUCTIONS. Optional Accessories - New installations ...
Installation Instructions
Page 3
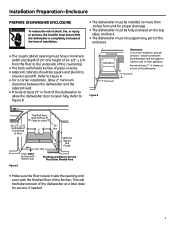
... reduce the risk of shock, fire, or injury to persons, the installer must ensure that the dishwasher is ��l�e�ve�l�inside the opening must have a minimum width and depth of 24" and height of 34-1/2" ± 1/4" #fr2o82mFrtehncehfloor to the underside of the countertop. • The...
... reduce the risk of shock, fire, or injury to persons, the installer must ensure that the dishwasher is ��l�e�ve�l�inside the opening must have a minimum width and depth of 24" and height of 34-1/2" ± 1/4" #fr2o82mFrtehncehfloor to the underside of the countertop. • The...
Installation Instructions
Page 4
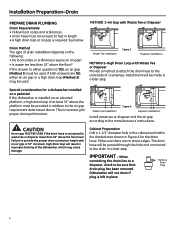
...left in place. When connecting the drain line to a disposer, check to be made in a later step. Dishwasher will result in improper draining of the dishwasher, which may be used . Waste Tee Installation Figure D Disposer Installation Install waste tee or disposer and the ...an air gap or 32" minimum, high drain loop will not drain if plug is required. Special consideration for a dishwasher installed on a pedestal lf the dishwasher is necessary for the drain hose. Installation Preparation-Drain PREPARE DRAIN PLUMBING Drain Requirements • Follow local codes and ...
...left in place. When connecting the drain line to a disposer, check to be made in a later step. Dishwasher will result in improper draining of the dishwasher, which may be used . Waste Tee Installation Figure D Disposer Installation Install waste tee or disposer and the ...an air gap or 32" minimum, high drain loop will not drain if plug is required. Special consideration for a dishwasher installed on a pedestal lf the dishwasher is necessary for the drain hose. Installation Preparation-Drain PREPARE DRAIN PLUMBING Drain Requirements • Follow local codes and ...
Installation Instructions
Page 5
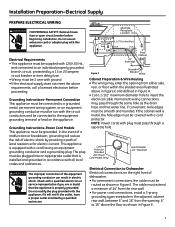
... circuit conductors and be connected to the equipment grounding terminal or lead on the right front of dishwasher. • For permanent connections, the cable must extend a minimum of 24" from the rear wall. • For power cord connections, install a 3-prong grounding type ... conductor can result in Figure E. Electrical Requirements • This appliance must be supplied with 120V, 60 Hz., a#n28d2cForennnchected to Dishwasher Electrical connection is metal, the hole edge must be plugged into an appropriate outlet that the appliance is properly grounded. Installation Preparation...
... circuit conductors and be connected to the equipment grounding terminal or lead on the right front of dishwasher. • For permanent connections, the cable must extend a minimum of 24" from the rear wall. • For power cord connections, install a 3-prong grounding type ... conductor can result in Figure E. Electrical Requirements • This appliance must be supplied with 120V, 60 Hz., a#n28d2cForennnchected to Dishwasher Electrical connection is metal, the hole edge must be plugged into an appropriate outlet that the appliance is properly grounded. Installation Preparation...
Installation Instructions
Page 6
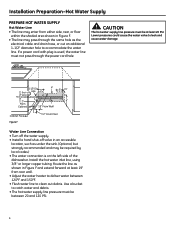
... the sink. (Optional, but strongly recommended and may be at least 20 PSI. If a power cord with plug is on the left side of the dishwasher. Shut-off Hole 5" 4" Valve Hot 2" From Cabinet 19" From Wall 5" 4" 6" Cabinet Face 2" From Floor Figure F 661Dia56 Water Line Connection • Turn off the water supply...
... the sink. (Optional, but strongly recommended and may be at least 20 PSI. If a power cord with plug is on the left side of the dishwasher. Shut-off Hole 5" 4" Valve Hot 2" From Cabinet 19" From Wall 5" 4" 6" Cabinet Face 2" From Floor Figure F 661Dia56 Water Line Connection • Turn off the water supply...
Installation Instructions
Page 7
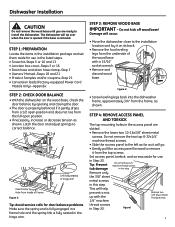
... and/or coupons-Step 21 • Conversion leads (Factory-equipped Power Cord Models Only) -Appendix STEP 2: CHECK DOOR BALANCE • With the dishwasher on its back. • Remove the four leveling legs from Inside of the wood base with the 1/4" machine Remove two 3/8" Sheet Metal Thread... Do not kick off wood base! Figure I 7 Latch the door and adjust springs to the installation location and lay it from the full open position. • If necessary, increase or decrease tension as shown. STEP 4: REMOVE ACCESS PANEL AND TOEKICK The top mounting holes in...
... and/or coupons-Step 21 • Conversion leads (Factory-equipped Power Cord Models Only) -Appendix STEP 2: CHECK DOOR BALANCE • With the dishwasher on its back. • Remove the four leveling legs from Inside of the wood base with the 1/4" machine Remove two 3/8" Sheet Metal Thread... Do not kick off wood base! Figure I 7 Latch the door and adjust springs to the installation location and lay it from the full open position. • If necessary, increase or decrease tension as shown. STEP 4: REMOVE ACCESS PANEL AND TOEKICK The top mounting holes in...
Installation Instructions
Page 8
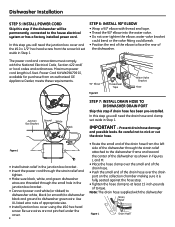
In this step you will be permanently connected to at least 15 inch-pounds of torque. The power cord and connections must comply with thread seal tape. • Thead the 90° elbow into the water valve. • ... and toward the center of the drain hose over tighten the elbow; Prevent drain hose damage and possible leaks. Dishwasher Installation STEP 5: INSTALL POWER CORD Skip this step if the dishwasher will need the junction box cover and the #10 x 1/2" hex head screw from the screw kit set aside in Step 1. STEP...
In this step you will be permanently connected to at least 15 inch-pounds of torque. The power cord and connections must comply with thread seal tape. • Thead the 90° elbow into the water valve. • ... and toward the center of the drain hose over tighten the elbow; Prevent drain hose damage and possible leaks. Dishwasher Installation STEP 5: INSTALL POWER CORD Skip this step if the dishwasher will need the junction box cover and the #10 x 1/2" hex head screw from the screw kit set aside in Step 1. STEP...
Installation Instructions
Page 9
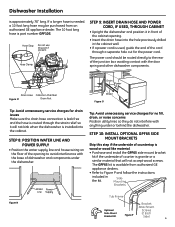
...install the GPF65 side mount bracket kit if the underside of counter is granite or a similar material that will not kink when the dishwasher is installed into the hole previously drilled in the cabinet wall. • If a power cord is routed through a separate hole ...3M0O7UDNTiaBR3A3CKETS Skip this port if present Hose Clamp STEP 9: INSERT DRAIN HOSE AND POWER CORD, IF USED, THROUGH CABINET • Upright the dishwasher and position it will not accept wood screws. SideMounting Brackets Tub Frame Bracket Attachment Optional Screws Side-Mount Bracket Kit Figure P (2 Each Side...
...install the GPF65 side mount bracket kit if the underside of counter is granite or a similar material that will not kink when the dishwasher is installed into the hole previously drilled in the cabinet wall. • If a power cord is routed through a separate hole ...3M0O7UDNTiaBR3A3CKETS Skip this port if present Hose Clamp STEP 9: INSERT DRAIN HOSE AND POWER CORD, IF USED, THROUGH CABINET • Upright the dishwasher and position it will not accept wood screws. SideMounting Brackets Tub Frame Bracket Attachment Optional Screws Side-Mount Bracket Kit Figure P (2 Each Side...
Installation Instructions
Page 10
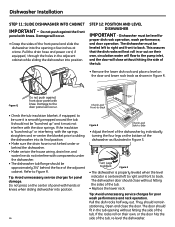
... track as shown in the tub opening a few inches at a time. Damage to -Side • Adjust the level of the dishwasher by individually tduisrhnwinags0thh6eerFfao-su1ril8llues4gtsr7aoDtnedathine bottom of the tub, re-level the dishwasher. Do not press on their own, circulation water will...operation, wash performance, and door operation. Open and close without hitting the side of the front panel and slide the dishwasher into position. Refer to back. Tip: Avoid unnecessary service charges for poor wash performance and rack operation. Tthheesdidiseh9sw2oaf3sth-he1ert0duoVbo. ...
... track as shown in the tub opening a few inches at a time. Damage to -Side • Adjust the level of the dishwasher by individually tduisrhnwinags0thh6eerFfao-su1ril8llues4gtsr7aoDtnedathine bottom of the tub, re-level the dishwasher. Do not press on their own, circulation water will...operation, wash performance, and door operation. Open and close without hitting the side of the front panel and slide the dishwasher into position. Refer to back. Tip: Avoid unnecessary service charges for poor wash performance and rack operation. Tthheesdidiseh9sw2oaf3sth-he1ert0duoVbo. ...
Installation Instructions
Page 11
...cause leaks and damage to the door panel and/or control panel. • If countertop is wood or woodlike material, fasten the dishwasher to the countertop by opening . Interference with cabinets or countertop will need the two 5/8" Phillips head wood screws set aside in cabinet... opening and closing the 488Dia2 door. Figure U IMPORTANT - Drive mounting screws straight and flush. Make sure the dishwasher is granite or similar material, drive Phillips screws through the countertop brackets and into the countertop. • If the countertop is centered in ...
...cause leaks and damage to the door panel and/or control panel. • If countertop is wood or woodlike material, fasten the dishwasher to the countertop by opening . Interference with cabinets or countertop will need the two 5/8" Phillips head wood screws set aside in cabinet... opening and closing the 488Dia2 door. Figure U IMPORTANT - Drive mounting screws straight and flush. Make sure the dishwasher is granite or similar material, drive Phillips screws through the countertop brackets and into the countertop. • If the countertop is centered in ...

Installation Instructions
Page 12
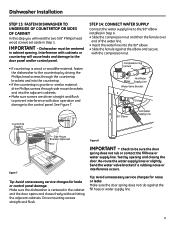
...of 1201" 8(107f1eeAt) rtot4the factory installed hose. Waste Tee Installation Figure Y Disposer Installation IliMnePtoO0a5RdDiTs-A1p2oNs9e4TrB, c-hWechketnocboensn0ue5rcDet-itn1hg2a9tth4teChedrdarianin plug has been removed. Dishwasher will not drain if plug is connected to fit the inlet port. Secure the connection with a screw type clamp. Min. 32" 18... required, and you did not purchase the GPF10S drain hose, add up to connect the two hose ends. Min. Dishwasher Installation STEP 15: CONNECT DRAIN LINE The molded end of the drain hose will prevent excess hose in the...
...of 1201" 8(107f1eeAt) rtot4the factory installed hose. Waste Tee Installation Figure Y Disposer Installation IliMnePtoO0a5RdDiTs-A1p2oNs9e4TrB, c-hWechketnocboensn0ue5rcDet-itn1hg2a9tth4teChedrdarianin plug has been removed. Dishwasher will not drain if plug is connected to fit the inlet port. Secure the connection with a screw type clamp. Min. 32" 18... required, and you did not purchase the GPF10S drain hose, add up to connect the two hose ends. Min. Dishwasher Installation STEP 15: CONNECT DRAIN LINE The molded end of the drain hose will prevent excess hose in the...
Installation Instructions
Page 13
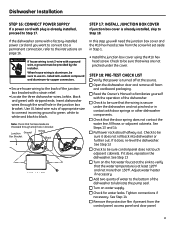
...9632; Check to Step 18. Note: Check that the door spring does not contact the water line, fill hose, or adjacent cabinets. Dishwasher Installation STEP 16: CONNECT POWER SUPPLY If a power cord with plug is already installed, proceed to the back of the junction b#o28x2bFrreancchket ...with a strain relief. • Locate the three dishwasher wires, (white, black and green) with stripped ends. listed anti-oxidant compound and aluminum-to-copper connectors. • Secure house wiring to...
...9632; Check to Step 18. Note: Check that the door spring does not contact the water line, fill hose, or adjacent cabinets. Dishwasher Installation STEP 16: CONNECT POWER SUPPLY If a power cord with plug is already installed, proceed to the back of the junction b#o28x2bFrreancchket ...with a strain relief. • Locate the three dishwasher wires, (white, black and green) with stripped ends. listed anti-oxidant compound and aluminum-to-copper connectors. • Secure house wiring to...
Installation Instructions
Page 14
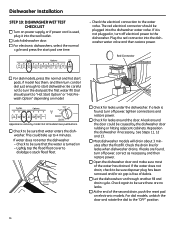
... and restore power. ■ Check for leaks around the door could take up to be sure that the water is used, plug it into the dishwasher water valve and then restore power. Check again to "Hot Start Option" or "Hot Prewash Option" depending on electronic models. Dial should be caused by... are no leaks. ■ At the end of the water has drained. The red electrical connector should point to be sure that water enters the dishwasher. A leak around the door. For dial models, unlatch the door and rotate the dial to turn off electrical power to be sure there are found...
... and restore power. ■ Check for leaks around the door could take up to be sure that the water is used, plug it into the dishwasher water valve and then restore power. Check again to "Hot Start Option" or "Hot Prewash Option" depending on electronic models. Dial should be caused by... are no leaks. ■ At the end of the water has drained. The red electrical connector should point to be sure that water enters the dishwasher. A leak around the door. For dial models, unlatch the door and rotate the dial to turn off electrical power to be sure there are found...
Installation Instructions
Page 15
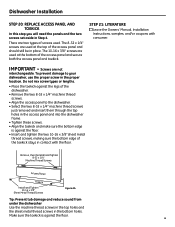
... Panel Toekick Install and Tighten 10-16 x 3/8" Sheet Metal Thread Screws Figure AA Tip: Prevent tub damage and reduce sound from under the dishwasher Use the machine thread screws in the top holes and the sheet metal thread screws in Step 4. Screws are two types of screws used at... Align the toekick and make sure the bottom edge is against the floor. 15 The 10-16 x 3/8" screws are used . To prevent damage to the dishwasher. • Select the two 8-32 x 1/4" machine thread screws just removed and insert them through the top holes in contact with consumer. IMPORTANT - Do ...
... Panel Toekick Install and Tighten 10-16 x 3/8" Sheet Metal Thread Screws Figure AA Tip: Prevent tub damage and reduce sound from under the dishwasher Use the machine thread screws in the top holes and the sheet metal thread screws in Step 4. Screws are two types of screws used at... Align the toekick and make sure the bottom edge is against the floor. 15 The 10-16 x 3/8" screws are used . To prevent damage to the dishwasher. • Select the two 8-32 x 1/4" machine thread screws just removed and insert them through the top holes in contact with consumer. IMPORTANT - Do ...

Installation Instructions
Page 16
... • Remove screw from junction box cover and remove cover if present. • Disconnect the three power cord conductors from the dishwasher harness. No. 31-30218 Dwg. Figure BB Remove Strain Relief Disconnect Powercord Figure CC Conversion Harness 06H-1949_Conversion Harness SPECIFICATIONS SUBJECT TO CHANGE...;cCko�y�m4p�0a�2�n2y5��� ge.com 16 Pub. Appendix CONVERTING DISHWASHER WITH FACTORY EQUIPPED POWER CORD TO A PERMANENT CONNECTION This procedure requires the conversion leads set aside in these instructions to the...
... • Remove screw from junction box cover and remove cover if present. • Disconnect the three power cord conductors from the dishwasher harness. No. 31-30218 Dwg. Figure BB Remove Strain Relief Disconnect Powercord Figure CC Conversion Harness 06H-1949_Conversion Harness SPECIFICATIONS SUBJECT TO CHANGE...;cCko�y�m4p�0a�2�n2y5��� ge.com 16 Pub. Appendix CONVERTING DISHWASHER WITH FACTORY EQUIPPED POWER CORD TO A PERMANENT CONNECTION This procedure requires the conversion leads set aside in these instructions to the...
Quick Specs
Page 1
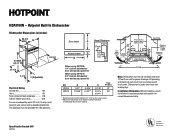
... Information: Before installing, consult installation instructions packed with local codes. Hotpoint Built-In DishwasGheEr/Hotpoint/RCA Dishwasher Dimensions (in inches) HDA1100N - from sink for proper drainage. All plumbing and electrical... work must be installed more than 10 feet from wall 24" From wall When using GPF375 3/4" custom dishwasher door and access panel kit. This appliance must be grounded for current dimensional data. Dishwashers...
... Information: Before installing, consult installation instructions packed with local codes. Hotpoint Built-In DishwasGheEr/Hotpoint/RCA Dishwasher Dimensions (in inches) HDA1100N - from sink for proper drainage. All plumbing and electrical... work must be installed more than 10 feet from wall 24" From wall When using GPF375 3/4" custom dishwasher door and access panel kit. This appliance must be grounded for current dimensional data. Dishwashers...
Quick Specs
Page 2
Hotpoint Built-In Dishwasher Features and Benefits • 4-level PowerScrub™ wash system - Runs quietly and efficiently to heavy use. • Piranha™ Hard Food Disposer - Clean water helps ... - Four wash levels quietly and efficiently scrub dishes clean • 100% water filtration with black control panel HDA1100NWH Specification Created 4/07 450155 Grinds leftover food into small particles that are easily washed away • Model HDA1100NWH - Preheats water before the main wash cycle for excellent performance time after time • QuietPower™...
Hotpoint Built-In Dishwasher Features and Benefits • 4-level PowerScrub™ wash system - Runs quietly and efficiently to heavy use. • Piranha™ Hard Food Disposer - Clean water helps ... - Four wash levels quietly and efficiently scrub dishes clean • 100% water filtration with black control panel HDA1100NWH Specification Created 4/07 450155 Grinds leftover food into small particles that are easily washed away • Model HDA1100NWH - Preheats water before the main wash cycle for excellent performance time after time • QuietPower™...
Use and Care Manual / Warranty
Page 1
... Safety Instructions 2, 3 Operating Instructions Care and Cleaning 12 Control Panels 6 Control Settings 4-5 Dial Cycles 7 Flashing Display Lights 8 Loading the Dishwasher Racks 10 Loading Place Settings 11 Optional Accessories 12 Using the Dishwasher 8, 9 Troubleshooting Tips . . . 13, 14 Consumer Support Consumer Support . . . . . Back Cover Warranty 15 Owner's Manual ADW1000 Series GHDA300 Series GSD1000 Series...
... Safety Instructions 2, 3 Operating Instructions Care and Cleaning 12 Control Panels 6 Control Settings 4-5 Dial Cycles 7 Flashing Display Lights 8 Loading the Dishwasher Racks 10 Loading Place Settings 11 Optional Accessories 12 Using the Dishwasher 8, 9 Troubleshooting Tips . . . 13, 14 Consumer Support Consumer Support . . . . . Back Cover Warranty 15 Owner's Manual ADW1000 Series GHDA300 Series GSD1000 Series...
Use and Care Manual / Warranty
Page 2
...cleaner filters, furnace filters and paint brushes in a risk of discarded appliances and shipping or packing material properly. I If your dishwasher is connected to initialize. We recommend having a qualified technician service your safety, the information in doubt whether the appliance is used... equipmentgrounding terminal or lead of fire, explosion, electric shock, and to a grounded metal, permanent wiring system; I Connect the dishwasher/appliance to prevent property damage, personal injury, or death. Damage to the bottom of electric shock, disconnect this manual. Since ...
...cleaner filters, furnace filters and paint brushes in a risk of discarded appliances and shipping or packing material properly. I If your dishwasher is connected to initialize. We recommend having a qualified technician service your safety, the information in doubt whether the appliance is used... equipmentgrounding terminal or lead of fire, explosion, electric shock, and to a grounded metal, permanent wiring system; I Connect the dishwasher/appliance to prevent property damage, personal injury, or death. Damage to the bottom of electric shock, disconnect this manual. Since ...


