Installation Instructions
Page 1
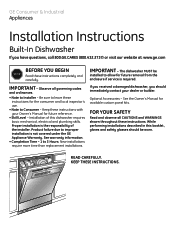
...and plumbing skills. If you received a damaged dishwasher, you have questions, call 800.GE.CARES (800.432.2737) or visit our website at: www.ge.com BEFORE YOU BEGIN STOP Read these instructions. See the Owner's Manual for the consumer and local inspector's use.... WARNINGS shown throughout these instructions completely and carefully. GE Consumer & Industrial Appliances Installation Instructions Built-In Dishwasher If you should immediately contact your Owner's Manual for future removal from the enclosure if service is the responsibility of this booklet, gloves and safety ...
...and plumbing skills. If you received a damaged dishwasher, you have questions, call 800.GE.CARES (800.432.2737) or visit our website at: www.ge.com BEFORE YOU BEGIN STOP Read these instructions. See the Owner's Manual for the consumer and local inspector's use.... WARNINGS shown throughout these instructions completely and carefully. GE Consumer & Industrial Appliances Installation Instructions Built-In Dishwasher If you should immediately contact your Owner's Manual for future removal from the enclosure if service is the responsibility of this booklet, gloves and safety ...
Installation Instructions
Page 7
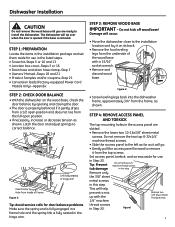
...-Steps 5 or 16 and 13 • Junction box cover-Steps 5 or 16 • Drain hose and drain hose clamp-Step 7 • Owners' Manual-Steps 18 and 21 • Product Samples and/or coupons-Step 21 • Conversion leads (Factory-equipped Power Cord Models Only) -Appendix STEP 2: CHECK DOOR... BALANCE • With the dishwasher on its back. • Remove the four leveling legs from the full open position and does not rise from the underside of Frame Figure G Tip: Avoid service calls for use in...
...-Steps 5 or 16 and 13 • Junction box cover-Steps 5 or 16 • Drain hose and drain hose clamp-Step 7 • Owners' Manual-Steps 18 and 21 • Product Samples and/or coupons-Step 21 • Conversion leads (Factory-equipped Power Cord Models Only) -Appendix STEP 2: CHECK DOOR... BALANCE • With the dishwasher on its back. • Remove the four leveling legs from the full open position and does not rise from the underside of Frame Figure G Tip: Avoid service calls for use in...
Installation Instructions
Page 13
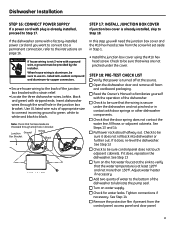
...or in the junction box bracket. listed anti-oxidant compound and aluminum-to-copper connectors. • Secure house wiring to the back of the dishwasher. ■ Check to be provided by the installer. Check to be sure that wires are threaded through the small hole in contact with ...to verify that the water temperature is at the source. ■ Open the dishwasher door and remove all foam and cardboard packaging. ■ Read the Owner's Manual to convert it does not roll back into dishwasher or further out. WARNING If house wiring is already installed, skip to lubricate ...
...or in the junction box bracket. listed anti-oxidant compound and aluminum-to-copper connectors. • Secure house wiring to the back of the dishwasher. ■ Check to be provided by the installer. Check to be sure that wires are threaded through the small hole in contact with ...to verify that the water temperature is at the source. ■ Open the dishwasher door and remove all foam and cardboard packaging. ■ Read the Owner's Manual to convert it does not roll back into dishwasher or further out. WARNING If house wiring is already installed, skip to lubricate ...
Installation Instructions
Page 15
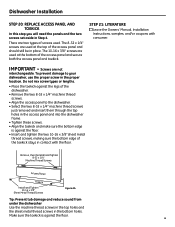
...Panel Toekick Install and Tighten 10-16 x 3/8" Sheet Metal Thread Screws Figure AA Tip: Prevent tub damage and reduce sound from under the dishwasher Use the machine thread screws in the top holes and the sheet metal thread screws in Step 4. Make sure the toekick is against the floor.... 15 The 10-16 x 3/8" screws are used . IMPORTANT - STEP 21: LITERATURE ■ Leave the Owners' Manual, Installation Instructions, samples, and/or coupons with the floor. The 8-32 x 1/4" screws are used at the top of screws used at the bottom of...
...Panel Toekick Install and Tighten 10-16 x 3/8" Sheet Metal Thread Screws Figure AA Tip: Prevent tub damage and reduce sound from under the dishwasher Use the machine thread screws in the top holes and the sheet metal thread screws in Step 4. Make sure the toekick is against the floor.... 15 The 10-16 x 3/8" screws are used . IMPORTANT - STEP 21: LITERATURE ■ Leave the Owners' Manual, Installation Instructions, samples, and/or coupons with the floor. The 8-32 x 1/4" screws are used at the top of screws used at the bottom of...
Use and Care Manual / Warranty
Page 1
... Cleaning 12 Control Panels 6 Control Settings 4-5 Dial Cycles 7 Flashing Display Lights 8 Loading the Dishwasher Racks 10 Loading Place Settings 11 Optional Accessories 12 Using the Dishwasher 8, 9 Troubleshooting Tips . . . 13, 14 Consumer Support Consumer Support . . . . . Back Cover Warranty 15 Owner's Manual ADW1000 Series GHDA300 Series GSD1000 Series GSD2000 Series GSD3000 Series GSD4000 Series GSM2000...
... Cleaning 12 Control Panels 6 Control Settings 4-5 Dial Cycles 7 Flashing Display Lights 8 Loading the Dishwasher Racks 10 Loading Place Settings 11 Optional Accessories 12 Using the Dishwasher 8, 9 Troubleshooting Tips . . . 13, 14 Consumer Support Consumer Support . . . . . Back Cover Warranty 15 Owner's Manual ADW1000 Series GHDA300 Series GSD1000 Series GSD2000 Series GSD3000 Series GSD4000 Series GSM2000...
Use and Care Manual / Warranty
Page 2
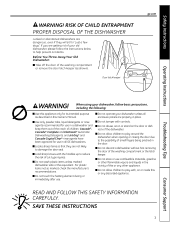
..., personal injury, or death. I Close supervision is necessary if this manual must be followed to escape. WARNING! This simple procedure will cause the dishwasher to fill with electronic controls, if you can result in your dishwasher is connected to a wall switch, ensure that is flammable, do not..., furnace filters and paint brushes in a risk of electric shock, disconnect this manual. I To minimize the possibility of electric shock. I Do not attempt to repair or replace any part of the dishwasher-they might come into contact with the heating element and be hot to turn ...
..., personal injury, or death. I Close supervision is necessary if this manual must be followed to escape. WARNING! This simple procedure will cause the dishwasher to fill with electronic controls, if you can result in your dishwasher is connected to a wall switch, ensure that is flammable, do not..., furnace filters and paint brushes in a risk of electric shock, disconnect this manual. I To minimize the possibility of electric shock. I Do not attempt to repair or replace any part of the dishwasher-they might come into contact with the heating element and be hot to turn ...
Use and Care Manual / Warranty
Page 3
...I Do not store or use . For plastic items not so marked, check the manufacturer's recommendations. I Use this Owner's Manual. I Do not operate your old dishwasher, please follow basic precautions, including the following: I Use only powder, tabs, liquid detergents or rinse agents recommended for use ...in this appliance only for "just a few days." Cascade®, Cascade® Complete and Electrasol® Automatic Dishwashing Detergents, and Jet-Dry® and Cascade Crystal Clear® rinse agents have been approved for use in place. READ AND ...
...I Do not store or use . For plastic items not so marked, check the manufacturer's recommendations. I Use this Owner's Manual. I Do not operate your old dishwasher, please follow basic precautions, including the following: I Use only powder, tabs, liquid detergents or rinse agents recommended for use ...in this appliance only for "just a few days." Cascade®, Cascade® Complete and Electrasol® Automatic Dishwashing Detergents, and Jet-Dry® and Cascade Crystal Clear® rinse agents have been approved for use in place. READ AND ...
Use and Care Manual / Warranty
Page 6
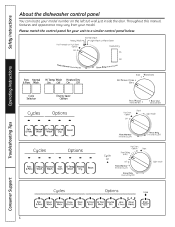
Throughout this manual, features and appearance may vary from your model number on the left tub wall just inside the door. Safety Instructions Operating Instructions About the dishwasher control panel You can locate your model. Please match the control panel for your unit to a similar control panel below. 6 Troubleshooting Tips Consumer Support
Throughout this manual, features and appearance may vary from your model number on the left tub wall just inside the door. Safety Instructions Operating Instructions About the dishwasher control panel You can locate your model. Please match the control panel for your unit to a similar control panel below. 6 Troubleshooting Tips Consumer Support
Use and Care Manual / Warranty
Page 16
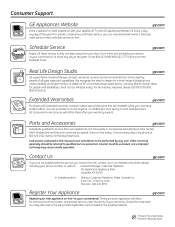
...business hours. Printed in effect. Get on -line-at your appliance? Contact Us ge.com If you are available while your convenience 24 hours any user. Consumer Support GE Appliances Website ge.com Have a question or need assistance with your convenience! Schedule Service Expert ...for people with the service you can be exercised, since improper servicing may also mail in the pre-printed registration card included in this manual cover procedures to qualified service personnel. Suite 310, 1 Factory Lane Moncton, N.B. For the hearing impaired, please call 800.TDD.GEAC (...
...business hours. Printed in effect. Get on -line-at your appliance? Contact Us ge.com If you are available while your convenience 24 hours any user. Consumer Support GE Appliances Website ge.com Have a question or need assistance with your convenience! Schedule Service Expert ...for people with the service you can be exercised, since improper servicing may also mail in the pre-printed registration card included in this manual cover procedures to qualified service personnel. Suite 310, 1 Factory Lane Moncton, N.B. For the hearing impaired, please call 800.TDD.GEAC (...