Installation Instructions
Page 2
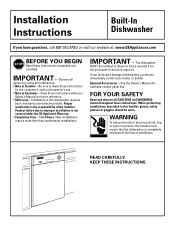
... instructions with your dealer or builder. New installations require more time than replacement installations. READ CAREFULLY. If you received a damaged dishwasher, you have questions, call 800-GECARES or visit our website at the time of installation. FOR YOUR SAFETY Read and observe ...; Note to Installer - WARNING To reduce the risk of electrical shock, fire, or injury to persons, the installer must ensure that the dishwasher is the responsibility of this booklet, gloves, safety glasses or goggles should immediately contact your Owner's Manual for future reference. • Skill ...
... instructions with your dealer or builder. New installations require more time than replacement installations. READ CAREFULLY. If you received a damaged dishwasher, you have questions, call 800-GECARES or visit our website at the time of installation. FOR YOUR SAFETY Read and observe ...; Note to Installer - WARNING To reduce the risk of electrical shock, fire, or injury to persons, the installer must ensure that the dishwasher is the responsibility of this booklet, gloves, safety glasses or goggles should immediately contact your Owner's Manual for future reference. • Skill ...
Installation Instructions
Page 3
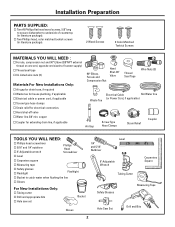
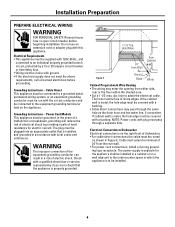
Hand shut-off valve Water line 3/8" min. copper Coupler for electrical connection. Installation Preparation PARTS SUPPLIED: Two #8 Phillips flat head wood screws, 5/8" long to secure dishwasher to catch water when flushing the line Gloves For New Installations Only: Tubing cutter Drill and appropriate bits Hole saw set Bucket Gloves 1/4" and 5/16" ...
Hand shut-off valve Water line 3/8" min. copper Coupler for electrical connection. Installation Preparation PARTS SUPPLIED: Two #8 Phillips flat head wood screws, 5/8" long to secure dishwasher to catch water when flushing the line Gloves For New Installations Only: Tubing cutter Drill and appropriate bits Hole saw set Bucket Gloves 1/4" and 5/16" ...
Installation Instructions
Page 4
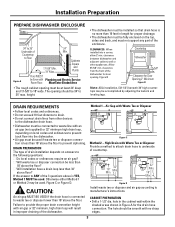
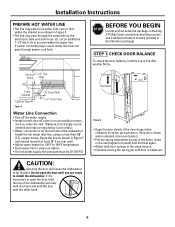
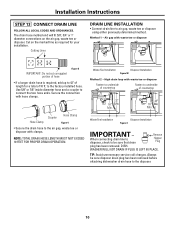
... and ordinances. • Do not exceed 10 feet distance to drain. • Do not connect drain lines from the front of the dishwasher for the drain hose connection. Figure D Install waste tee or disposer and air gap according to provide the proper drain connection height with an... countertop. 18" Min. 32" Min. 32" Min. 18" Min. Must Enter Shaded Area • The rough cabinet opening . Installation Preparation PREPARE DISHWASHER ENCLOSURE 34" to 35" Underside of Countertop to 18" wide. Air Gap with Plumbing and Electric Service Room Floor. hole in the cabinet wall within...
... and ordinances. • Do not exceed 10 feet distance to drain. • Do not connect drain lines from the front of the dishwasher for the drain hose connection. Figure D Install waste tee or disposer and air gap according to provide the proper drain connection height with an... countertop. 18" Min. 32" Min. 32" Min. 18" Min. Must Enter Shaded Area • The rough cabinet opening . Installation Preparation PREPARE DISHWASHER ENCLOSURE 34" to 35" Underside of Countertop to 18" wide. Air Gap with Plumbing and Electric Service Room Floor. hole in the cabinet wall within...
Installation Instructions
Page 5
... of the equipment grounding conductor can result in which the appliance is properly grounded. 1-1/2" Dia. dia. hole to Dishwasher Electrical connection is on a wall adjacent to the undercounter space in a risk of dishwasher. • For cable direct connections the cable must be grounded. The hole must pass through the same hole as...
... of the equipment grounding conductor can result in which the appliance is properly grounded. 1-1/2" Dia. dia. hole to Dishwasher Electrical connection is on a wall adjacent to the undercounter space in a risk of dishwasher. • For cable direct connections the cable must be grounded. The hole must pass through the same hole as...
Installation Instructions
Page 6
... again. • Adjust both door springs to the same tension. • Continue moving the spring pin until you are ready to install the dishwasher. Route the line as the electrical cable and drain hose. If the door closes when released, decrease tension. • Pull the spring adjustment ...pin out of the dishwasher. hole to tip forward. Increase Decrease Figure G • Open the door slowly, if the door drops when released, increase spring tension. If ...
... again. • Adjust both door springs to the same tension. • Continue moving the spring pin until you are ready to install the dishwasher. Route the line as the electrical cable and drain hose. If the door closes when released, decrease tension. • Pull the spring adjustment ...pin out of the dishwasher. hole to tip forward. Increase Decrease Figure G • Open the door slowly, if the door drops when released, increase spring tension. If ...
Installation Instructions
Page 7
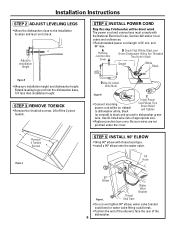
.... • Recommended power cord length is 54" min. Installation Instructions STEP 2 ADJUST LEVELING LEGS • Move the dishwasher close to face the rear of the dishwasher. 6 Use UL listed wire nuts of the elbow to the installation location and lay it on its back. The power...fitting could break. • Position the end of appropriate size. • Replace junction box cover. Lift off the 2 piece toekick. Adjust to dishwasher green wire. Remove 4 Toekick Screws Figure J D Use UL Listed Wire Nuts Figure K C Insert Power • Connect incoming power cord white (or ...
.... • Recommended power cord length is 54" min. Installation Instructions STEP 2 ADJUST LEVELING LEGS • Move the dishwasher close to face the rear of the dishwasher. 6 Use UL listed wire nuts of the elbow to the installation location and lay it on its back. The power...fitting could break. • Position the end of appropriate size. • Replace junction box cover. Lift off the 2 piece toekick. Adjust to dishwasher green wire. Remove 4 Toekick Screws Figure J D Use UL Listed Wire Nuts Figure K C Insert Power • Connect incoming power cord white (or ...
Installation Instructions
Page 8
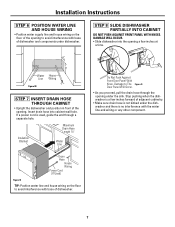
...and house wiring on the floor to avoid interference with base of adjacent cabinetry. • Make sure drain hose is not kinked under dishwasher. If a power cord is no interference with the water line and wiring or any other component. Damage to The Figure O Door Panel.... 4" 6" Water House Line Wiring Figure M STEP 7 INSERT DRAIN HOSE THROUGH CABINET • Upright the dishwasher and position in front of the opening. DAMAGE WILL OCCUR. • Slide dishwasher into cabinet wall hole. Maximum Drain Hose Length 10' Insulation Blanket Water Line Do Not Push Against Front Door...
...and house wiring on the floor to avoid interference with base of adjacent cabinetry. • Make sure drain hose is not kinked under dishwasher. If a power cord is no interference with the water line and wiring or any other component. Damage to The Figure O Door Panel.... 4" 6" Water House Line Wiring Figure M STEP 7 INSERT DRAIN HOSE THROUGH CABINET • Upright the dishwasher and position in front of the opening. DAMAGE WILL OCCUR. • Slide dishwasher into cabinet wall hole. Maximum Drain Hose Length 10' Insulation Blanket Water Line Do Not Push Against Front Door...

Installation Instructions
Page 9
... or cabinets with door springs. Adjust leveling legs to align door to be flush with door springs or other dishwasher components. Check to tub. 8 The front corners of the dishwasher door should be level for proper dish rack operation and wash performance. • Place level on door and ... doors. Do Not Push Against Front Door Panel With Knee. Damage to check that wires are secure under the dishwasher and not pinched or in either direction, the dishwasher must be positioned so it is not installed correctly. It should be sure the rack does not roll forward or...
... or cabinets with door springs. Adjust leveling legs to align door to be flush with door springs or other dishwasher components. Check to tub. 8 The front corners of the dishwasher door should be level for proper dish rack operation and wash performance. • Place level on door and ... doors. Do Not Push Against Front Door Panel With Knee. Damage to check that wires are secure under the dishwasher and not pinched or in either direction, the dishwasher must be positioned so it is not installed correctly. It should be sure the rack does not roll forward or...
Installation Instructions
Page 10
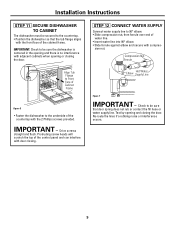
...- Compression Nut Ferrule 90° Elbow Hot Water Supply Line Figure T IMPORTANT - IMPORTANT: Check to be sure the dishwasher is centered in the opening and there is no interference with door closing. Drive screws straight and flush. Installation Instructions STEP 11 SECURE... DISHWASHER TO CABINET The dishwasher must be secured to the countertop. • Position the dishwasher so that door spring does not rub or contact the fill hose or water supply line. IMPORTANT...
...- Compression Nut Ferrule 90° Elbow Hot Water Supply Line Figure T IMPORTANT - IMPORTANT: Check to be sure the dishwasher is centered in the opening and there is no interference with door closing. Drive screws straight and flush. Installation Instructions STEP 11 SECURE... DISHWASHER TO CABINET The dishwasher must be secured to the countertop. • Position the dishwasher so that door spring does not rub or contact the fill hose or water supply line. IMPORTANT...
Installation Instructions
Page 11
.... Waste Tee Installation Disposer Installation Figure X IMPORTANT - When connecting drain line to disposer, check to be sure disposer drain plug has been removed before attaching dishwasher drain hose to 42" of length for your installation. Always be sure that drain Remove Hopper Plug plug has been removed. TIP: Avoid unnecessary service...
.... Waste Tee Installation Disposer Installation Figure X IMPORTANT - When connecting drain line to disposer, check to be sure disposer drain plug has been removed before attaching dishwasher drain hose to 42" of length for your installation. Always be sure that drain Remove Hopper Plug plug has been removed. TIP: Avoid unnecessary service...
Installation Instructions
Page 12
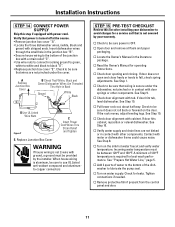
... C Insert Power Cord Wires Thru Strain Relief and Tighten E. See Step 9. See Step 10. If door hits cabinet, reposition or relevel dishwasher. See Step 8. See "Prepare Hot Water Line," page 5. Tighten connections if needed. Installation Instructions STEP 14 CONNECT POWER SUPPLY Skip this ... Step 10. Turn on water supply. Check for operating instructions. A Remove Junction Box Cover B Check That White, Black and Green Dishwasher Wires Are Threaded Thru Hole in the literature package. Check to the bottom of 120°F temperature is required for a service call ...
... C Insert Power Cord Wires Thru Strain Relief and Tighten E. See Step 9. See Step 10. If door hits cabinet, reposition or relevel dishwasher. See Step 8. See "Prepare Hot Water Line," page 5. Tighten connections if needed. Installation Instructions STEP 14 CONNECT POWER SUPPLY Skip this ... Step 10. Turn on water supply. Check for operating instructions. A Remove Junction Box Cover B Check That White, Black and Green Dishwasher Wires Are Threaded Thru Hole in the literature package. Check to the bottom of 120°F temperature is required for a service call ...
Installation Instructions
Page 13
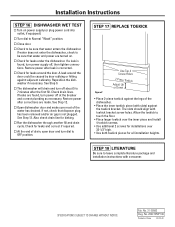
...the door. See Step 9. See Step 12. No. 31-30566 Dwg. Close door. Restore power after the first fill. Check drain lines. Open dishwasher door and make sure most of drain, open door and turn power off , then tighten connections. The slots should align with slots) against the toekick... bracket. No. 206C1559P106 Printed in China 07-03 JR Check to be caused by door rubbing or hitting against the legs of the dishwasher. • Place the inner toekick piece (with toekick bracket screw holes. Check for kinking. STEP 17 REPLACE TOEKICK Figure Z Use Top 4 ...
...the door. See Step 9. See Step 12. No. 31-30566 Dwg. Close door. Restore power after the first fill. Check drain lines. Open dishwasher door and make sure most of drain, open door and turn power off , then tighten connections. The slots should align with slots) against the toekick... bracket. No. 206C1559P106 Printed in China 07-03 JR Check to be caused by door rubbing or hitting against the legs of the dishwasher. • Place the inner toekick piece (with toekick bracket screw holes. Check for kinking. STEP 17 REPLACE TOEKICK Figure Z Use Top 4 ...
Use and Care Manual / Warranty
Page 1
Dishwashers ge.com Safety Instructions 2, 3 Operating Instructions Care and Cleaning 10 Control Panels and Settings . . 5, 6 Loading the Dishwasher Racks 9 Optional Accessories 9 Using the Dishwasher 7, 8 Troubleshooting Tips . . . . 12, 13 Consumer Support Consumer Support . . . Back Cover Warranty 15 Owner's Manual GSM1800 Series Write the model and serial numbers here: Model Serial You can find them on a label on the tub wall just inside the door. 165D4700P337 49-55017 12-05 JR
Dishwashers ge.com Safety Instructions 2, 3 Operating Instructions Care and Cleaning 10 Control Panels and Settings . . 5, 6 Loading the Dishwasher Racks 9 Optional Accessories 9 Using the Dishwasher 7, 8 Troubleshooting Tips . . . . 12, 13 Consumer Support Consumer Support . . . Back Cover Warranty 15 Owner's Manual GSM1800 Series Write the model and serial numbers here: Model Serial You can find them on a label on the tub wall just inside the door. 165D4700P337 49-55017 12-05 JR
Use and Care Manual / Warranty
Page 2
... GAS IS EXPLOSIVE. or run for two weeks or more . We recommend having a qualified technician service your dishwasher unless it is specifically recommended in a risk of the dishwasher. I Dispose of small fingers being pinched in this appliance or any other 2 appliance. READ ALL INSTRUCTIONS BEFORE... in doubt whether the appliance is connected to play around I Do not discard a dishwasher without first removing the door or removing the door latch. NOTE: Turning the dishwasher off does not disconnect the appliance from the power supply before it is used for ...
... GAS IS EXPLOSIVE. or run for two weeks or more . We recommend having a qualified technician service your dishwasher unless it is specifically recommended in a risk of the dishwasher. I Dispose of small fingers being pinched in this appliance or any other 2 appliance. READ ALL INSTRUCTIONS BEFORE... in doubt whether the appliance is connected to play around I Do not discard a dishwasher without first removing the door or removing the door latch. NOTE: Turning the dishwasher off does not disconnect the appliance from the power supply before it is used for ...
Use and Care Manual / Warranty
Page 3
... touch the heating element during or immediately after use in place. I Using a detergent that they will sit for use in your old dishwasher, please follow the instructions below to damage the door seal. I Load sharp knives with the heating element and be damaged. Damage to... or staining of the washing compartment or remove the door latch keeper (as electronic air cleaner filters, furnace filters and paint brushes in a dishwasher and keep them out of the reach of cut-type injuries. For plastic items not so marked, check the manufacturer's recommendations. I Load ...
... touch the heating element during or immediately after use in place. I Using a detergent that they will sit for use in your old dishwasher, please follow the instructions below to damage the door seal. I Load sharp knives with the heating element and be damaged. Damage to... or staining of the washing compartment or remove the door latch keeper (as electronic air cleaner filters, furnace filters and paint brushes in a dishwasher and keep them out of the reach of cut-type injuries. For plastic items not so marked, check the manufacturer's recommendations. I Load ...

Use and Care Manual / Warranty
Page 4
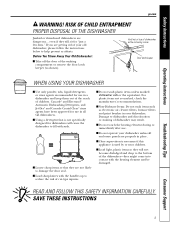
Safety Instructions Features of the dishwasher (a side view). Upper rack Upper spray arm Lower rack Lower spray arm Motor Leveling legs Control panel Door spring Panel Toe kick Operating Instructions Troubleshooting Tips Consumer Support 4
Safety Instructions Features of the dishwasher (a side view). Upper rack Upper spray arm Lower rack Lower spray arm Motor Leveling legs Control panel Door spring Panel Toe kick Operating Instructions Troubleshooting Tips Consumer Support 4

Use and Care Manual / Warranty
Page 5
.... LIGHT WASH For dishes with medium soils. DO NOT use the CHINA CRYSTAL cycle. This cycle will save energy and water. Safety Instructions About the dishwasher control panel. Everyday dishes may vary from your model. For dried-on or baked-on for fast drying. NOTE: Many dishes have lighter soil than...
.... LIGHT WASH For dishes with medium soils. DO NOT use the CHINA CRYSTAL cycle. This cycle will save energy and water. Safety Instructions About the dishwasher control panel. Everyday dishes may vary from your model. For dried-on or baked-on for fast drying. NOTE: Many dishes have lighter soil than...
Use and Care Manual / Warranty
Page 6
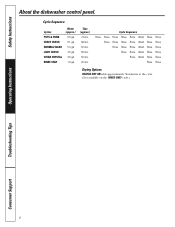
... ON adds approximately 36 minutes to the cycle. (Not available on the RINSE ONLY cycle.) Operating Instructions Troubleshooting Tips Consumer Support 6 Safety Instructions About the dishwasher control panel. Cycle Sequence Cycles POTS & PANS HEAVY WASH NORMAL WASH LIGHT WASH CHINA CRYSTAL RINSE ONLY Water (approx.) 6.9 gal. 6.1 gal. 5.3 gal. 4.5 gal. 3.6 gal. 1.8 gal...
... ON adds approximately 36 minutes to the cycle. (Not available on the RINSE ONLY cycle.) Operating Instructions Troubleshooting Tips Consumer Support 6 Safety Instructions About the dishwasher control panel. Cycle Sequence Cycles POTS & PANS HEAVY WASH NORMAL WASH LIGHT WASH CHINA CRYSTAL RINSE ONLY Water (approx.) 6.9 gal. 6.1 gal. 5.3 gal. 4.5 gal. 3.6 gal. 1.8 gal...
Use and Care Manual / Warranty
Page 7
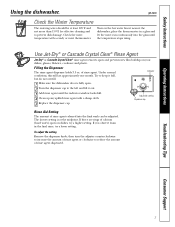
...the water run continuously into the final wash can be at the midpoint. Troubleshooting Tips Consumer Support 7 Turn on the hot water faucet nearest the dishwasher, place the thermometer in the final rinse, try a higher setting. Use Jet-Dry® or Cascade Crystal Clear® Rinse Agent Jet-Dry&#... increase the amount of rinse agent dispensed. ge.com Check the Water Temperature The entering water should be adjusted. Indicator 1 Make sure the dishwasher door is at least 120°F and not more than 150°F, for effective cleaning and to reduce the amount of rinse agent or ...
...the water run continuously into the final wash can be at the midpoint. Troubleshooting Tips Consumer Support 7 Turn on the hot water faucet nearest the dishwasher, place the thermometer in the final rinse, try a higher setting. Use Jet-Dry® or Cascade Crystal Clear® Rinse Agent Jet-Dry&#... increase the amount of rinse agent dispensed. ge.com Check the Water Temperature The entering water should be adjusted. Indicator 1 Make sure the dishwasher door is at least 120°F and not more than 150°F, for effective cleaning and to reduce the amount of rinse agent or ...
Use and Care Manual / Warranty
Page 8
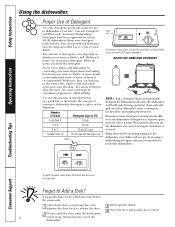
.... Steam may use the Pots and Pans or Heavy Wash cycles and add a little extra detergent. Keep your water is not specifically designed for dishwashers will be added any time before the main wash. 1 Unlatch the door to relatch. 8 2 Do not open and cause flooding. While there...depends on whether your dishes will flip back. Troubleshooting Tips Consumer Support To open cup Button Open cup For heavily-soiled loads, use the dishwasher the correct detergent and where it in the water valve, which could stick while open the door until you need less detergent. A ...
.... Steam may use the Pots and Pans or Heavy Wash cycles and add a little extra detergent. Keep your water is not specifically designed for dishwashers will be added any time before the main wash. 1 Unlatch the door to relatch. 8 2 Do not open and cause flooding. While there...depends on whether your dishes will flip back. Troubleshooting Tips Consumer Support To open cup Button Open cup For heavily-soiled loads, use the dishwasher the correct detergent and where it in the water valve, which could stick while open the door until you need less detergent. A ...


