
Product Manual
Page 4
See Warranty for complete details. You can also register by: Calling: 1-877-839-2046 Visiting: Hoover.com or Hoover.ca It's Guaranteed. TM Welcome to register your new vacuum, customize FloorSense™ settings, receive system maintenance reminders and access tips and tricks. Make it official. App Store is a service mark of Google Inc. Android...
See Warranty for complete details. You can also register by: Calling: 1-877-839-2046 Visiting: Hoover.com or Hoover.ca It's Guaranteed. TM Welcome to register your new vacuum, customize FloorSense™ settings, receive system maintenance reminders and access tips and tricks. Make it official. App Store is a service mark of Google Inc. Android...

Product Manual
Page 5
... and/or filters in place. 3 To avoid injury or damage, keep children away from product, and do not allow to prevent the vacuum from falling, always place vacuum at voltage specified on data label on stairs or furniture, as described in . Do not place product on wet surfaces. • Do...any openings. • Use only as it to a service center prior to place fingers or other objects into any opening blocked. Do not place vacuum on bottom of body away from heated surfaces. • Do not unplug by children age 12 and under. When using an electrical appliance, basic ...
... and/or filters in place. 3 To avoid injury or damage, keep children away from product, and do not allow to prevent the vacuum from falling, always place vacuum at voltage specified on data label on stairs or furniture, as described in . Do not place product on wet surfaces. • Do...any openings. • Use only as it to a service center prior to place fingers or other objects into any opening blocked. Do not place vacuum on bottom of body away from heated surfaces. • Do not unplug by children age 12 and under. When using an electrical appliance, basic ...

Product Manual
Page 7
... location of features 5 Tip - Attach the plug end to push, open the Suction Control Valve on how to remove clogs. 4 Suction Control Val ve* If vacuum is difficult to the cord. To unwrap cord quickly, rotate cord hook 180 degrees. Tip - Tip - User Controls 1 Power the unit ON/OFF.* 2 Power ...FloorSense™ ON/OFF.* 3 System Check Indicator* Refer to the Maintenance section or the Hoover App for convenient storage. Make sure all pieces click into canister until it clicks in place. 3 Insert hose into place.
... location of features 5 Tip - Attach the plug end to push, open the Suction Control Valve on how to remove clogs. 4 Suction Control Val ve* If vacuum is difficult to the cord. To unwrap cord quickly, rotate cord hook 180 degrees. Tip - Tip - User Controls 1 Power the unit ON/OFF.* 2 Power ...FloorSense™ ON/OFF.* 3 System Check Indicator* Refer to the Maintenance section or the Hoover App for convenient storage. Make sure all pieces click into canister until it clicks in place. 3 Insert hose into place.

Product Manual
Page 10
... against the baseboard and wheels touching the floor, then glide along baseboard. Only use Baseboard Duster if pad is completely dry. Refer to Hoover.com or Hoover.ca for tools included in Quick LiftTM Mode. 4 Align the Baseboard Duster with warm water and mild detergent. 4 Tumble dry on low.... ***Tools vary by pressing firmly. 2 Remove wand from vacuum spine and attach tool to the end of the wand. 3 Detach canister from baseboards. 1 1Align...
... against the baseboard and wheels touching the floor, then glide along baseboard. Only use Baseboard Duster if pad is completely dry. Refer to Hoover.com or Hoover.ca for tools included in Quick LiftTM Mode. 4 Align the Baseboard Duster with warm water and mild detergent. 4 Tumble dry on low.... ***Tools vary by pressing firmly. 2 Remove wand from vacuum spine and attach tool to the end of the wand. 3 Detach canister from baseboards. 1 1Align...

Product Manual
Page 11
... dashboard. 9 On hard floors, FloorSenseTM automatically slows the brush roll to lift deep-down embedded dirt. Once FloorSenseTM has determined the optimal setting for your vacuum. On carpet, FloorSenseTM automatically increases brush roll speed to prevent scattering of your floor type, you will see CARPET or HARD FLOOR illuminated on the...
... dashboard. 9 On hard floors, FloorSenseTM automatically slows the brush roll to lift deep-down embedded dirt. Once FloorSenseTM has determined the optimal setting for your vacuum. On carpet, FloorSenseTM automatically increases brush roll speed to prevent scattering of your floor type, you will see CARPET or HARD FLOOR illuminated on the...

Product Manual
Page 13
Vacuum must be powered ON to connect to : 1. App Store is a service mark of Google Inc. 11 Download the Hoover App to the Hoover App. Receive system maintenance reminders 4. Android, Google Play, and the Google Play logo are trademarks of Apple Inc. ... Register your mobile device. Customize FloorSense™ settings 3. Apple and the Apple logos are compatible with the Hoover App. Hoover® REACTTM vacuums are trademarks of Apple, Inc., registered in the U.S., and other countries. Tip - The headlights will flash three times when the vacuum connects to your new...
Vacuum must be powered ON to connect to : 1. App Store is a service mark of Google Inc. 11 Download the Hoover App to the Hoover App. Receive system maintenance reminders 4. Android, Google Play, and the Google Play logo are trademarks of Apple Inc. ... Register your mobile device. Customize FloorSense™ settings 3. Apple and the Apple logos are compatible with the Hoover App. Hoover® REACTTM vacuums are trademarks of Apple, Inc., registered in the U.S., and other countries. Tip - The headlights will flash three times when the vacuum connects to your new...

Product Manual
Page 14
... Wand or Handle Detach Canister Release Detach canister from falling, always place cleaner at the bottom of the wand or handle. 3. Turn ON vacuum. ! Do no place cleaner on nozzle and pull handle back. 2. CAUTION ! Press wand or handle release and pull handle up. 2.... to the ON position. CAUTION ! Allow FloorSense™ to prevent the cleaner from vacuum spine by pressing QuickLiftTM Mode. 4. ! CAUTION ! Not to the end of the stairs or on stairs. Using Your Hoover® REACT™ Upright Upright Mode 1. Tip - QuickLiftTM Mode 1. Attach cleaning ...
... Wand or Handle Detach Canister Release Detach canister from falling, always place cleaner at the bottom of the wand or handle. 3. Turn ON vacuum. ! Do no place cleaner on nozzle and pull handle back. 2. CAUTION ! Press wand or handle release and pull handle up. 2.... to the ON position. CAUTION ! Allow FloorSense™ to prevent the cleaner from vacuum spine by pressing QuickLiftTM Mode. 4. ! CAUTION ! Not to the end of the stairs or on stairs. Using Your Hoover® REACT™ Upright Upright Mode 1. Tip - QuickLiftTM Mode 1. Attach cleaning ...

Product Manual
Page 15
... WARNING ! To reduce the risk of personal injury, unplug before cleaning or servicing. Hoover® REACTTM vacuums should be done by pressing the dirt cup release button. 2. Refer to continuing use vacuum without dirt cup and dry filters. When the Thermal Protector activates, the cleaner will ... Cup: 1. ! If appliance is unplugged and motor cools off for any obstructions. Empty dirt cup after following the above steps, your vacuum. Inspect the nozzle inlet, hose connector, hose, dirt cup inlet, cyclonic filter, rinsable filters and HEPA filters for 30 minutes, the ...
... WARNING ! To reduce the risk of personal injury, unplug before cleaning or servicing. Hoover® REACTTM vacuums should be done by pressing the dirt cup release button. 2. Refer to continuing use vacuum without dirt cup and dry filters. When the Thermal Protector activates, the cleaner will ... Cup: 1. ! If appliance is unplugged and motor cools off for any obstructions. Empty dirt cup after following the above steps, your vacuum. Inspect the nozzle inlet, hose connector, hose, dirt cup inlet, cyclonic filter, rinsable filters and HEPA filters for 30 minutes, the ...

Product Manual
Page 16
... and nozzle guard. Rotate brush roll manually to release excess dirt. Vacuum is equipped with bearings which contain sufficient lubrication for 24 hours before cleaning or servicing. Do not add lubricant to Know Your Hoover® REACT™ QuickLift™ for obstructions in the event of... the canister to the bottom of personal injury, unplug before replacing into vacuum. To reduce the risk of the filters in place. Replace...
... and nozzle guard. Rotate brush roll manually to release excess dirt. Vacuum is equipped with bearings which contain sufficient lubrication for 24 hours before cleaning or servicing. Do not add lubricant to Know Your Hoover® REACT™ QuickLift™ for obstructions in the event of... the canister to the bottom of personal injury, unplug before replacing into vacuum. To reduce the risk of the filters in place. Replace...

Product Manual
Page 17
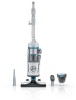
Maintenance Removing System Clogs If your vacuum is losing suction, check and remove any clogs. Check for clogs in the areas highlighted below. 1 1Nozzle inlet 2 Hose connector 3 Dirt cup inlet 4 Cyclonic filter 1 5 Rinsable filters 6 HEPA filters 7 Hose 8 Wand 15
Maintenance Removing System Clogs If your vacuum is losing suction, check and remove any clogs. Check for clogs in the areas highlighted below. 1 1Nozzle inlet 2 Hose connector 3 Dirt cup inlet 4 Cyclonic filter 1 5 Rinsable filters 6 HEPA filters 7 Hose 8 Wand 15

Product Manual
Page 18
.... A Thermal Protector may be sure to plug it to a service center prior to the Hoover App. My vacuum is not displaying correctly. 1. Your filter should be powered ON to connect to continuing use. My brush roll is not spinning or FloorSenseTM dashboard is ... dirt cup if it is a blown fuse or tripped breaker, replace fuse or reset breaker in home. Refer to the Maintenance section or the Hoover App for directions on how to the Hoover App. I can't connect my vacuum to remove clogs. 4. To reduce the risk of personal injury, unplug before cleaning or servicing.
.... A Thermal Protector may be sure to plug it to a service center prior to the Hoover App. My vacuum is not displaying correctly. 1. Your filter should be powered ON to connect to continuing use. My brush roll is not spinning or FloorSenseTM dashboard is ... dirt cup if it is a blown fuse or tripped breaker, replace fuse or reset breaker in home. Refer to the Maintenance section or the Hoover App for directions on how to the Hoover App. I can't connect my vacuum to remove clogs. 4. To reduce the risk of personal injury, unplug before cleaning or servicing.

Product Manual
Page 19
...by the model number and manufacturing code when requesting information or ordering replacement parts. (the model number and manufacturing code for the vacuum appears on the bottom of the canister.) LIMITED FIVE YEAR WARRANTY (DOMESTIC USE) WHAT THIS WARRANTY COVERS When used and maintained in... service center. This warranty does not apply to state. 17 THIS WARRANTY IS THE EXCLUSIVE WARRANTY AND REMEDY PROVIDED BY HOOVER®. Hoover.com or Hoover.ca. In Canada, contact Hoover® Canada, Carson Building, 100 Carson St., Etobicoke, Ontario M8W 3R9, Phone: 1-877-839-2046, Mon-Fri...
...by the model number and manufacturing code when requesting information or ordering replacement parts. (the model number and manufacturing code for the vacuum appears on the bottom of the canister.) LIMITED FIVE YEAR WARRANTY (DOMESTIC USE) WHAT THIS WARRANTY COVERS When used and maintained in... service center. This warranty does not apply to state. 17 THIS WARRANTY IS THE EXCLUSIVE WARRANTY AND REMEDY PROVIDED BY HOOVER®. Hoover.com or Hoover.ca. In Canada, contact Hoover® Canada, Carson Building, 100 Carson St., Etobicoke, Ontario M8W 3R9, Phone: 1-877-839-2046, Mon-Fri...


