Product Manual
Page 2
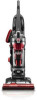
... date of purchase may be required for an automated referral of your product online at hoover.com. Visit Hoover.com for additional video instructions for choosing a HOOVER®product. CONTENTS Important Safety Instructions 3 Vacuum Assembly...5 Carton Contents...5 Attach Handle...5 Attach Dirt Cup...5 Position Tools...5 How To Use...6 Vacuum Description 6 On-Off Switch...6 Suction Only...
... date of purchase may be required for an automated referral of your product online at hoover.com. Visit Hoover.com for additional video instructions for choosing a HOOVER®product. CONTENTS Important Safety Instructions 3 Vacuum Assembly...5 Carton Contents...5 Attach Handle...5 Attach Dirt Cup...5 Position Tools...5 How To Use...6 Vacuum Description 6 On-Off Switch...6 Suction Only...

Product Manual
Page 3
... be followed, including the following: READ ALL INSTRUCTIONS BEFORE USING THIS APPLIANCE. Close supervision is necessary when used as a toy. WASH HANDS AFTER HANDLING. 3 To avoid injury or damage, keep free of dust, lint, hair, and anything that may be present. • Unplug before unplugging....smoking, such as it should always be used near children. To unplug, grasp the plug, not the cord. • Do not handle plug or appliance with damaged cord or plug. IMPORTANT SAFETY INSTRUCTIONS SAVE THESE INSTRUCTIONS When using an electrical appliance, basic precautions should , ...
... be followed, including the following: READ ALL INSTRUCTIONS BEFORE USING THIS APPLIANCE. Close supervision is necessary when used as a toy. WASH HANDS AFTER HANDLING. 3 To avoid injury or damage, keep free of dust, lint, hair, and anything that may be present. • Unplug before unplugging....smoking, such as it should always be used near children. To unplug, grasp the plug, not the cord. • Do not handle plug or appliance with damaged cord or plug. IMPORTANT SAFETY INSTRUCTIONS SAVE THESE INSTRUCTIONS When using an electrical appliance, basic precautions should , ...

Product Manual
Page 5
...identify each item shown. Pivot cup into vacuum base. 1. C I . Push down firmly. 1.3 Using a Phillips screwdriver, fasten (1) screw behind handle into vacuum. Dirt cup is secure when you hear a click. 1.4 POSITION TOOLS (varies per model 1.1 A Remove all parts are located before... disposing of vacuum as shown. 5 Actual model may be ordered at Hoover.com or call 1-800-944-9200. VACUUM ASSEMBLY CARTON CONTENTS A. Articulating Upholstry Tool* J. Articulating Dusting Tool* K. B C 1.6 Place Crevice ...
...identify each item shown. Pivot cup into vacuum base. 1. C I . Push down firmly. 1.3 Using a Phillips screwdriver, fasten (1) screw behind handle into vacuum. Dirt cup is secure when you hear a click. 1.4 POSITION TOOLS (varies per model 1.1 A Remove all parts are located before... disposing of vacuum as shown. 5 Actual model may be ordered at Hoover.com or call 1-800-944-9200. VACUUM ASSEMBLY CARTON CONTENTS A. Articulating Upholstry Tool* J. Articulating Dusting Tool* K. B C 1.6 Place Crevice ...
Product Manual
Page 6
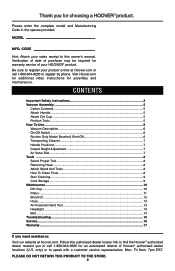
...pile carpet deeper than 1", brushroll should be in the upright position. ! ON/OFF Switch 2 3. Dirt Cup Release Button 4. Stair Cleaning Handle 7. Telescoping Wand 17. Hose Release Button 9 18 21. A The vacuum is in off . IMPORTANT Pedal (A) is inactive when the ...1. Headlight* 8. Furniture Guard 4 13 10. To turn vacuum ON, push ON/OFF switch once. Actual model may vary from images shown. 6 Handle 2.1 1 2. System Check Indicator 14. Cord *Available on bare floors and carpet with pile deeper than 1". ! Air Valve Dial **Varies per model...
...pile carpet deeper than 1", brushroll should be in the upright position. ! ON/OFF Switch 2 3. Dirt Cup Release Button 4. Stair Cleaning Handle 7. Telescoping Wand 17. Hose Release Button 9 18 21. A The vacuum is in off . IMPORTANT Pedal (A) is inactive when the ...1. Headlight* 8. Furniture Guard 4 13 10. To turn vacuum ON, push ON/OFF switch once. Actual model may vary from images shown. 6 Handle 2.1 1 2. System Check Indicator 14. Cord *Available on bare floors and carpet with pile deeper than 1". ! Air Valve Dial **Varies per model...

Product Manual
Page 7
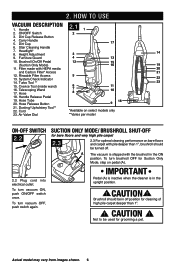
...positions: 1) Upright for storage and when using cleaning tools. 2) Operating position for general operation on carpets and floors. 2.7 Step on handle release pedal to lower handle. 1 2 CARPET HEIGHT ADJUSTMENT 2.8 A 2.8 To adjust height setting, TURN knob (A) to pick up debris by the Hose/ HOSE... dial must be returned to "FLOOR" position in upright position, tilt cleaner back on rear wheels and push forward. 2.6 HANDLE POSITIONS 2.7 The handle of carpet. • Higher settings: for general floor cleaning thru nozzle. FLOOR position is for very deep pile carpet, where...
...positions: 1) Upright for storage and when using cleaning tools. 2) Operating position for general operation on carpets and floors. 2.7 Step on handle release pedal to lower handle. 1 2 CARPET HEIGHT ADJUSTMENT 2.8 A 2.8 To adjust height setting, TURN knob (A) to pick up debris by the Hose/ HOSE... dial must be returned to "FLOOR" position in upright position, tilt cleaner back on rear wheels and push forward. 2.6 HANDLE POSITIONS 2.7 The handle of carpet. • Higher settings: for general floor cleaning thru nozzle. FLOOR position is for very deep pile carpet, where...
Product Manual
Page 8
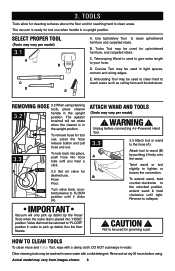
...debris thru the floor Nozzle. IMPORTANT Vacuum will not rotate when the cleaner is in water. Unplug before using cleaning tools, place cleaner 3.2 handle in the upright position. Attach tool to pick up debris by pushing it clicks (A). Not to the hose (A). Rinse and air dry 24...-Powered Hand Tool. 3.3 A B 3.3 Attach tool or wand to be used in upright position. Valve dial must be used for desired use when handle is placed into hose tube until you hear a click. 3.3 Set air valve for upholstered furniture, and carpeted stairs. ATTACH WAND AND TOOLS (Tools ...
...debris thru the floor Nozzle. IMPORTANT Vacuum will not rotate when the cleaner is in water. Unplug before using cleaning tools, place cleaner 3.2 handle in the upright position. Attach tool to pick up debris by pushing it clicks (A). Not to the hose (A). Rinse and air dry 24...-Powered Hand Tool. 3.3 A B 3.3 Attach tool or wand to be used in upright position. Valve dial must be used for desired use when handle is placed into hose tube until you hear a click. 3.3 Set air valve for upholstered furniture, and carpeted stairs. ATTACH WAND AND TOOLS (Tools ...

Product Manual
Page 9
... on stairs. Attach the plug end to the cord. 9 Actual model may result in upright position. 3.4 3.5 ! When using tools, always ensure handle is in upright position. CAUTION ! To avoid personal injury or damage, and to back. Use extra care when cleaning on floor. CORD STORAGE 3.6 ...3.6 Wrap cord around hooks for stair cleaning. Never leave the vacuum standing on stairs. STAIR CLEANING 3.4 Lift vacuum by Stair Cleaning Handle and position on stairs when not cleaning. 3.5 Use the Hose and Turbo Tool (Tool varies per model) for convenient storage. Clean forward to...
... on stairs. Attach the plug end to the cord. 9 Actual model may result in upright position. 3.4 3.5 ! When using tools, always ensure handle is in upright position. CAUTION ! To avoid personal injury or damage, and to back. Use extra care when cleaning on floor. CORD STORAGE 3.6 ...3.6 Wrap cord around hooks for stair cleaning. Never leave the vacuum standing on stairs. STAIR CLEANING 3.4 Lift vacuum by Stair Cleaning Handle and position on stairs when not cleaning. 3.5 Use the Hose and Turbo Tool (Tool varies per model) for convenient storage. Clean forward to...
Product Manual
Page 13
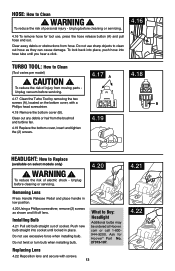
...to Replace (available on the bottom cover, with screws. 13 4.21 4.22 Unplug before cleaning or servicing. 4.20 Removing Lens Press Handle Release Pedal and place handle in place. HOSE: How to Clean (Tool varies per model) ! CAUTION ! To reduce the risk of electric shock - Unplug ...before cleaning or servicing. 4.16 To remove hose for Hoover® Part No. 27313-107. Replacing Lens 4.22 Reposition lens and secure with a ...
...to Replace (available on the bottom cover, with screws. 13 4.21 4.22 Unplug before cleaning or servicing. 4.20 Removing Lens Press Handle Release Pedal and place handle in place. HOSE: How to Clean (Tool varies per model) ! CAUTION ! To reduce the risk of electric shock - Unplug ...before cleaning or servicing. 4.16 To remove hose for Hoover® Part No. 27313-107. Replacing Lens 4.22 Reposition lens and secure with a ...


