Hoover UH71100 Support and Manuals
Get Help and Manuals for this Hoover item
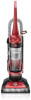
View All Support Options Below
Free Hoover UH71100 manuals!
Problems with Hoover UH71100?
Ask a Question
Free Hoover UH71100 manuals!
Problems with Hoover UH71100?
Ask a Question
Hoover UH71100 Videos

Hoover Max Cap UH71100 Review
Duration: :42
Total Views: 280
Duration: :42
Total Views: 280
Popular Hoover UH71100 Manual Pages
Product Manual - Page 1

...;gina 29
hoover.com
IMPORTANT: READ CAREFULLY BEFORE ASSEMBLY AND USE. All Rights Reserved. #961152124-R1
THIS PRODUCT IS INTENDED FOR HOUSEHOLD USE ONLY. IF USED COMMERCIALLY WARRANTY IS VOID.
©2019 Techtronic Floor Care Technology Limited. PLEASE DO NOT RETURN THIS PRODUCT TO THE STORE. OWNER'S MANUAL
Operating and Servicing Instructions
French - 15...
Product Manual - Page 2

... Cup...9 Filters...9-10 Brushroll...11 Belt ...11 Hose...12 Troubleshooting 13 Service & Warranty 14
If you need assistance: Visit our website at Hoover.com or call 1-800-944-9200 for an automated referral of Hoover® authorized dealer locations (U.S. Follow the authorized dealer locator link to this owner's manual. MODEL
MFG. CODE
Hint: Attach your sales receipt to...
Product Manual - Page 3
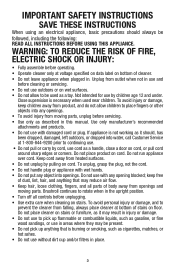
... burning or smoking, such as described in this manual. Do not place cleaner on cord.
Do not... away from moving parts. WARNING: TO REDUCE THE RISK OF FIRE, ELECTRIC SHOCK OR INJURY:
• Fully assemble before servicing. • Use... a handle, close a door on cord. IMPORTANT SAFETY INSTRUCTIONS SAVE THESE INSTRUCTIONS
When using an electrical appliance, basic precautions should , has...
Product Manual - Page 4
... cause damage. • With brushroll on and handle is wider than the other). Always store vacuum with this appliance has a polarized plug (one way.
CAUTION: TO REDUCE THE RISK OF DAMAGE... • Do not use sharp objects to install the proper outlet. To avoid damage to carpet, rugs, furniture and flooring, avoid tipping cleaner or setting it still does not fit, contact a qualified...
Product Manual - Page 5

....
1.2
1.3
POSITION TOOLS
1.4 Place Crevice Tool into hose tube until you hear a click.
1.6
1.5
F
E
5 Actual model may vary from carton and identify each item shown. VACUUM ASSEMBLY
CARTON CONTENTS
A.
1. Remove all parts are located before disposing of hose guide located on top of the wand.
*Varies per model. Using a Phillips screwdriver, fasten (1) large screw behind handle into...
Product Manual - Page 6

...; For high pile carpet, use high carpet setting to the next higher setting. IMPORTANT
If the vacuum is difficult to push, push down and turn knob to ease pushing effort.
Actual model may vary from images shown. 6 Hose
15.
CARPET HEIGHT ADJUSTMENT*
2.3
C
*Number of height settings vary per model.
9
18
13
ON-OFF SWITCH
2.2
A
2.2 Plug cord...
Product Manual - Page 7
... back into place, push hose into place.
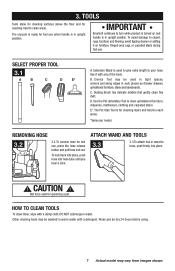
! CAUTION ! The vacuum is in water. To avoid damage to carpet, rugs, furniture and flooring, avoid tipping cleaner or setting it with a damp cloth. SELECT PROPER TOOL
3.1
A
B
C...length to reach areas.
*Varies per model. DO NOT submerge in upright position. Rinse and air dry 24 hours before using.
7 Actual model may be used in tight spaces, ...
Product Manual - Page 8
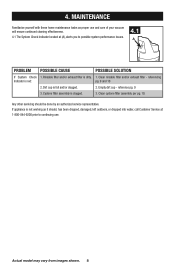
... dropped, damaged, left outdoors, or dropped into water, call Customer Service at (A), alerts you to continuing use and care of your vacuum will ensure continued cleaning effectiveness.
4.1 The System Check Indicator located at 1-800-844-9200 prior to possible system performance issues.
4.1
A
PROBLEM POSSIBLE CAUSE
POSSIBLE SOLUTION
If System Check 1.
Clean cyclone filter...
Product Manual - Page 9
... minutes or until it locks into your cleaner needs servicing.
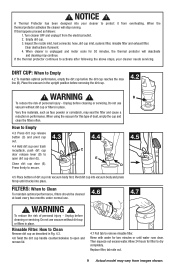
How to Empty
4.3 Press dirt cup release button... dry completely.
Replace filter, tab side out.
9 Actual model may continue. Clear obstructions if present. 4. WARNING !
When using the vacuum for filter to... filter. Place the vacuum in place.
Unplug before the dirt cup reaches the max line (B). FILTERS: ...
Product Manual - Page 10
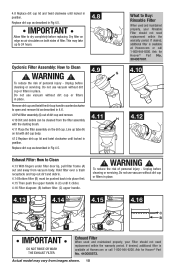
... not need replacement within the warranty period. Do not use vacuum without dirt cup or filters in 4.6.
4.9 Pull filter assembly (G) out of filter.
Unplug before cleaning or servicing. To reduce the risk of personal injury - G 4.10
H 4.12
Exhaust Filter: How to Clean
! Replace dirt cup as described in place. Ask for Hoover® Part
No. 440005573...
Product Manual - Page 11
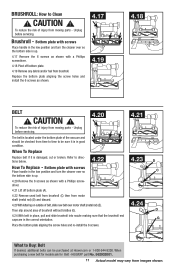
... plate aligning the screw holes and install the 6 screws as shown with a Phillips screwdriver.
4.18 Pivot off bottom plate (A).
4.22 Remove used belt from brushroll (C) then from images shown. The belt is located under the bottom plate of the vacuum and should be checked from moving parts - When To Replace
Replace belt if it is damaged, cut or...
Product Manual - Page 12

... To remove hose for their lifetime. Clear away debris or obstructions from images shown. 12 The addition of personal injury - Actual model may vary from hose.
Unplug before cleaning or servicing.
LUBRICATION
The motor and brushroll are equipped with bearings which contain sufficient lubrication for tool use sharp objects to motor or...
Product Manual - Page 13

....
2. Unplug before cleaning or servicing. Rinsable Filter and/or Exhaust Filter
not installed completely. 1. POSSIBLE SOLUTION
1. Reference Pg. 9 & 10. 2. Replace belt - Pg. 13. Set Carpet Height Adjustment to cool for 30min. (This willl reset the thermal protector)
1. Pg.6.
1. Pg. 6.
1. Clear/ remove debris from images shown. TROUBLESHOOTING
If a minor problem occurs, it should be...
Product Manual - Page 14

...Hoover. SERVICE & WARRANTY
SERVICE INFORMATION & LIMITED WARRANTY FOR HOOVER® WINDTUNNEL HIGH CAPACITY & WINDTUNNEL MAX CAPACITY
LIMITED TWO YEAR WARRANTY (DOMESTIC USE)
If this product at 888 679-2121. Military Exchanges, and Canada. 6.
Please have other acts beyond the control of the product by the original owner. If parts and replacements are either repair your Hoover...
Hoover UH71100 Reviews
We have not received any reviews for Hoover yet.