
Product Manual
Page 3
... outdoors or on wet surfaces. • Do not allow children to place fingers or other objects into openings. Unplug from openings and moving parts. • Turn off all parts of stairs on floor. Do not use with damaged cord or plug. IMPORTANT SAFETY INSTRUCTIONS SAVE THESE INSTRUCTIONS When using an electrical appliance...
... outdoors or on wet surfaces. • Do not allow children to place fingers or other objects into openings. Unplug from openings and moving parts. • Turn off all parts of stairs on floor. Do not use with damaged cord or plug. IMPORTANT SAFETY INSTRUCTIONS SAVE THESE INSTRUCTIONS When using an electrical appliance...

Product Manual
Page 5
... behind handle into vacuum. Dirt cup is secure when you hear a click. 1.4 POSITION TOOLS (varies per model 1.1 A Remove all parts are located before disposing of Turbo Tool (A) and pivot into Air powered Tool Clip until instruction 1.3 1.2 Insert handle section into vacuum body...DIRT CUP 1.4 Place bottom of vacuum as shown. 5 Actual model may be ordered at Hoover.com or call 1-800-944-9200. Pivot cup into vacuum base. Telescoping Wand F. Screw (for assembly) G. Make sure all parts from images shown. B C 1.6 Place Crevice Tool into Wand and slide into tool storage...
... behind handle into vacuum. Dirt cup is secure when you hear a click. 1.4 POSITION TOOLS (varies per model 1.1 A Remove all parts are located before disposing of Turbo Tool (A) and pivot into Air powered Tool Clip until instruction 1.3 1.2 Insert handle section into vacuum body...DIRT CUP 1.4 Place bottom of vacuum as shown. 5 Actual model may be ordered at Hoover.com or call 1-800-944-9200. Pivot cup into vacuum base. Telescoping Wand F. Screw (for assembly) G. Make sure all parts from images shown. B C 1.6 Place Crevice Tool into Wand and slide into tool storage...
Product Manual
Page 11
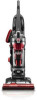
...on dirt cup latch to Clean 4.8 With fingers in Fig 4.5. ! If desired, additional filter is available at Hoover.com or call 1-800-944-9200. Ask for Hoover® Part No. 304087001 Filter Made With HEPA Media: How to open dirt cup door (C). This may vary from water and...vacuum. ! WARNING ! IMPORTANT 4.8 DO NOT RINSE OR WASH THE FILTER MADE WITH HEPA MEDIA. Squeeze filter twice while underwater. Ask for Hoover® Part No. 305687001. 11 Actual model may take up . WARNING ! Rinsable Filter: How to dry completely before cleaning or servicing. IMPORTANT Allow ...
...on dirt cup latch to Clean 4.8 With fingers in Fig 4.5. ! If desired, additional filter is available at Hoover.com or call 1-800-944-9200. Ask for Hoover® Part No. 304087001 Filter Made With HEPA Media: How to open dirt cup door (C). This may vary from water and...vacuum. ! WARNING ! IMPORTANT 4.8 DO NOT RINSE OR WASH THE FILTER MADE WITH HEPA MEDIA. Squeeze filter twice while underwater. Ask for Hoover® Part No. 305687001. 11 Actual model may take up . WARNING ! Rinsable Filter: How to dry completely before cleaning or servicing. IMPORTANT Allow ...
Product Manual
Page 12
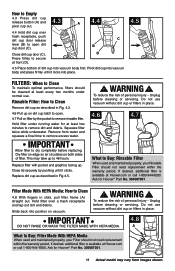
... screws (A). 4.14 Pivot out bottom plate away from hidden latch (B) and remove any debris and/or hair from images shown. 12 Press firmly at Hoover.com or call 1-800-944-9200. IMPORTANT DO NOT RINSE OR WASH the Carbon Filter. Place the filter assembly (4.9, A) on the dirt cup, ...aligning (3) tabs on select models only). Ask for Hoover® Part 902404001. . BRUSHROLL: How to Clean (Available on filter with HEPA media. Carbon Filter : How to Clean ! To reduce the risk of filter ...
... screws (A). 4.14 Pivot out bottom plate away from hidden latch (B) and remove any debris and/or hair from images shown. 12 Press firmly at Hoover.com or call 1-800-944-9200. IMPORTANT DO NOT RINSE OR WASH the Carbon Filter. Place the filter assembly (4.9, A) on the dirt cup, ...aligning (3) tabs on select models only). Ask for Hoover® Part 902404001. . BRUSHROLL: How to Clean (Available on filter with HEPA media. Carbon Filter : How to Clean ! To reduce the risk of filter ...
Product Manual
Page 13
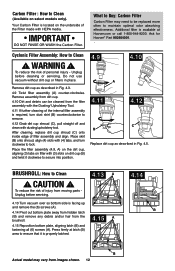
Unplug before cleaning or servicing. 4.16 To remove hose for Hoover® Part No. 27313-107. To reduce the risk of socket. Installing Bulb 4.21 Pull old bulb straight out of injury from moving parts Unplug vacuum before cleaning or servicing. 4.20 Removing Lens Press Handle Release ...18 Remove the bottom cover (B). WARNING ! To reduce the risk of personal injury - HOSE: How to Buy: Headlight Additional bulbs may be ordered at Hoover. Clear away debris or obstructions from the brushroll and turbine fan. 4.19 Replace the bottom cover, insert and tighten the (2) screws. 4.17 A ...
Unplug before cleaning or servicing. 4.16 To remove hose for Hoover® Part No. 27313-107. To reduce the risk of socket. Installing Bulb 4.21 Pull old bulb straight out of injury from moving parts Unplug vacuum before cleaning or servicing. 4.20 Removing Lens Press Handle Release ...18 Remove the bottom cover (B). WARNING ! To reduce the risk of personal injury - HOSE: How to Buy: Headlight Additional bulbs may be ordered at Hoover. Clear away debris or obstructions from the brushroll and turbine fan. 4.19 Replace the bottom cover, insert and tighten the (2) screws. 4.17 A ...
Product Manual
Page 14
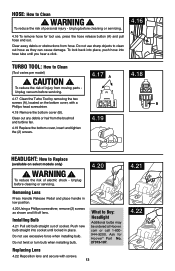
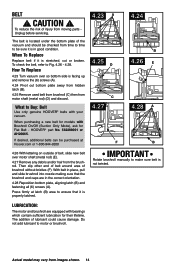
... (metal rod) (E). 4.27 Remove any debris and/or hair from time to time to be purchased at latch (B) area to Buy: Belt Use only genuine HOOVER® belts with Brushroll On/Off (Suction Only Mode), ask for Flat Belt - Do not add lubricant to motor or brushroll. 4.23 A 4.24 4.25 D... B 4.26 E C 4.27 4.28 A F B IMPORTANT Rotate brushroll manually to Fig. 4.26 - 4.28. BELT ! CAUTION ! HOOVER® part No. 562289001 or AH20065. If desired, additional belts can be sure it is properly latched.
... (metal rod) (E). 4.27 Remove any debris and/or hair from time to time to be purchased at latch (B) area to Buy: Belt Use only genuine HOOVER® belts with Brushroll On/Off (Suction Only Mode), ask for Flat Belt - Do not add lubricant to motor or brushroll. 4.23 A 4.24 4.25 D... B 4.26 E C 4.27 4.28 A F B IMPORTANT Rotate brushroll manually to Fig. 4.26 - 4.28. BELT ! CAUTION ! HOOVER® part No. 562289001 or AH20065. If desired, additional belts can be sure it is properly latched.
Product Manual
Page 16
Mon-Fri 8am-7pm EST. SERVICE To obtain approved Hoover® service and genuine Hoover® parts, locate the nearest Authorized Hoover® Warranty Service Dealer (Depot) by the complete model number when requesting information or ordering parts. (The model number appears on the bottom of authorized service outlet locations call 1-800-944-9200; Do not...
Mon-Fri 8am-7pm EST. SERVICE To obtain approved Hoover® service and genuine Hoover® parts, locate the nearest Authorized Hoover® Warranty Service Dealer (Depot) by the complete model number when requesting information or ordering parts. (The model number appears on the bottom of authorized service outlet locations call 1-800-944-9200; Do not...

Product Manual
Page 17
... States, including its territories and possessions, outside of Canada. Some states do not allow the exclusion of warranty service outlets, phone the Hoover® Consumer Response Center, Phone 1-800-9449200, Mon-Fri 8am-7pm EST. 7. This warranty does not cover pick up, delivery,...the state of purchase (the "Warranty Period"). The Warranty Period will provide labor and parts, at www.hoover. you mail your HOOVER® product is not transferable and may not apply to a Hoover® Authorized Warranty Service Dealer, cost of purchase. For additional assistance or information ...
... States, including its territories and possessions, outside of Canada. Some states do not allow the exclusion of warranty service outlets, phone the Hoover® Consumer Response Center, Phone 1-800-9449200, Mon-Fri 8am-7pm EST. 7. This warranty does not cover pick up, delivery,...the state of purchase (the "Warranty Period"). The Warranty Period will provide labor and parts, at www.hoover. you mail your HOOVER® product is not transferable and may not apply to a Hoover® Authorized Warranty Service Dealer, cost of purchase. For additional assistance or information ...


