Product Manual
Page 3
...944-9200 to speak with a customer service representative; Visit Hoover.com for additional video instructions for an automated referral of Hoover® authorized dealer locations (U.S. Mon- Please enter the complete model and Manufacturing Code in the spaces provided. Verification of date... of purchase may be required for choosing a HOOVER® product. Thank you for warranty service of your HOOVER® product. MODEL MFG. MANUFACTURING CODE (Label located on back of vacuum) CONTENTS Important Safety Instructions 3 Vacuum ...
...944-9200 to speak with a customer service representative; Visit Hoover.com for additional video instructions for an automated referral of Hoover® authorized dealer locations (U.S. Mon- Please enter the complete model and Manufacturing Code in the spaces provided. Verification of date... of purchase may be required for choosing a HOOVER® product. Thank you for warranty service of your HOOVER® product. MODEL MFG. MANUFACTURING CODE (Label located on back of vacuum) CONTENTS Important Safety Instructions 3 Vacuum ...
Product Manual
Page 10
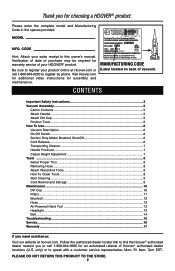
... instruction 1.3 1.2 Insert handle section into vacuum body first. Dirt cup is secure when you hear a click. 1.4 POSITION TOOLS (varies per model Remove all parts are located before disposing of dirt cup into vacuum base. Air-Powered Hand Tool* D D. Dirt Cup H Dusting/Upholstery Tool* ...*Varies per model) 1.5 Attach bottom of vacuum as shown. 1.5 A 1.6 C B 5 Actual model may be ordered at Hoover.com or call 1-800-944-9200. ATTACH HANDLE Note: Remove the screw located in the vacuum base ...
... instruction 1.3 1.2 Insert handle section into vacuum body first. Dirt cup is secure when you hear a click. 1.4 POSITION TOOLS (varies per model Remove all parts are located before disposing of dirt cup into vacuum base. Air-Powered Hand Tool* D D. Dirt Cup H Dusting/Upholstery Tool* ...*Varies per model) 1.5 Attach bottom of vacuum as shown. 1.5 A 1.6 C B 5 Actual model may be ordered at Hoover.com or call 1-800-944-9200. ATTACH HANDLE Note: Remove the screw located in the vacuum base ...
Product Manual
Page 11
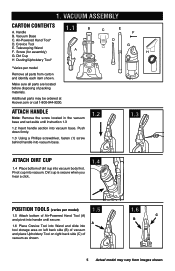
... (A) once. Brushroll should be turned off position for cleaning of the plug and pull to be in the upright position. ! IMPORTANT When pulling on select models only 23. HOW TO USE VACUUM DESCRIPTION 1. Handle 2.1 1 2. ON/OFF Switch 3. Air-Powered Hand Tool ** 2 4. Rinsable Filter Access 3 7. Dirt Cup 8. Cord... cord is shipped with HEPA media 5 and Carbon Filter* Access 13 14 10. Handle Release Pedal **Varies per model ON-OFF SWITCH 2.2 A SUCTION ONLY MODE/ BRUSHROLL SHUT-OFF for grooming a pet. To turn vacuum OFF, push switch again. Actual...
... (A) once. Brushroll should be turned off position for cleaning of the plug and pull to be in the upright position. ! IMPORTANT When pulling on select models only 23. HOW TO USE VACUUM DESCRIPTION 1. Handle 2.1 1 2. ON/OFF Switch 3. Air-Powered Hand Tool ** 2 4. Rinsable Filter Access 3 7. Dirt Cup 8. Cord... cord is shipped with HEPA media 5 and Carbon Filter* Access 13 14 10. Handle Release Pedal **Varies per model ON-OFF SWITCH 2.2 A SUCTION ONLY MODE/ BRUSHROLL SHUT-OFF for grooming a pet. To turn vacuum OFF, push switch again. Actual...
Product Manual
Page 14
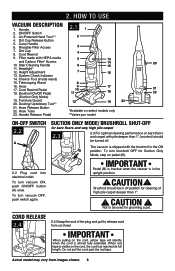
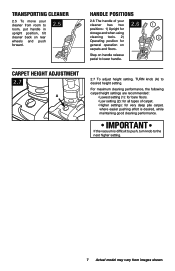
... cleaning tools. 2) Operating position for very deep pile carpet, where easier pushing effort is difficult to push, turn knob to the next higher setting. 7 Actual model may vary from room to room, put handle in upright position, tilt cleaner back on rear wheels and push forward. 2.5 HANDLE POSITIONS 2.6 The handle of...
... cleaning tools. 2) Operating position for very deep pile carpet, where easier pushing effort is difficult to push, turn knob to the next higher setting. 7 Actual model may vary from room to room, put handle in upright position, tilt cleaner back on rear wheels and push forward. 2.5 HANDLE POSITIONS 2.6 The handle of...
Product Manual
Page 15
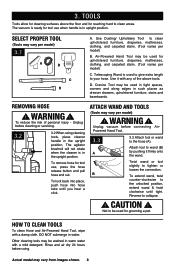
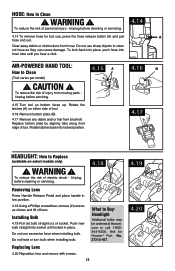
... submerge in the upright position. D. Unplug before cleaning or servicing. 3.2 3.2 When using . ATTACH WAND AND TOOLS (Tools may vary per model) ! Attach tool to be used for tool use , press the hose release button and pull hose end out. To remove hose for upholstered... furniture, draperies, mattresses, clothing, and carpeted stairs. (Tool varies per model) B. Reverse to tighten or loosen the connection. The vacuum is in warm water with a mild detergent. Unplug vacuum before using cleaning ...
... submerge in the upright position. D. Unplug before cleaning or servicing. 3.2 3.2 When using . ATTACH WAND AND TOOLS (Tools may vary per model) ! Attach tool to be used for tool use , press the hose release button and pull hose end out. To remove hose for upholstered... furniture, draperies, mattresses, clothing, and carpeted stairs. (Tool varies per model) B. Reverse to tighten or loosen the connection. The vacuum is in warm water with a mild detergent. Unplug vacuum before using cleaning ...
Product Manual
Page 18
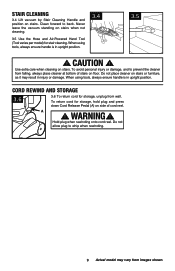
... cord for stair cleaning. Never leave the vacuum standing on stairs when not cleaning. 3.5 Use the Hose and Air-Powered Hand Tool (Tool varies per model) for storage, hold plug and press down Cord Release Pedal (A) on side of stairs on stairs or furniture, as it may vary from falling, always...
... cord for stair cleaning. Never leave the vacuum standing on stairs when not cleaning. 3.5 Use the Hose and Air-Powered Hand Tool (Tool varies per model) for storage, hold plug and press down Cord Release Pedal (A) on side of stairs on stairs or furniture, as it may vary from falling, always...
Product Manual
Page 19
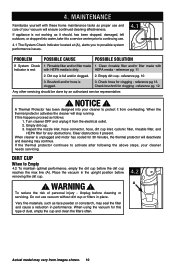
... continued cleaning effectiveness. 4.1 If appliance is full and/or clogged. 2. To reduce the risk of dust, empty the cup and clean the filters often. 4.2 A Actual model may vary from the electrical outlet. 2. Check brushroll for clogging - Empty dirt cup - Very fine materials, such as follows: 1. Clean rinsable filter and/or filter...
... continued cleaning effectiveness. 4.1 If appliance is full and/or clogged. 2. To reduce the risk of dust, empty the cup and clean the filters often. 4.2 A Actual model may vary from the electrical outlet. 2. Check brushroll for clogging - Empty dirt cup - Very fine materials, such as follows: 1. Clean rinsable filter and/or filter...

Product Manual
Page 22
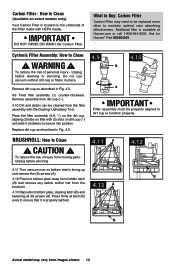
...vary from water and squeeze a final time to remove excess water. To reduce the risk of personal injury - Ask for Hoover® Part No. 305687001. 11 Actual model may take up to 48 hours. WARNING ! Unplug before replacing. Close lid securely by the pocket to remove rinsable filter.... to Buy: Filter Made With HEPA Media When used and maintained properly, your Filter should not need replacement within the warranty period. Ask for Hoover® Part No. 303903001. Hold filter under normal use vacuum without dirt cup or filters in slots, pull filter frame (A) straight out. ...
...vary from water and squeeze a final time to remove excess water. To reduce the risk of personal injury - Ask for Hoover® Part No. 305687001. 11 Actual model may take up to 48 hours. WARNING ! Unplug before replacing. Close lid securely by the pocket to remove rinsable filter.... to Buy: Filter Made With HEPA Media When used and maintained properly, your Filter should not need replacement within the warranty period. Ask for Hoover® Part No. 303903001. Hold filter under normal use vacuum without dirt cup or filters in slots, pull filter frame (A) straight out. ...
Product Manual
Page 23
...dirt cup or filters in Fig. 4.5. 4.9 4.10 B A IMPORTANT Filter assembly must be properly aligned to dirt cup to function properly. CAUTION ! B Actual model may need to be cleaned from images shown. 12 Remove assembly from dirt cup (A). 4.10 Dirt and debris can be replaced more often to Clean... filter assembly (4.9, B) on the dirt cup, aligning (3) tabs on dirt cup (A) and twist it clockwise to ensure that it is available at Hoover.com or call 1-800-944-9200. What to Buy: Carbon Filter Carbon Filter may vary from the filter assembly with (3) slots on filter with the...
...dirt cup or filters in Fig. 4.5. 4.9 4.10 B A IMPORTANT Filter assembly must be properly aligned to dirt cup to function properly. CAUTION ! B Actual model may need to be cleaned from images shown. 12 Remove assembly from dirt cup (A). 4.10 Dirt and debris can be replaced more often to Clean... filter assembly (4.9, B) on the dirt cup, aligning (3) tabs on dirt cup (A) and twist it clockwise to ensure that it is available at Hoover.com or call 1-800-944-9200. What to Buy: Carbon Filter Carbon Filter may vary from the filter assembly with (3) slots on filter with the...
Product Manual
Page 26
... hose tube until locked in low position. 4.18 Using a Phillips screwdriver, remove (2) screws as they can cause damage. Rotate the latches (A) on select models only) ! Replace bottom plate by aligning tabs along front edge of socket. Replacing Lens 4.20 Reposition lens and secure with screws. 13 4.19 4.20 ... of tool. Do not twist or turn bulb when installing bulb. HOSE: How to Buy: Headlight Additional bulbs may be ordered at Hoover. To reduce the risk of electric shock - What to Clean ! Unplug before cleaning or servicing. 4.14 4.14 To remove hose for...
... hose tube until locked in low position. 4.18 Using a Phillips screwdriver, remove (2) screws as they can cause damage. Rotate the latches (A) on select models only) ! Replace bottom plate by aligning tabs along front edge of socket. Replacing Lens 4.20 Reposition lens and secure with screws. 13 4.19 4.20 ... of tool. Do not twist or turn bulb when installing bulb. HOSE: How to Buy: Headlight Additional bulbs may be ordered at Hoover. To reduce the risk of electric shock - What to Clean ! Unplug before cleaning or servicing. 4.14 4.14 To remove hose for...
Product Manual
Page 27
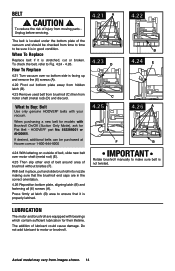
... manually to make sure belt is stretched, cut or broken. Do not add lubricant to Buy: Belt Use only genuine HOOVER® belts with your vacuum. Press firmly at Hoover.com or 1-800-944-9200 4.24 With lettering on outside of belt, slide new belt over so bottom side is... bristles (F). The belt is located under the bottom plate of injury from motor shaft (metal rod) (D) and discard. When purchasing a new belt for models with bearings which contain sufficient lubrication for Flat Belt - What to motor or brushroll. How To Replace 4.21 Turn vacuum over motor shaft (metal rod...
... manually to make sure belt is stretched, cut or broken. Do not add lubricant to Buy: Belt Use only genuine HOOVER® belts with your vacuum. Press firmly at Hoover.com or 1-800-944-9200 4.24 With lettering on outside of belt, slide new belt over so bottom side is... bristles (F). The belt is located under the bottom plate of injury from motor shaft (metal rod) (D) and discard. When purchasing a new belt for models with bearings which contain sufficient lubrication for Flat Belt - What to motor or brushroll. How To Replace 4.21 Turn vacuum over motor shaft (metal rod...

Product Manual
Page 31
.... This will only result in Glenwillow for service. 6. SERVICE To obtain approved Hoover® service and genuine Hoover® parts, locate the nearest Authorized Hoover® Warranty Service Dealer (Depot) by the complete model number when requesting information or ordering parts. (The model number appears on the bottom of authorized service outlet locations call 1-800...
.... This will only result in Glenwillow for service. 6. SERVICE To obtain approved Hoover® service and genuine Hoover® parts, locate the nearest Authorized Hoover® Warranty Service Dealer (Depot) by the complete model number when requesting information or ordering parts. (The model number appears on the bottom of authorized service outlet locations call 1-800...

