Product Manual
Page 3
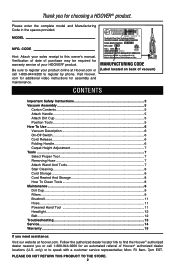
... register by phone. CODE Hint: Attach your product online at hoover.com. Verification of date of purchase may be required for warranty service of vacuum) CONTENTS Important Safety Instructions 3 Vacuum Assembly 5 Carton Contents 5 Attach Handle 5 Attach Dirt Cup 5 Position Tools 5 How To Use ...6 Vacuum Description 6 On-Off Switch 6 Cord Release 6 Folding Handle 6 Carpet Height...
... register by phone. CODE Hint: Attach your product online at hoover.com. Verification of date of purchase may be required for warranty service of vacuum) CONTENTS Important Safety Instructions 3 Vacuum Assembly 5 Carton Contents 5 Attach Handle 5 Attach Dirt Cup 5 Position Tools 5 How To Use ...6 Vacuum Description 6 On-Off Switch 6 Cord Release 6 Folding Handle 6 Carpet Height...
Product Manual
Page 10
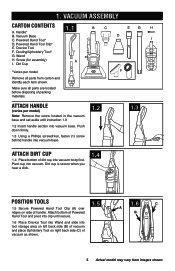
... Screw (for assembly) I F ATTACH HANDLE (varies per model Remove all parts are located before disposing of dirt cup into vacuum body first. Pivot cup into vacuum base. Powered Hand Tool Clip* E. Dusting/Upholstery Tool* G. Push down firmly. 1.3 Using a Phillips screwdriver, fasten (1) ...vary from carton and identify each item shown. Attach bottom of Powered Hand Tool and pivot into clip until instruction 1.3 1.2 Insert handle section into vacuum. Vacuum Base C. B C EG H D I . Dirt cup is secure when you hear a click. 1.4 POSITION TOOLS 1.5 Secure Powered Hand ...
... Screw (for assembly) I F ATTACH HANDLE (varies per model Remove all parts are located before disposing of dirt cup into vacuum body first. Pivot cup into vacuum base. Powered Hand Tool Clip* E. Dusting/Upholstery Tool* G. Push down firmly. 1.3 Using a Phillips screwdriver, fasten (1) ...vary from carton and identify each item shown. Attach bottom of Powered Hand Tool and pivot into clip until instruction 1.3 1.2 Insert handle section into vacuum. Vacuum Base C. B C EG H D I . Dirt cup is secure when you hear a click. 1.4 POSITION TOOLS 1.5 Secure Powered Hand ...
Product Manual
Page 11
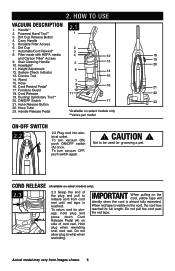
... cord, the cord has reached its full length. Headlight* 19 20 11. Hose 7 8 16. Hose Release Button 17 23 22. To turn vacuum OFF, push switch again. ! HOW TO USE VACUUM DESCRIPTION 2.1 1. Filter made with HEPA media 4 12 18 and Carbon Filter* Access 9. Height Adjustment 6 12. Furniture Guard 10 18. trical outlet... *Available on select models only) 2.3 Grasp the end of cord reel. 2. Powered Hand Tool** 1 3. Carry Handle 5. Stair Cleaning Handle 5 13 10. Wand 15. To turn vacuum ON, A push ON/OFF switch (A) once.
... cord, the cord has reached its full length. Headlight* 19 20 11. Hose 7 8 16. Hose Release Button 17 23 22. To turn vacuum OFF, push switch again. ! HOW TO USE VACUUM DESCRIPTION 2.1 1. Filter made with HEPA media 4 12 18 and Carbon Filter* Access 9. Height Adjustment 6 12. Furniture Guard 10 18. trical outlet... *Available on select models only) 2.3 Grasp the end of cord reel. 2. Powered Hand Tool** 1 3. Carry Handle 5. Stair Cleaning Handle 5 13 10. Wand 15. To turn vacuum ON, A push ON/OFF switch (A) once.
Product Manual
Page 14
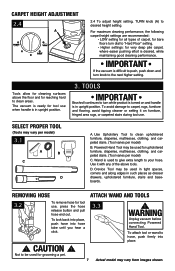
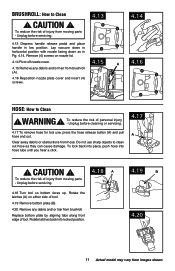
...Not to "Hard Floor" setting. • Higher settings: for tool use , press the hose release button and pull hose end out. The vacuum is ready for very deep pile carpet, where easier pushing effort is used in tight spaces, corners and along edges in upright position. Wand is... desired, while maintaining good cleaning performance. D. WARNING Unplug vacuum before connecting Powered Hand Tool. Use Upholstery Tool to clean areas. To lock back into place, push hose into place. ! CAUTION ! TOOLS ...
...Not to "Hard Floor" setting. • Higher settings: for tool use , press the hose release button and pull hose end out. The vacuum is ready for very deep pile carpet, where easier pushing effort is used in tight spaces, corners and along edges in upright position. Wand is... desired, while maintaining good cleaning performance. D. WARNING Unplug vacuum before connecting Powered Hand Tool. Use Upholstery Tool to clean areas. To lock back into place, push hose into place. ! CAUTION ! TOOLS ...
Product Manual
Page 15
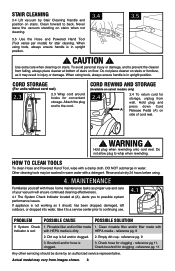
...Rinse and air dry 24 hours before using tools, always ensure handle is dirty. Attach the plug end to continuing use and care of your vacuum will ensure continued cleaning effectiveness. 4.1 A 4.1 The System Check Indicator located at bottom of cord reel. ! HEPA media - Empty dirt ... only) 2.4 2.4 To return cord for clogging - Hold plug and press down Cord A Release Pedal (A) on stairs. STAIR CLEANING 3.4 Lift vacuum by an authorized service representative. Any other servicing should , has been dropped, damaged, left outdoors, or dropped into water, take it should be...
...Rinse and air dry 24 hours before using tools, always ensure handle is dirty. Attach the plug end to continuing use and care of your vacuum will ensure continued cleaning effectiveness. 4.1 A 4.1 The System Check Indicator located at bottom of cord reel. ! HEPA media - Empty dirt ... only) 2.4 2.4 To return cord for clogging - Hold plug and press down Cord A Release Pedal (A) on stairs. STAIR CLEANING 3.4 Lift vacuum by an authorized service representative. Any other servicing should , has been dropped, damaged, left outdoors, or dropped into water, take it should be...
Product Manual
Page 18
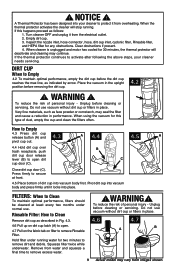
... cup door release lever (B) to open . 4.7 Pull on the fabric tab on filter to remove excess water. ! Pivot dirt cup into vacuum body and press firmly until it from water and squeeze a final time to remove Rinsable Filter. To reduce the risk of personal injury - ...If this type of dirt cup into your cleaner needs servicing. WARNING ! Very fine materials, such as described in performance. When using the vacuum for any obstructions. ! Squeeze filter twice while underwater. Unplug before cleaning or servicing. Empty dirt cup. 3. FILTERS: When to open dirt cup...
... cup door release lever (B) to open . 4.7 Pull on the fabric tab on filter to remove excess water. ! Pivot dirt cup into vacuum body and press firmly until it from water and squeeze a final time to remove Rinsable Filter. To reduce the risk of personal injury - ...If this type of dirt cup into your cleaner needs servicing. WARNING ! Very fine materials, such as described in performance. When using the vacuum for any obstructions. ! Squeeze filter twice while underwater. Unplug before cleaning or servicing. Empty dirt cup. 3. FILTERS: When to open dirt cup...
Product Manual
Page 19
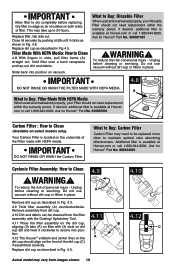
...800-944-9200. Additional filter is available at Hoover.com or call 1-800-944-9200. Hold filter over a trash receptacle and tap out dirt and debris. Ask for Hoover® Part No. 304087001 ! Dry filter on edge so air circulates on vacuum. Replace filter, tab side out. IMPORTANT 4.8 ...DO NOT RINSE OR WASH THE FILTER MADE WITH HEPA MEDIA. Ask for Hoover® Part No. 305687001. Unplug before cleaning ...
...800-944-9200. Additional filter is available at Hoover.com or call 1-800-944-9200. Hold filter over a trash receptacle and tap out dirt and debris. Ask for Hoover® Part No. 304087001 ! Dry filter on edge so air circulates on vacuum. Replace filter, tab side out. IMPORTANT 4.8 ...DO NOT RINSE OR WASH THE FILTER MADE WITH HEPA MEDIA. Ask for Hoover® Part No. 305687001. Unplug before cleaning ...
Product Manual
Page 22
... hose as in Fig. 4.14. To reduce the risk of tool. 4.19 Remove bottom plate (B). 4.20 Remove any debris and/or hair from hose. Lay vacuum down in hortizontal position with nozzle facing down as they can cause damage. Do not use , press the hose release button (A) and pull hose end...
... hose as in Fig. 4.14. To reduce the risk of tool. 4.19 Remove bottom plate (B). 4.20 Remove any debris and/or hair from hose. Lay vacuum down in hortizontal position with nozzle facing down as they can cause damage. Do not use , press the hose release button (A) and pull hose end...
Product Manual
Page 23
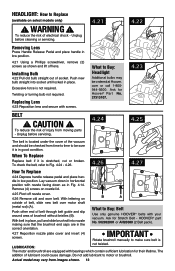
... until locked in hortizontal position with bearings which contain sufficient lubrication for their lifetime. Replacing Lens 4.23 Reposition lens and secure with your vacuum. CAUTION ! Unplug before cleaning or servicing. 4.21 4.22 Removing Lens Press Handle Release Pedal and place handle in low position. 4....sure it is not required. Unplug before servicing. 4.24 4.25 The belt is located under the cover of the vacuum and should be checked from images shown. 12 HOOVER® part No. 562932001 or AH20080 (2 Belt pack). HEADLIGHT: How to Replace (available on nozzle lid. ...
... until locked in hortizontal position with bearings which contain sufficient lubrication for their lifetime. Replacing Lens 4.23 Reposition lens and secure with your vacuum. CAUTION ! Unplug before cleaning or servicing. 4.21 4.22 Removing Lens Press Handle Release Pedal and place handle in low position. 4....sure it is not required. Unplug before servicing. 4.24 4.25 The belt is located under the cover of the vacuum and should be checked from images shown. 12 HOOVER® part No. 562932001 or AH20080 (2 Belt pack). HEADLIGHT: How to Replace (available on nozzle lid. ...
Product Manual
Page 26
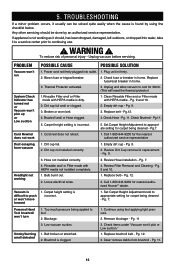
.... 3. Remove blockage - TROUBLESHOOTING If a minor problem occurs, it to a service center prior to tool. 2. Pg. 9. 2. Pg. 7. Low vacuum suction. To reduce risk of personal injury - Set Carpet Height Adjustment to cool for nearest authorized Hoover® dealer. smell detected 2. Brushroll and/ or Hose clogged. 4. Powered Hand Tool brushroll won 't pick or Low...
.... 3. Remove blockage - TROUBLESHOOTING If a minor problem occurs, it to a service center prior to tool. 2. Pg. 9. 2. Pg. 7. Low vacuum suction. To reduce risk of personal injury - Set Carpet Height Adjustment to cool for nearest authorized Hoover® dealer. smell detected 2. Brushroll and/ or Hose clogged. 4. Powered Hand Tool brushroll won 't pick or Low...

Product Manual
Page 27
... service outlet locations call 1-800-944-9200; Do not send your vacuum by : • Checking the Yellow Pages under "Vacuum Cleaners" or "Household". • Visit our website at hoover.com (U.S. This will only result in Glenwillow for service. Always identify your vacuum to find the service outlet nearest you need further assistance: To speak...
... service outlet locations call 1-800-944-9200; Do not send your vacuum by : • Checking the Yellow Pages under "Vacuum Cleaners" or "Household". • Visit our website at hoover.com (U.S. This will only result in Glenwillow for service. Always identify your vacuum to find the service outlet nearest you need further assistance: To speak...


