
Manual
Page 3
...lint, hair, and anything that may reduce air flow. • Keep hair, loose clothing, fingers, and all controls before operating. • Operate vacuum only at bottom of cleaner. • Do not leave appliance when plugged in areas where they may result in injury or damage. • Do... into any opening blocked; Do not place product on stairs. Do not place cleaner on floor. Unplug from openings and moving parts. • Turn off all parts of California to cause cancer, birth defects or reproductive harm. WARNING: TO REDUCE THE RISK OF FIRE, ELECTRIC SHOCK OR INJURY...
...lint, hair, and anything that may reduce air flow. • Keep hair, loose clothing, fingers, and all controls before operating. • Operate vacuum only at bottom of cleaner. • Do not leave appliance when plugged in areas where they may result in injury or damage. • Do... into any opening blocked; Do not place product on stairs. Do not place cleaner on floor. Unplug from openings and moving parts. • Turn off all parts of California to cause cancer, birth defects or reproductive harm. WARNING: TO REDUCE THE RISK OF FIRE, ELECTRIC SHOCK OR INJURY...

Manual
Page 5
...parts from images shown. Attach handle (varies per model) Note: Remove the screw located in the vacuum... base and set aside until instruction 1.3 1.2 Insert handle section into clip until secure. Extension Wand H. Push down firmly. 1.3 Using a Phillips screwdriver, fasten (1) screw behind handle into vacuum... base. 1.2 1.3 Attach dirt cup 1.4 Place bottom of AirPowered Hand Tool and pivot into vacuum base. Crevice...(C) of handle. 1. Vacuum ASSEMBLY Carton contents A. Air-Powered Hand Tool* 1.1 B C G H D E I . Pivot cup into vacuum body first. B C...
...parts from images shown. Attach handle (varies per model) Note: Remove the screw located in the vacuum... base and set aside until instruction 1.3 1.2 Insert handle section into clip until secure. Extension Wand H. Push down firmly. 1.3 Using a Phillips screwdriver, fasten (1) screw behind handle into vacuum... base. 1.2 1.3 Attach dirt cup 1.4 Place bottom of AirPowered Hand Tool and pivot into vacuum base. Crevice...(C) of handle. 1. Vacuum ASSEMBLY Carton contents A. Air-Powered Hand Tool* 1.1 B C G H D E I . Pivot cup into vacuum body first. B C...

Manual
Page 8
... brushroll will not rotate when the cleaner is used in tight spaces, corners and along edges in the upright position. Unplug vacuum before servicing. Crevice Tool may be used to give extra length to the unlocked position, extend wand & twist clockwise until ...into hose tube until tight. B To extend wand, twist counter-clockwise to your hose. Select Proper Tool (Tools may vary from moving parts, unplug vacuum before connecting AirPowered Hand Tool. CAUTION ! 3. Removing Hose 3.2 3.2 When using . 8 Actual model may vary per model) B. Twist...
... brushroll will not rotate when the cleaner is used in tight spaces, corners and along edges in the upright position. Unplug vacuum before servicing. Crevice Tool may be used to give extra length to the unlocked position, extend wand & twist clockwise until ...into hose tube until tight. B To extend wand, twist counter-clockwise to your hose. Select Proper Tool (Tools may vary from moving parts, unplug vacuum before connecting AirPowered Hand Tool. CAUTION ! 3. Removing Hose 3.2 3.2 When using . 8 Actual model may vary per model) B. Twist...
Manual
Page 11
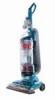
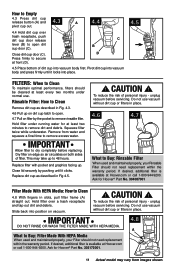
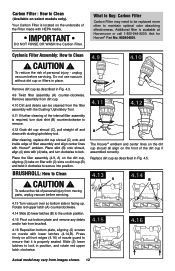
... desired, additional filter is available at least every two months under running water for at Hoover.com or call 1-800-944-9200. Slide back into vacuum body first. Ask for Hoover® Part No. 304087001 Filter Made With HEPA Media: How to Clean 4.8 With fingers in Fig... bottom of personal injury - Remove from images shown. Replace filter with pocket and graphics facing up. unplug vacuum before servicing. Press firmly to dry completely before replacing. Ask for Hoover® Part No. 303172001. 4.8 A 11 Actual model may take up on dirt cup latch to open dirt cup ...
... desired, additional filter is available at least every two months under running water for at Hoover.com or call 1-800-944-9200. Slide back into vacuum body first. Ask for Hoover® Part No. 304087001 Filter Made With HEPA Media: How to Clean 4.8 With fingers in Fig... bottom of personal injury - Remove from images shown. Replace filter with pocket and graphics facing up. unplug vacuum before servicing. Press firmly to dry completely before replacing. Ask for Hoover® Part No. 303172001. 4.8 A 11 Actual model may take up on dirt cup latch to open dirt cup ...
Manual
Page 12
cyclonic filter assembly: how to lock in Fig. 4.5. 4.13 A 4.14 b 4.13 Turn vacuum over so bottom side is properly seated. unplug vacuum before servicing. 4.11 4.12 C b The Hoover® emblem and center lines on the dirt cup should all front edges (4.16) of nozzle guard to ensure... position, and rotate red upper latch clockwise. 4.15 4.16 Actual model may need to be cleaned from moving parts, unplug vacuum before servicing. CAUTION ! Ask for Hoover® Part No. 902404001. Replace dirt cup as described in place. To reduce the risk of the dirt cup if assembled...
cyclonic filter assembly: how to lock in Fig. 4.5. 4.13 A 4.14 b 4.13 Turn vacuum over so bottom side is properly seated. unplug vacuum before servicing. 4.11 4.12 C b The Hoover® emblem and center lines on the dirt cup should all front edges (4.16) of nozzle guard to ensure... position, and rotate red upper latch clockwise. 4.15 4.16 Actual model may need to be cleaned from moving parts, unplug vacuum before servicing. CAUTION ! Ask for Hoover® Part No. 902404001. Replace dirt cup as described in place. To reduce the risk of the dirt cup if assembled...

Manual
Page 13
... 4.21 Using a Phillips screwdriver, remove (2) screws as they can cause damage. What to Clean (Tool varies per model) ! Ask for Hoover® Part No. 27313-107. 4.23 Replacing Lens 4.23 Reposition lens and secure with screws. 13 Actual model may be used for tool use excessive ...installing bulb. To reduce the risk of tool. 4.19 Remove bottom plate (B). 4.20 Remove any debris and/ or hair from moving parts, unplug vacuum before servicing. Not to Replace (available on either side of personal injury from brushroll. Replace bottom plate by aligning tabs along front edge...
... 4.21 Using a Phillips screwdriver, remove (2) screws as they can cause damage. What to Clean (Tool varies per model) ! Ask for Hoover® Part No. 27313-107. 4.23 Replacing Lens 4.23 Reposition lens and secure with screws. 13 Actual model may be used for tool use excessive ...installing bulb. To reduce the risk of tool. 4.19 Remove bottom plate (B). 4.20 Remove any debris and/ or hair from moving parts, unplug vacuum before servicing. Not to Replace (available on either side of personal injury from brushroll. Replace bottom plate by aligning tabs along front edge...

Manual
Page 14
...belt is stretched, cut or broken. Actual model may vary from motor shaft (metal rod) (D) and discard. CAUTION ! HOOVER® part No. 562289001 or AH20065. Slide (2) lower latches to lock in the correct orientation. 4.29 Reposition bottom plate, aligning ...HOOVER® belts with Brushroll On/Off (Suction Only Mode), ask for Flat Belt - Rotate red upper latch (A) counter clockwise. 4.25 Slide 2 lower latches (B) to ensure that the brushroll end caps are in position, and rotate red upper latch clockwise. If desired, additional belts can be checked from moving parts, unplug vacuum...
...belt is stretched, cut or broken. Actual model may vary from motor shaft (metal rod) (D) and discard. CAUTION ! HOOVER® part No. 562289001 or AH20065. Slide (2) lower latches to lock in the correct orientation. 4.29 Reposition bottom plate, aligning ...HOOVER® belts with Brushroll On/Off (Suction Only Mode), ask for Flat Belt - Rotate red upper latch (A) counter clockwise. 4.25 Slide 2 lower latches (B) to ensure that the brushroll end caps are in position, and rotate red upper latch clockwise. If desired, additional belts can be checked from moving parts, unplug vacuum...

Manual
Page 16
Service To obtain approved Hoover® service and genuine Hoover® parts, locate the nearest Authorized Hoover® Warranty Service Dealer (Depot) by the complete model number when requesting information or ordering parts. (The model number appears on the bottom of authorized service outlet locations call 1-800-944-9200; Always identify your vacuum to find the service...
Service To obtain approved Hoover® service and genuine Hoover® parts, locate the nearest Authorized Hoover® Warranty Service Dealer (Depot) by the complete model number when requesting information or ordering parts. (The model number appears on the bottom of authorized service outlet locations call 1-800-944-9200; Always identify your vacuum to find the service...


