
Manual
Page 3
..., keep free of dust, lint, hair, and anything that may reduce air flow. • Keep hair, loose clothing, fingers, and all parts of body away from openings and moving parts. • Turn off all controls before cleaning or servicing. • Do not use in areas where they may result in injury or...
..., keep free of dust, lint, hair, and anything that may reduce air flow. • Keep hair, loose clothing, fingers, and all parts of body away from openings and moving parts. • Turn off all controls before cleaning or servicing. • Do not use in areas where they may result in injury or...

Manual
Page 5
...of packing materials. Handle* B. Dusting/Upholstery Tool* G. Make sure all parts from images shown. Pivot cup into vacuum body first. Attach bottom of vacuum as shown. 5 Actual model may be ordered at Hoover.com or call 1-800-944-9200. Extension Wand H. Vacuum Base C. ...Tool Clip* E. Dirt cup is secure when you hear a click. 1.4 Position Tools (varies per model F Remove all parts are located before disposing of handle. Additional parts may vary from carton and identify each item shown. Dirt Cup *Varies per model) 1.5 1.6 1.5 Secure Air-Powered Hand ...
...of packing materials. Handle* B. Dusting/Upholstery Tool* G. Make sure all parts from images shown. Pivot cup into vacuum body first. Attach bottom of vacuum as shown. 5 Actual model may be ordered at Hoover.com or call 1-800-944-9200. Extension Wand H. Vacuum Base C. ...Tool Clip* E. Dirt cup is secure when you hear a click. 1.4 Position Tools (varies per model F Remove all parts are located before disposing of handle. Additional parts may vary from carton and identify each item shown. Dirt Cup *Varies per model) 1.5 1.6 1.5 Secure Air-Powered Hand ...

Manual
Page 8
... for tool use when handle is in such places as dresser drawers, upholstered furniture, stairs and baseboards. Air-Powered Hand Tool may vary from moving parts, unplug vacuum before connecting AirPowered Hand Tool. To lock back into place, push hose into hose tube until tight. Extension Wand is ready for cleaning...
... for tool use when handle is in such places as dresser drawers, upholstered furniture, stairs and baseboards. Air-Powered Hand Tool may vary from moving parts, unplug vacuum before connecting AirPowered Hand Tool. To lock back into place, push hose into hose tube until tight. Extension Wand is ready for cleaning...
Manual
Page 11
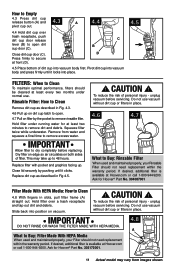
...release lever (B) to open . 4.7 Pull on filter by pushing until it locks into vacuum body and press firmly until it clicks. Ask for Hoover® Part No. 303172001. 4.8 A 11 Actual model may take up on dirt cup latch to open dirt cup door (C). CAUTION ! Slide back into ... pull filter frame (A) straight out. Close dirt cup door (C). Press firmly to secure at least every two months under running water for Hoover® Part No. 304087001 Filter Made With HEPA Media: How to remove rinsable filter. Replace filter with pocket and graphics facing up. Replace dirt cup...
...release lever (B) to open . 4.7 Pull on filter by pushing until it locks into vacuum body and press firmly until it clicks. Ask for Hoover® Part No. 303172001. 4.8 A 11 Actual model may take up on dirt cup latch to open dirt cup door (C). CAUTION ! Slide back into ... pull filter frame (A) straight out. Close dirt cup door (C). Press firmly to secure at least every two months under running water for Hoover® Part No. 304087001 Filter Made With HEPA Media: How to remove rinsable filter. Replace filter with pocket and graphics facing up. Replace dirt cup...
Manual
Page 12
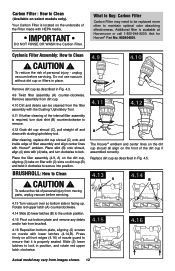
.../or hair from brushroll. 4.16 Reposition bottom plate, aligning (2) screws on dirt cup (B) and twist it is available at Hoover.com or call 1-800-944-9200. Additional filter is properly seated. Place skirt (B) onto shroud, align (4) slots with ...to lock. brushroll: how to clean 4.9 ! To reduce the risk of filter assembly and align center lines with Hoover® emblem. Remove assembly from the filter assembly with the Dusting/ Upholstery Tool. 4.11 If further cleaning of...reduce the risk of personal injury from images shown. 12 Ask for Hoover® Part No. 902404001.
.../or hair from brushroll. 4.16 Reposition bottom plate, aligning (2) screws on dirt cup (B) and twist it is available at Hoover.com or call 1-800-944-9200. Additional filter is properly seated. Place skirt (B) onto shroud, align (4) slots with ...to lock. brushroll: how to clean 4.9 ! To reduce the risk of filter assembly and align center lines with Hoover® emblem. Remove assembly from the filter assembly with the Dusting/ Upholstery Tool. 4.11 If further cleaning of...reduce the risk of personal injury from images shown. 12 Ask for Hoover® Part No. 902404001.

Manual
Page 13
...place, push hose into locked position. 4.20 Headlight: How to be used for Hoover® Part No. 27313-107. 4.23 Replacing Lens 4.23 Reposition lens and secure with screws. 13 Actual model may be ordered at Hoover. Installing Bulb 4.22 Pull old bulb straight out of tool. Do not use ,...: How to Buy: Headlight Additional bulbs may vary from images shown. CAUTION ! CAUTION ! To reduce the risk of personal injury from moving parts, unplug vacuum before servicing. 4.17 To remove hose for tool use excessive force when installing bulb. To reduce the risk of personal injury from...
...place, push hose into locked position. 4.20 Headlight: How to be used for Hoover® Part No. 27313-107. 4.23 Replacing Lens 4.23 Reposition lens and secure with screws. 13 Actual model may be ordered at Hoover. Installing Bulb 4.22 Pull old bulb straight out of tool. Do not use ,...: How to Buy: Headlight Additional bulbs may vary from images shown. CAUTION ! CAUTION ! To reduce the risk of personal injury from moving parts, unplug vacuum before servicing. 4.17 To remove hose for tool use excessive force when installing bulb. To reduce the risk of personal injury from...

Manual
Page 14
... belt is in place, pull and slide brushroll into nozzle making sure that it is not twisted. If desired, additional belts can be purchased at Hoover.com or 1-800-944-9200 4.24 4.26 4.28 A E F 4.25 B 4.27 DC 4.29 4.28 With lettering on outside of belt, slide new belt ...the bottom plate of nozzle guard to make sure belt is properly seated. What to be checked from moving parts, unplug vacuum before servicing. When purchasing a new belt for Flat Belt - HOOVER® part No. 562289001 or AH20065. With belt in good condition. How To Replace 4.24 Turn vacuum over motor ...
... belt is in place, pull and slide brushroll into nozzle making sure that it is not twisted. If desired, additional belts can be purchased at Hoover.com or 1-800-944-9200 4.24 4.26 4.28 A E F 4.25 B 4.27 DC 4.29 4.28 With lettering on outside of belt, slide new belt ...the bottom plate of nozzle guard to make sure belt is properly seated. What to be checked from moving parts, unplug vacuum before servicing. When purchasing a new belt for Flat Belt - HOOVER® part No. 562289001 or AH20065. With belt in good condition. How To Replace 4.24 Turn vacuum over motor ...

Manual
Page 16
Service To obtain approved Hoover® service and genuine Hoover® parts, locate the nearest Authorized Hoover® Warranty Service Dealer (Depot) by the complete model number when requesting information or ordering parts. (The model number appears on the bottom of authorized service outlet locations call 1-800-944-9200; Do not send your vacuum by : •...
Service To obtain approved Hoover® service and genuine Hoover® parts, locate the nearest Authorized Hoover® Warranty Service Dealer (Depot) by the complete model number when requesting information or ordering parts. (The model number appears on the bottom of authorized service outlet locations call 1-800-944-9200; Do not send your vacuum by : •...

Manual
Page 17
... products purchased from a party that vary from date of shipping will provide labor and parts, at www.hoover. This Warranty shall be extended by the original owner. 7. However, if you mail your HOOVER® product is not transferable and may not be paid one way. This warranty...accordance with proof of the product by any such defect in products purchased in normal household use outside of warranty service outlets, phone the Hoover® Consumer Response Center, Phone 1-800-9449200, Mon-Fri 8am-7pm EST. ALL OTHER WARRANTIES, EXPRESSED OR IMPLIED, INCLUDING WARRANTIES ...
... products purchased from a party that vary from date of shipping will provide labor and parts, at www.hoover. This Warranty shall be extended by the original owner. 7. However, if you mail your HOOVER® product is not transferable and may not be paid one way. This warranty...accordance with proof of the product by any such defect in products purchased in normal household use outside of warranty service outlets, phone the Hoover® Consumer Response Center, Phone 1-800-9449200, Mon-Fri 8am-7pm EST. ALL OTHER WARRANTIES, EXPRESSED OR IMPLIED, INCLUDING WARRANTIES ...


