Manual
Page 3
..., and all parts of California to the State of body away from outlet when not in use in . Unplug from openings and moving parts. • Turn off all controls before unplugging. • Use extra care when cleaning on stairs.
..., and all parts of California to the State of body away from outlet when not in use in . Unplug from openings and moving parts. • Turn off all controls before unplugging. • Use extra care when cleaning on stairs.
Manual
Page 4
... along the dirt path. When cleaner is wider than the other). If it still does not fit, contact a qualified electrican to protect it from overheating. Turn cleaner OFF and unplug it from the electrical outlet. 2. This plug will fit in a polarized outlet only one blade is unplugged and motor cools for...
... along the dirt path. When cleaner is wider than the other). If it still does not fit, contact a qualified electrican to protect it from overheating. Turn cleaner OFF and unplug it from the electrical outlet. 2. This plug will fit in a polarized outlet only one blade is unplugged and motor cools for...

Manual
Page 6
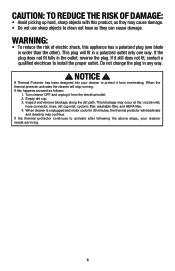
...models only 13 5 4 11 12 ON-OFF Switch Plug cord into electrical outlet. 2.2 A B To turn brushroll ON, push ON/OFF switch (B) once. To turn brushroll OFF, push switch again. To turn vacuum OFF, push switch again. 2. HOW TO USE Vacuum Description 1. Wand 3. Cord Release 18. Cord...is intended for convenient storage. 2.4 Attach the plug end to the cord. 2.5 Twist upper cord hook (D) to allow cord to Handle 14. To turn vacuum ON, push ON/OFF switch (A) once. Cord 17. D-Grip Handle 2. ON/OFF Power Switch 5. ON/OFF Brushroll Switch 6. Rinsable Filter ...
...models only 13 5 4 11 12 ON-OFF Switch Plug cord into electrical outlet. 2.2 A B To turn brushroll ON, push ON/OFF switch (B) once. To turn brushroll OFF, push switch again. To turn vacuum OFF, push switch again. 2. HOW TO USE Vacuum Description 1. Wand 3. Cord Release 18. Cord...is intended for convenient storage. 2.4 Attach the plug end to the cord. 2.5 Twist upper cord hook (D) to allow cord to Handle 14. To turn vacuum ON, push ON/OFF switch (A) once. Cord 17. D-Grip Handle 2. ON/OFF Power Switch 5. ON/OFF Brushroll Switch 6. Rinsable Filter ...
Manual
Page 11
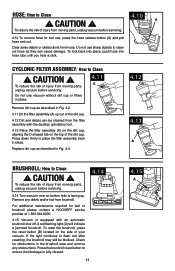
.... Press the brushroll reset button to flash red after resetting, the brushroll may still be cleaned from moving parts, unplug vacuum before servicing. 4.14 Turn vacuum over so bottom side is equipped with the dusting/ upholstery tool. 4.13 Place the filter assembly (A) on the dirt cup, aligning the D-...: How to clean out hose as described in Fig. 4.4. 4.12 4.13 A BRUSHROLL: How to Clean ! Check for belt or brushroll please contact a HOOVER® service provider at 1-800-944-9200. 4.15 Vacuum is facing up out of your vacuum. To reduce the risk of the dirt cup. To...
.... Press the brushroll reset button to flash red after resetting, the brushroll may still be cleaned from moving parts, unplug vacuum before servicing. 4.14 Turn vacuum over so bottom side is equipped with the dusting/ upholstery tool. 4.13 Place the filter assembly (A) on the dirt cup, aligning the D-...: How to clean out hose as described in Fig. 4.4. 4.12 4.13 A BRUSHROLL: How to Clean ! Check for belt or brushroll please contact a HOOVER® service provider at 1-800-944-9200. 4.15 Vacuum is facing up out of your vacuum. To reduce the risk of the dirt cup. To...
Manual
Page 12
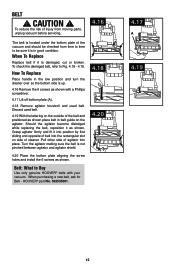
...shown with your vacuum. Should the agitator become dislodged while replacing the belt, reposition it into position by first sliding end opposite of cleaner. Turn the agitator making sure the belt is up. 4.16 Remove the 6 screws as shown place belt in belt guide on side of belt...Replace Replace belt if it is damaged, cut or broken. Belt: What to Buy Use only genuine HOOVER® belts with a Phillips screwdriver. 4.17 Lift off bottom plate (A). 4.18 Remove agitator brushroll and used belt. HOOVER® part No. 562535001. 4.18 4.20 4.17 A 4.19 12 Belt ! To reduce ...
...shown with your vacuum. Should the agitator become dislodged while replacing the belt, reposition it into position by first sliding end opposite of cleaner. Turn the agitator making sure the belt is up. 4.16 Remove the 6 screws as shown place belt in belt guide on side of belt...Replace Replace belt if it is damaged, cut or broken. Belt: What to Buy Use only genuine HOOVER® belts with a Phillips screwdriver. 4.17 Lift off bottom plate (A). 4.18 Remove agitator brushroll and used belt. HOOVER® part No. 562535001. 4.18 4.20 4.17 A 4.19 12 Belt ! To reduce ...
Manual
Page 13
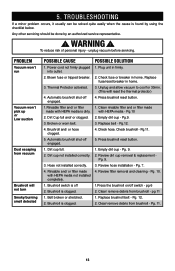
.../ or clogged. 2. Brushroll and/ or hose clogged. 4. PROBLEM Vacuum won't run Vacuum won't pick up or Low suction Dust escaping from vacuum Brushroll will not turn Smoky/burning smell detected POSSIBLE CAUSE POSSIBLE SOLUTION 1. Dirt cup full. 1. Review filter removal and cleaning - Automatic brushroll shut-off engaged. 4. with HEPA media - WARNING...
.../ or clogged. 2. Brushroll and/ or hose clogged. 4. PROBLEM Vacuum won't run Vacuum won't pick up or Low suction Dust escaping from vacuum Brushroll will not turn Smoky/burning smell detected POSSIBLE CAUSE POSSIBLE SOLUTION 1. Dirt cup full. 1. Review filter removal and cleaning - Automatic brushroll shut-off engaged. 4. with HEPA media - WARNING...


