Manual
Page 3
..., or fine wood sandings, or use in areas where they may reduce air flow. • Keep hair, loose clothing, fingers, and all parts of body away from openings and moving parts. • Turn off all controls before cleaning or servicing. • Do not use cord as a handle, close a door on cord, or...
..., or fine wood sandings, or use in areas where they may reduce air flow. • Keep hair, loose clothing, fingers, and all parts of body away from openings and moving parts. • Turn off all controls before cleaning or servicing. • Do not use cord as a handle, close a door on cord, or...
Manual
Page 5
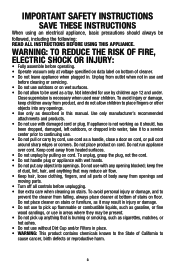
... area (B) on the dirt cup release button to secure into vacuum body first. Make sure all parts are located before disposing of dirt cup into place. 1.4 1.3 A Position Tools 1.5 For storage mode, push dusting brush all parts from carton and identify each item shown. Pivot cup into vacuum base. 1.3 To remove handle, press...
... area (B) on the dirt cup release button to secure into vacuum body first. Make sure all parts are located before disposing of dirt cup into place. 1.4 1.3 A Position Tools 1.5 For storage mode, push dusting brush all parts from carton and identify each item shown. Pivot cup into vacuum base. 1.3 To remove handle, press...
Manual
Page 9
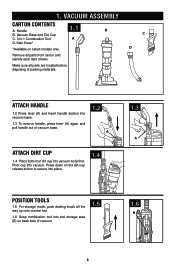
.... Close dirt cup door (B). Pivot dirt cup into place. 4.3 B 4.2 A 4.4 A 9 Place the vacuum in performance. When using the vacuum for this type of injury from moving parts, unplug vacuum before servicing. CAUTION ! Dirt Cup: How to Empty 4.2 Press dirt cup release button and pivot cup out. 4.3 Hold dirt cup over trash receptacle...
.... Close dirt cup door (B). Pivot dirt cup into place. 4.3 B 4.2 A 4.4 A 9 Place the vacuum in performance. When using the vacuum for this type of injury from moving parts, unplug vacuum before servicing. CAUTION ! Dirt Cup: How to Empty 4.2 Press dirt cup release button and pivot cup out. 4.3 Hold dirt cup over trash receptacle...
Manual
Page 10
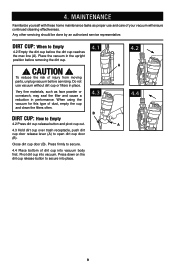
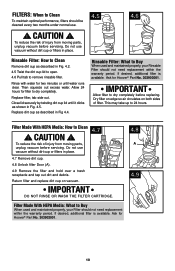
... use vacuum without dirt cup or filters in Fig. 4.5. Return filter and replace dirt cup on both sides of injury from moving parts, unplug vacuum before servicing. Ask for Hoover® Part No. 303902001. 4.8 A 4.9 10 Replace filter, tab side out. Replace dirt cup as shown in place. 4.7 4.7 Remove dirt cup. 4.8 Unlock ...When used and maintained properly, your Rinsable Filter should not need replacement within the warranty period. To reduce the risk of injury from moving parts, unplug vacuum before servicing. Ask for Hoover® Part No. 303903001.
... use vacuum without dirt cup or filters in Fig. 4.5. Return filter and replace dirt cup on both sides of injury from moving parts, unplug vacuum before servicing. Ask for Hoover® Part No. 303902001. 4.8 A 4.9 10 Replace filter, tab side out. Replace dirt cup as shown in place. 4.7 4.7 Remove dirt cup. 4.8 Unlock ...When used and maintained properly, your Rinsable Filter should not need replacement within the warranty period. To reduce the risk of injury from moving parts, unplug vacuum before servicing. Ask for Hoover® Part No. 303903001.
Manual
Page 11
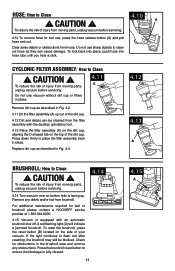
... dusting/ upholstery tool. 4.13 Place the filter assembly (A) on the dirt cup, aligning the D-shaped tab on the side of injury from moving parts, unplug vacuum before servicing. 4.14 Turn vacuum over so bottom side is facing up out of the dirt cup. 4.12 Dirt and debris can ... shut off. To reset the brushroll, press the reset button (B) located on the top of injury from moving parts, unplug vacuum before servicing. 4.10 To remove hose for belt or brushroll please contact a HOOVER® service provider at 1-800-944-9200. 4.15 Vacuum is fully cleared. 4.14 11 4.15 A B CAUTION ! ...
... dusting/ upholstery tool. 4.13 Place the filter assembly (A) on the dirt cup, aligning the D-shaped tab on the side of injury from moving parts, unplug vacuum before servicing. 4.14 Turn vacuum over so bottom side is facing up out of the dirt cup. 4.12 Dirt and debris can ... shut off. To reset the brushroll, press the reset button (B) located on the top of injury from moving parts, unplug vacuum before servicing. 4.10 To remove hose for belt or brushroll please contact a HOOVER® service provider at 1-800-944-9200. 4.15 Vacuum is fully cleared. 4.14 11 4.15 A B CAUTION ! ...
Manual
Page 12
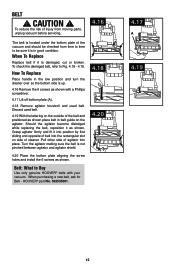
... is located under the bottom plate of agitator into place. Grasp agitator firmly and fit it is up. 4.16 Remove the 6 screws as shown. HOOVER® part No. 562535001. 4.18 4.20 4.17 A 4.19 12 When To Replace Replace belt if it as shown with your vacuum. When purchasing a new... ! Turn the agitator making sure the belt is damaged, cut or broken. CAUTION ! To check the damaged belt, refer to Buy Use only genuine HOOVER® belts with a Phillips screwdriver. 4.17 Lift off bottom plate (A). 4.18 Remove agitator brushroll and used belt. 4.19 With the lettering on the...
... is located under the bottom plate of agitator into place. Grasp agitator firmly and fit it is up. 4.16 Remove the 6 screws as shown. HOOVER® part No. 562535001. 4.18 4.20 4.17 A 4.19 12 When To Replace Replace belt if it as shown with your vacuum. When purchasing a new... ! Turn the agitator making sure the belt is damaged, cut or broken. CAUTION ! To check the damaged belt, refer to Buy Use only genuine HOOVER® belts with a Phillips screwdriver. 4.17 Lift off bottom plate (A). 4.18 Remove agitator brushroll and used belt. 4.19 With the lettering on the...
Manual
Page 14
...; Warranty Service Dealer (Depot) by the complete model number when requesting information or ordering parts. (The model number appears on the bottom of authorized service outlet locations call 1-800-944-9200; Customers) or hoover.ca (Canadian customers). Do not send your vacuum by : • Checking the Yellow ...18129-111 Ave., Edmonton, AB T5W 2P2, Phone: 1-800-944-9200, Mon-Fri 8am-7pm EST. Follow the service center link to Hoover®, Inc., Company in delay. This will only result in Glenwillow for service. Always identify your vacuum to find the service outlet nearest you...
...; Warranty Service Dealer (Depot) by the complete model number when requesting information or ordering parts. (The model number appears on the bottom of authorized service outlet locations call 1-800-944-9200; Customers) or hoover.ca (Canadian customers). Do not send your vacuum by : • Checking the Yellow ...18129-111 Ave., Edmonton, AB T5W 2P2, Phone: 1-800-944-9200, Mon-Fri 8am-7pm EST. Follow the service center link to Hoover®, Inc., Company in delay. This will only result in Glenwillow for service. Always identify your vacuum to find the service outlet nearest you...

Manual
Page 15
...that is not as maid, janitorial and equipment rental services), brushroll, belt, improper maintenance of Ohio. During the Warranty Period, Hoover® will be assigned. ALL OTHER WARRANTIES, EXPRESSED OR IMPLIED, INCLUDING WARRANTIES OF MERCHANTABILITY OR FITNESS FOR PARTICULAR PURPOSE, ARE...product to products purchased outside the United States, including its territories and possessions, outside of shipping will provide labor and parts, at www.hoover.com. 7. WARRANTY Limited TWO Year Warranty (Domestic Use) WHAT THIS WARRANTY COVERS When used and maintained in normal ...
...that is not as maid, janitorial and equipment rental services), brushroll, belt, improper maintenance of Ohio. During the Warranty Period, Hoover® will be assigned. ALL OTHER WARRANTIES, EXPRESSED OR IMPLIED, INCLUDING WARRANTIES OF MERCHANTABILITY OR FITNESS FOR PARTICULAR PURPOSE, ARE...product to products purchased outside the United States, including its territories and possessions, outside of shipping will provide labor and parts, at www.hoover.com. 7. WARRANTY Limited TWO Year Warranty (Domestic Use) WHAT THIS WARRANTY COVERS When used and maintained in normal ...


