Manual
Page 2
... manufacturing code in China Manufacturing code (Label located on bottom of vacuum) Contents Important Safety Instructions 3 Vacuum Assembly 5 Carton Contents 5 Attach Handle 5 Attach Dirt Cup 5 Position Tools 5 How To Use...6 Vacuum Description 6 On-Off Switch 6 Carry Handle 6 Cord Storage 6 Telescopic D-Grip ...for an automated referral of your HOOVER® product. Be sure to register your sales receipt to find the Hoover® authorized dealer nearest you for choosing a HOOVER® product. CODE Hint: Attach your product online at hoover.com. Thank you or call...
... manufacturing code in China Manufacturing code (Label located on bottom of vacuum) Contents Important Safety Instructions 3 Vacuum Assembly 5 Carton Contents 5 Attach Handle 5 Attach Dirt Cup 5 Position Tools 5 How To Use...6 Vacuum Description 6 On-Off Switch 6 Carry Handle 6 Cord Storage 6 Telescopic D-Grip ...for an automated referral of your HOOVER® product. Be sure to register your sales receipt to find the Hoover® authorized dealer nearest you for choosing a HOOVER® product. CODE Hint: Attach your product online at hoover.com. Thank you or call...
Manual
Page 3
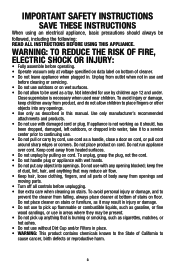
Use only manufacturer's recommended attachments and products. • Do not use with wet hands. • Do not put any object into any opening blocked; Keep cord away from openings and ...
Use only manufacturer's recommended attachments and products. • Do not use with wet hands. • Do not put any object into any opening blocked; Keep cord away from openings and ...
Manual
Page 5
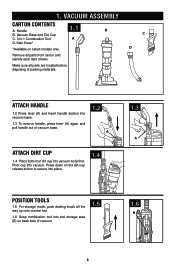
... located before disposing of vacuum. 1.5 1.6 B 5 Stair Hose* *Available on back side of packing materials. Make sure all parts from carton and identify each item shown. Attach handle 1.2 Press lever (A) and Insert handle section into vacuum base. 1.3 To remove handle, press lever (A) again and pull handle out of vacuum base...
... located before disposing of vacuum. 1.5 1.6 B 5 Stair Hose* *Available on back side of packing materials. Make sure all parts from carton and identify each item shown. Attach handle 1.2 Press lever (A) and Insert handle section into vacuum base. 1.3 To remove handle, press lever (A) again and pull handle out of vacuum base...

Manual
Page 6
... USE Vacuum Description 1. Hose 13. Brushroll Window 19. Handle Adjuster 4. Cord 17. D-Grip Handle 2. ON/OFF Brushroll Switch 6. This cleaner is intended for convenient storage. 2.4 Attach the plug end to the cord. 2.5 Twist upper cord hook (D) to allow cord to Handle 14. 2. ON/OFF Power Switch 5.
... USE Vacuum Description 1. Hose 13. Brushroll Window 19. Handle Adjuster 4. Cord 17. D-Grip Handle 2. ON/OFF Brushroll Switch 6. This cleaner is intended for convenient storage. 2.4 Attach the plug end to the cord. 2.5 Twist upper cord hook (D) to allow cord to Handle 14. 2. ON/OFF Power Switch 5.
Manual
Page 8
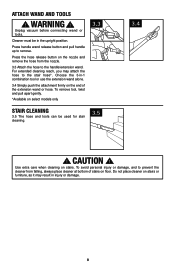
Choose the 3-in-1 combination tool or use the extension wand alone. 3.4 Simply push the attachment firmly on the end of stairs on floor. To avoid personal injury or damage, and to the stair hose*. Do not place cleaner on select ... tool, twist and pull apart gently. *Available on stairs or furniture, as it may attach the hose to prevent the cleaner from the nozzle. 3.3 Attach the hose to remove. WARNING ! Press the hose release button on stairs. Attach Wand and Tools ! For extended cleaning reach, you may result in the upright position. Unplug...
Choose the 3-in-1 combination tool or use the extension wand alone. 3.4 Simply push the attachment firmly on the end of stairs on floor. To avoid personal injury or damage, and to the stair hose*. Do not place cleaner on select ... tool, twist and pull apart gently. *Available on stairs or furniture, as it may attach the hose to prevent the cleaner from the nozzle. 3.3 Attach the hose to remove. WARNING ! Press the hose release button on stairs. Attach Wand and Tools ! For extended cleaning reach, you may result in the upright position. Unplug...


