Manual
Page 2
... product to the store. 2 Thank you or call 1-800-944-9200 to register by phone. CODE Hint: Attach your HOOVER® product. Visit Hoover. Model 1-800-944-9200 MFG. Made in the spaces provided. Please enter the complete model and Manufacturing Code in China ... 7 Tools ...7 Select Proper Tool 7 Removing Hose 7 Attach Wand And Tools 7 Stair Cleaning 8 How To Clean Tools 8 Maintenance...8 Dirt Cup...9 Filters...9 Brushroll...11 Hose...11 Powered Hand Tool 11 Headlight...12 Belt...13 Troubleshooting 14 Service...15 Warranty...16 If you need assistance: Visit our website...
... product to the store. 2 Thank you or call 1-800-944-9200 to register by phone. CODE Hint: Attach your HOOVER® product. Visit Hoover. Model 1-800-944-9200 MFG. Made in the spaces provided. Please enter the complete model and Manufacturing Code in China ... 7 Tools ...7 Select Proper Tool 7 Removing Hose 7 Attach Wand And Tools 7 Stair Cleaning 8 How To Clean Tools 8 Maintenance...8 Dirt Cup...9 Filters...9 Brushroll...11 Hose...11 Powered Hand Tool 11 Headlight...12 Belt...13 Troubleshooting 14 Service...15 Warranty...16 If you need assistance: Visit our website...
Manual
Page 3
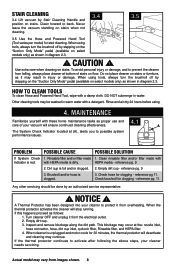
... should , has been dropped, damaged, left outdoors, or dropped into water, take it to a service center prior to continuing use without Dirt Cup and/or Filters in place. • WARNING: This product contains chemicals known to the State of stairs on floor. Not intended for use by cord, use cord as...
... should , has been dropped, damaged, left outdoors, or dropped into water, take it to a service center prior to continuing use without Dirt Cup and/or Filters in place. • WARNING: This product contains chemicals known to the State of stairs on floor. Not intended for use by cord, use cord as...
Manual
Page 6
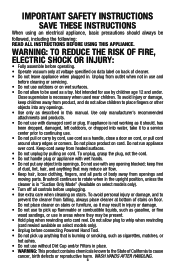
... Handle Release (A) to fold the handle to storage position. To turn vacuum OFF, push switch again. Handle** 2. Dirt Cup Release Button 4. Rinsable Filter Access 14. System Check Indicator 15. Hose 19. Hold plug when rewinding onto cord reel. Actual model may vary from cord reel until red tape... is visible on the cord, yellow tape will identify when the cord is shipped with HEPA media and Carbon Filter* Access 13. Headlight* 8. Filter made with the brushroll in the ON position. Crevice Tool 17. Hose Release Button 22. Dusting/ Upholstery Tool** 23. ...
... Handle Release (A) to fold the handle to storage position. To turn vacuum OFF, push switch again. Handle** 2. Dirt Cup Release Button 4. Rinsable Filter Access 14. System Check Indicator 15. Hose 19. Hold plug when rewinding onto cord reel. Actual model may vary from cord reel until red tape... is visible on the cord, yellow tape will identify when the cord is shipped with HEPA media and Carbon Filter* Access 13. Headlight* 8. Filter made with the brushroll in the ON position. Crevice Tool 17. Hose Release Button 22. Dusting/ Upholstery Tool** 23. ...
Manual
Page 8
... the "Suction Only Mode" pedal (available on select models only) as it from the electrical outlet. 2. Rinsable filter and/or filter made with Indicator is unplugged and motor cools for stair cleaning. Clean rinsable filter and/or filter made 1. Check brushroll for clogging - reference pg. 11. Empty dirt cup. 3. When using . 4. DO NOT submerge... clogging - When the thermal protector activates the cleaner will deactivate and cleaning may occur at the: nozzle inlet, hose connector, hose, dirt cup inlet, cyclonic filter, Rinsable filter, and HEPA...
... the "Suction Only Mode" pedal (available on select models only) as it from the electrical outlet. 2. Rinsable filter and/or filter made with Indicator is unplugged and motor cools for stair cleaning. Clean rinsable filter and/or filter made 1. Check brushroll for clogging - reference pg. 11. Empty dirt cup. 3. When using . 4. DO NOT submerge... clogging - When the thermal protector activates the cleaner will deactivate and cleaning may occur at the: nozzle inlet, hose connector, hose, dirt cup inlet, cyclonic filter, Rinsable filter, and HEPA...
Manual
Page 9
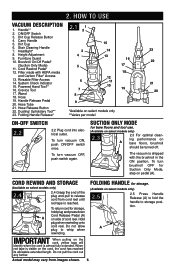
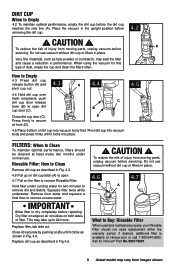
...as described in Fig. 4.6. Do not use vacuum without dirt cup or filters in Fig 4.5. ! Replace dirt cup as face powder or cornstarch, may seal the filter and cause a reduction in place. When using the vacuum for Hoover® Part No.303173001. 9 Actual model may take up on dirt .... 4.3. 4.6 Pull up to 24 hours. Dry filter on edge so air circulates on the filter to remove Rinsable Filter. This may vary from moving parts, unplug vacuum before the dirt cup reaches the max line (A). Close lid securely by pushing at Hoover.com or call 1-800-944-9200. Pivot dirt...
...as described in Fig. 4.6. Do not use vacuum without dirt cup or filters in Fig 4.5. ! Replace dirt cup as face powder or cornstarch, may seal the filter and cause a reduction in place. When using the vacuum for Hoover® Part No.303173001. 9 Actual model may take up on dirt .... 4.3. 4.6 Pull up to 24 hours. Dry filter on edge so air circulates on the filter to remove Rinsable Filter. This may vary from moving parts, unplug vacuum before the dirt cup reaches the max line (A). Close lid securely by pushing at Hoover.com or call 1-800-944-9200. Pivot dirt...
Manual
Page 10
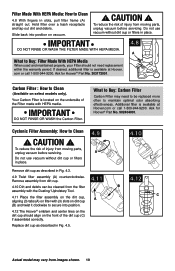
... receptacle and tap out dirt and debris. Do not use vacuum without dirt cup or filters in Fig. 4.5. Ask for Hoover® Part No. 303172001. Do not use vacuum without dirt cup or filters in place. 4.9 A 4.10 Remove dirt cup as described in place. Actual model ...reduce the risk of the dirt cup (C) if assembled correctly. Your Carbon Filter is available at Hoover. C 4.11 Place the filter assembly on the dirt cup, A aligning (3) tabs (A) on filter with the Dusting/ Upholstery Tool. Additional filter is located on the front of injury from moving parts, unplug vacuum ...
... receptacle and tap out dirt and debris. Do not use vacuum without dirt cup or filters in Fig. 4.5. Ask for Hoover® Part No. 303172001. Do not use vacuum without dirt cup or filters in place. 4.9 A 4.10 Remove dirt cup as described in place. Actual model ...reduce the risk of the dirt cup (C) if assembled correctly. Your Carbon Filter is available at Hoover. C 4.11 Place the filter assembly on the dirt cup, A aligning (3) tabs (A) on filter with the Dusting/ Upholstery Tool. Additional filter is located on the front of injury from moving parts, unplug vacuum ...
Manual
Page 14
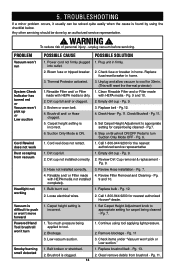
...firmly. Pg. 9. 3. Pg.12. 4. Set Carpet Height Adjustment to cool for 30min. (This willl reset the thermal protector) 1.Rinsable Filter and/ or Filter 1. Pg. 6. 1. Pg. 12. 2. Call 1-800-944-9200 for the nearest authorized service representative 1. Blockage. 3. Check items ...allow vacuum to appropriate setting for carpet being cleaned - with HEPA media not installed 9 and 10. Call 1-800-944-9200 for nearest authorized Hoover® dealer. 1. Hose not installed correctly. 3. Review Hose installation - Pg. 7. 4. Bulb burnt out. 1. Brushroll is incorrect. 2....
...firmly. Pg. 9. 3. Pg.12. 4. Set Carpet Height Adjustment to cool for 30min. (This willl reset the thermal protector) 1.Rinsable Filter and/ or Filter 1. Pg. 6. 1. Pg. 12. 2. Call 1-800-944-9200 for the nearest authorized service representative 1. Blockage. 3. Check items ...allow vacuum to appropriate setting for carpet being cleaned - with HEPA media not installed 9 and 10. Call 1-800-944-9200 for nearest authorized Hoover® dealer. 1. Hose not installed correctly. 3. Review Hose installation - Pg. 7. 4. Bulb burnt out. 1. Brushroll is incorrect. 2....


