Manual
Page 3
.... • Use extra care when cleaning on cord, or pull cord around sharp edges or corners. keep children away from openings and moving parts. IMPORTANT SAFETY INSTRUCTIONS SAVE THESE INSTRUCTIONS When using an electrical appliance, basic precautions should , has been dropped, damaged, left outdoors, or dropped into...not use to pick up anything that is not working as it may reduce air flow. • Keep hair, loose clothing, fingers, and all parts of cleaner. • Do not leave appliance when plugged in "Suction Only Mode" (Available on select models only). • Turn off all ...
.... • Use extra care when cleaning on cord, or pull cord around sharp edges or corners. keep children away from openings and moving parts. IMPORTANT SAFETY INSTRUCTIONS SAVE THESE INSTRUCTIONS When using an electrical appliance, basic precautions should , has been dropped, damaged, left outdoors, or dropped into...not use to pick up anything that is not working as it may reduce air flow. • Keep hair, loose clothing, fingers, and all parts of cleaner. • Do not leave appliance when plugged in "Suction Only Mode" (Available on select models only). • Turn off all ...
Manual
Page 5
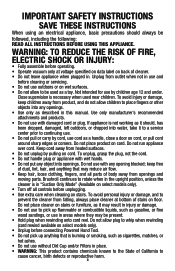
...and pivot into clip until instruction 1.3 1.2 Insert handle section into vacuum. 1. Powered Hand Tool* D. Screw (for assembly) I F Attach handle (varies per model Remove all parts are located before disposing of handle. Handle* B. Powered Hand Tool Clip E. Dirt cup is secure when you hear a click. 1.4 Position Tools 1.5 1.5 Secure Powered Hand Tool... in the vacuum base and set aside until secure. 1.6 Place Crevice Tool into Wand and slide into vacuum body first. Make sure all parts from images shown. Dusting/Upholstery Tool* G. Pivot cup into vacuum base.
...and pivot into clip until instruction 1.3 1.2 Insert handle section into vacuum. 1. Powered Hand Tool* D. Screw (for assembly) I F Attach handle (varies per model Remove all parts are located before disposing of handle. Handle* B. Powered Hand Tool Clip E. Dirt cup is secure when you hear a click. 1.4 Position Tools 1.5 1.5 Secure Powered Hand Tool... in the vacuum base and set aside until secure. 1.6 Place Crevice Tool into Wand and slide into vacuum body first. Make sure all parts from images shown. Dusting/Upholstery Tool* G. Pivot cup into vacuum base.
Manual
Page 9
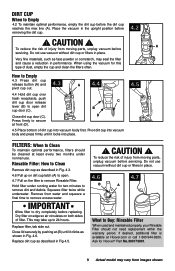
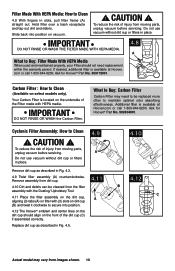
...To reduce the risk of injury from water and squeeze a final time to remove excess water. When using the vacuum for Hoover® Part No.303173001. 9 Actual model may vary from moving parts, unplug vacuum before removing the dirt cup. 4.2 ! Pivot dirt cup into vacuum body and press firmly until it locks ... within the warranty period. Dirt Cup When to Empty 4.2 To maintain optimal performance, empty the dirt cup before replacing. Press firmly to secure at Hoover.com or call 1-800-944-9200. Rinsable Filter: How to open dirt cup door (C). To reduce the risk of filter. Do not use ....
...To reduce the risk of injury from water and squeeze a final time to remove excess water. When using the vacuum for Hoover® Part No.303173001. 9 Actual model may vary from moving parts, unplug vacuum before removing the dirt cup. 4.2 ! Pivot dirt cup into vacuum body and press firmly until it locks ... within the warranty period. Dirt Cup When to Empty 4.2 To maintain optimal performance, empty the dirt cup before replacing. Press firmly to secure at Hoover.com or call 1-800-944-9200. Rinsable Filter: How to open dirt cup door (C). To reduce the risk of filter. Do not use ....
Manual
Page 10
... vacuum without dirt cup or filters in Fig. 4.5. com or call 1-800-944-9200. Your Carbon Filter is located on vacuum. ! Ask for Hoover® Part No. 303172001. Do not use vacuum without dirt cup or filters in place. 4.9 A 4.10 Remove dirt cup as described in place. C ...With HEPA Media: How to Clean ! A What to maintain optimal odor absorbing effectiveness. CAUTION ! If desired, additional filter is available at Hoover. Ask for Hoover® Part No. 902404001. Replace dirt cup as described in slots, pull filter frame (A) straight out.
... vacuum without dirt cup or filters in Fig. 4.5. com or call 1-800-944-9200. Your Carbon Filter is located on vacuum. ! Ask for Hoover® Part No. 303172001. Do not use vacuum without dirt cup or filters in place. 4.9 A 4.10 Remove dirt cup as described in place. C ...With HEPA Media: How to Clean ! A What to maintain optimal odor absorbing effectiveness. CAUTION ! If desired, additional filter is available at Hoover. Ask for Hoover® Part No. 902404001. Replace dirt cup as described in slots, pull filter frame (A) straight out.
Manual
Page 11
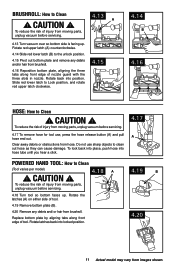
...they can cause damage. CAUTION ! 4.18 A To reduce the risk of tool. 4.19 Remove bottom plate (B). 4.20 Remove any debris and/or hair from moving parts, unplug vacuum before servicing. 4.18 Turn tool so bottom faces up . Rotate red upper latch (A) counterclockwise. 4.14 Slide red lower latch (B) to the unlock ...position. 4.15 Pivot out bottom plate and remove any debris and/ or hair from moving parts, unplug vacuum before servicing. 4.17 To remove hose for tool use sharp objects to Clean (Tool varies per model) !
...they can cause damage. CAUTION ! 4.18 A To reduce the risk of tool. 4.19 Remove bottom plate (B). 4.20 Remove any debris and/or hair from moving parts, unplug vacuum before servicing. 4.18 Turn tool so bottom faces up . Rotate red upper latch (A) counterclockwise. 4.14 Slide red lower latch (B) to the unlock ...position. 4.15 Pivot out bottom plate and remove any debris and/ or hair from moving parts, unplug vacuum before servicing. 4.17 To remove hose for tool use sharp objects to Clean (Tool varies per model) !
Manual
Page 12
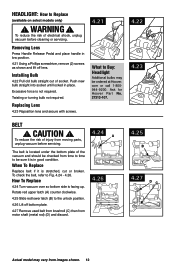
... or broken. installing bulb 4.22 Pull old bulb straight out of the vacuum and should be checked from time to time to be ordered at Hoover. how to the unlock position. 4.26 Lift off lens. WARNING ! Rotate red upper latch (A) counter clockwise. 4.25 Slide red lower latch (B) to replace 4.24...into socket until locked in good condition. com or call 1-800944-9200. Excessive force is located under the bottom plate of socket. CAUTION ! Ask for Hoover¨ Part No. 27313-107. 4.22 4.23 belt ! headliGht: how to buy: headlight Additional bulbs may vary from images shown. 12
... or broken. installing bulb 4.22 Pull old bulb straight out of the vacuum and should be checked from time to time to be ordered at Hoover. how to the unlock position. 4.26 Lift off lens. WARNING ! Rotate red upper latch (A) counter clockwise. 4.25 Slide red lower latch (B) to replace 4.24...into socket until locked in good condition. com or call 1-800944-9200. Excessive force is located under the bottom plate of socket. CAUTION ! Ask for Hoover¨ Part No. 27313-107. 4.22 4.23 belt ! headliGht: how to buy: headlight Additional bulbs may vary from images shown. 12
Manual
Page 13
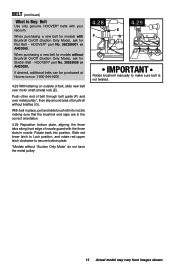
... and slide brushroll into position. When purchasing a new belt for models with your vacuum. If desired, additional belts can be purchased at Hoover.com or 1-800-944-9200 4.28 With lettering on outside of belt, slide new belt over metal pulley*, then slip around area of...the metal pulley 4.28 F 4.29 E G IMPORTANT Rotate brushroll manually to Buy: Belt Use only genuine HOOVER® belts with Brushroll On/Off (Suction Only Mode), ask for Stretch Belt - HOOVER® part No. 562289001 or AH20065. Push other end of brushroll without bristles (G). Belt (continued) What to make sure...
... and slide brushroll into position. When purchasing a new belt for models with your vacuum. If desired, additional belts can be purchased at Hoover.com or 1-800-944-9200 4.28 With lettering on outside of belt, slide new belt over metal pulley*, then slip around area of...the metal pulley 4.28 F 4.29 E G IMPORTANT Rotate brushroll manually to Buy: Belt Use only genuine HOOVER® belts with Brushroll On/Off (Suction Only Mode), ask for Stretch Belt - HOOVER® part No. 562289001 or AH20065. Push other end of brushroll without bristles (G). Belt (continued) What to make sure...

Manual
Page 15
... call 1-800-944-9200. Service To obtain approved Hoover® service and genuine Hoover® parts, locate the nearest Authorized Hoover® Warranty Service Dealer (Depot) by the complete model number when requesting information or ordering parts. (The model number appears on the bottom of ...authorized service outlet locations call 1-800-944-9200; This will only result in Glenwillow for service. Follow the service center link to Hoover®, Inc., Company in delay. ...
... call 1-800-944-9200. Service To obtain approved Hoover® service and genuine Hoover® parts, locate the nearest Authorized Hoover® Warranty Service Dealer (Depot) by the complete model number when requesting information or ordering parts. (The model number appears on the bottom of ...authorized service outlet locations call 1-800-944-9200; This will only result in Glenwillow for service. Follow the service center link to Hoover®, Inc., Company in delay. ...
Manual
Page 16
... This Warranty is not as maid, janitorial and equipment rental services), brushroll, belt, improper maintenance of purchase. During the Warranty Period, Hoover® will provide labor and parts, at www.hoover. HOW TO MAKE A WARRANTY CLAIM If this product is not transferable and may also have others that is warranted against original defects...
... This Warranty is not as maid, janitorial and equipment rental services), brushroll, belt, improper maintenance of purchase. During the Warranty Period, Hoover® will provide labor and parts, at www.hoover. HOW TO MAKE A WARRANTY CLAIM If this product is not transferable and may also have others that is warranted against original defects...


