Manual
Page 2
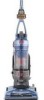
... return this owner's manual. Visit Hoover. Thank you or call 1-800-944-9200 for an automated referral of Hoover® authorized dealer locations (U.S. Verification of date of purchase may be required for warranty service of vacuum) Contents Important Safety Instructions 3 Vacuum Assembly 5 Carton Contents 5 Attach ...Cup...9 Filters...9 Brushroll...11 Hose...11 Powered Hand Tool 11 Headlight...12 Belt...13 Troubleshooting 14 Service...15 Warranty...16 If you need assistance: Visit our website at Hoover.com or call 1-800-944-9200 to find the Hoover® authorized dealer nearest you...
... return this owner's manual. Visit Hoover. Thank you or call 1-800-944-9200 for an automated referral of Hoover® authorized dealer locations (U.S. Verification of date of purchase may be required for warranty service of vacuum) Contents Important Safety Instructions 3 Vacuum Assembly 5 Carton Contents 5 Attach ...Cup...9 Filters...9 Brushroll...11 Hose...11 Powered Hand Tool 11 Headlight...12 Belt...13 Troubleshooting 14 Service...15 Warranty...16 If you need assistance: Visit our website at Hoover.com or call 1-800-944-9200 to find the Hoover® authorized dealer nearest you...

Manual
Page 4
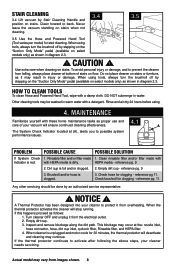
Always put the cleaner in a dry place. Do not change the plug in a polarized outlet only one blade is in the outlet... TO THE STORE. 4 To avoid damage to carpet, rugs, furniture and flooring, avoid tipping cleaner or setting it still does not fit, contact a qualified electrican to clean out hose as they can cause damage. CAUTION: TO REDUCE THE RISK OF DAMAGE: • Avoid picking...Only Mode" (Available on and handle is wider than the other). If the plug does not fit fully in upright position. For assistance, please call Customer Service at 1-800-9449200 Mon-Fri 8am-7pm EST.
Always put the cleaner in a dry place. Do not change the plug in a polarized outlet only one blade is in the outlet... TO THE STORE. 4 To avoid damage to carpet, rugs, furniture and flooring, avoid tipping cleaner or setting it still does not fit, contact a qualified electrican to clean out hose as they can cause damage. CAUTION: TO REDUCE THE RISK OF DAMAGE: • Avoid picking...Only Mode" (Available on and handle is wider than the other). If the plug does not fit fully in upright position. For assistance, please call Customer Service at 1-800-9449200 Mon-Fri 8am-7pm EST.
Manual
Page 6
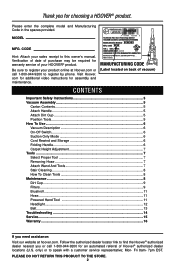
...red tape is reached. 2. Dirt Cup Release Button 4. Headlight* 8. Filter made with the brushroll in the ON position. Powered Hand Tool** 16. Hose 19. Hose Release Button 22. FOLDING HANDLE for bare floors and tool use. (Available on select models only) 2.3 2.3 For optimal cleaning performance on pedal (A). Do...ON/OFF switch once. Do not allow plug to storage position. Carry Handle 5. Rinsable Filter Access 14. To turn vacuum OFF, push switch again. The vacuum is almost fully extended. Actual model may vary from cord reel until red tape is visible on side of the plug ...
...red tape is reached. 2. Dirt Cup Release Button 4. Headlight* 8. Filter made with the brushroll in the ON position. Powered Hand Tool** 16. Hose 19. Hose Release Button 22. FOLDING HANDLE for bare floors and tool use. (Available on select models only) 2.3 2.3 For optimal cleaning performance on pedal (A). Do...ON/OFF switch once. Do not allow plug to storage position. Carry Handle 5. Rinsable Filter Access 14. To turn vacuum OFF, push switch again. The vacuum is almost fully extended. Actual model may vary from cord reel until red tape is visible on side of the plug ...
Manual
Page 7
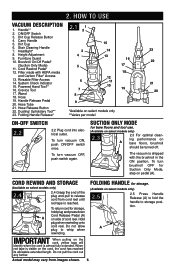
... flooring, avoid tipping cleaner or setting it with "Suction Only Mode", always place vacuum in such places as dresser drawers, upholstered furniture, stairs and baseboards. TOOLS Tools allow for cleaning surfaces above tools. To avoid damage to your hose. Use Upholstery Tool to hose, push firmly into ...knob to turn while product is turned on and handle is in upright position unless vacuum is in upright position. Select Proper Tool (Tools may vary from images shown. Removing Hose Attach Wand and Tools 3.2 To remove hose for tool use . Actual model may vary per model) C....
... flooring, avoid tipping cleaner or setting it with "Suction Only Mode", always place vacuum in such places as dresser drawers, upholstered furniture, stairs and baseboards. TOOLS Tools allow for cleaning surfaces above tools. To avoid damage to your hose. Use Upholstery Tool to hose, push firmly into ...knob to turn while product is turned on and handle is in upright position unless vacuum is in upright position. Select Proper Tool (Tools may vary from images shown. Removing Hose Attach Wand and Tools 3.2 To remove hose for tool use . Actual model may vary per model) C....
Manual
Page 8
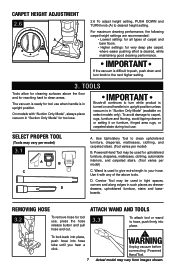
... dirty. Inspect and remove blockage along the dirt path. Do not place cleaner on stairs. HEPA media - Stair Cleaning 3.4 Lift vacuum by an authorized service representative. ! Clean forward to Clean Tools To clean Hose and Powered Hand Tool, wipe with these home maintenance tasks as follows: 1. When using . 4. Other cleaning tools may result...
... dirty. Inspect and remove blockage along the dirt path. Do not place cleaner on stairs. HEPA media - Stair Cleaning 3.4 Lift vacuum by an authorized service representative. ! Clean forward to Clean Tools To clean Hose and Powered Hand Tool, wipe with these home maintenance tasks as follows: 1. When using . 4. Other cleaning tools may result...
Manual
Page 11
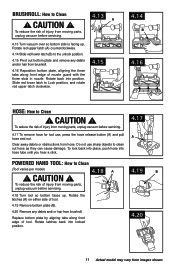
.... 4.16 Reposition bottom plate, aligning the three tabs along front edge of injury from moving parts, unplug vacuum before servicing. 4.17 To remove hose for tool use sharp objects to clean out hose as they can cause damage. Rotate back into locked position. 4.19 B 4.20 11 Actual model may...red lower latch (B) to Clean ! Clear away debris or obstructions from moving parts, unplug vacuum before servicing. 4.18 Turn tool so bottom faces up . Do not use , press the hose release button (A) and pull hose end out. Replace bottom plate by aligning tabs along front edge of nozzle guard with ...
.... 4.16 Reposition bottom plate, aligning the three tabs along front edge of injury from moving parts, unplug vacuum before servicing. 4.17 To remove hose for tool use sharp objects to clean out hose as they can cause damage. Rotate back into locked position. 4.19 B 4.20 11 Actual model may...red lower latch (B) to Clean ! Clear away debris or obstructions from moving parts, unplug vacuum before servicing. 4.18 Turn tool so bottom faces up . Do not use , press the hose release button (A) and pull hose end out. Replace bottom plate by aligning tabs along front edge of nozzle guard with ...
Manual
Page 14
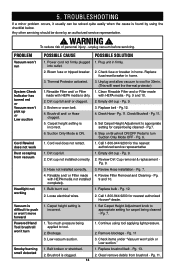
... Cord Rewind does not work Dust escaping from brushroll - Plug unit in home. 3. Unplug and allow vacuum to cool for nearest authorized Hoover® dealer. 1. Dirt cup full and/ or clogged. 2. Replace belt - Pg. 6. 1. ...Pg. 9. 2. Dirt cup not installed correctly. 2. Pg. 7. 4. with HEPA media - Loose electrical wires. 1. Low vacuum suction. 1. Check items under "Vacuum won 't turn Suction Only Mode OFF - Replace fuse/reset breaker in firmly. Check Hose...
... Cord Rewind does not work Dust escaping from brushroll - Plug unit in home. 3. Unplug and allow vacuum to cool for nearest authorized Hoover® dealer. 1. Dirt cup full and/ or clogged. 2. Replace belt - Pg. 6. 1. ...Pg. 9. 2. Dirt cup not installed correctly. 2. Pg. 7. 4. with HEPA media - Loose electrical wires. 1. Low vacuum suction. 1. Check items under "Vacuum won 't turn Suction Only Mode OFF - Replace fuse/reset breaker in firmly. Check Hose...


