
Product Manual
Page 1
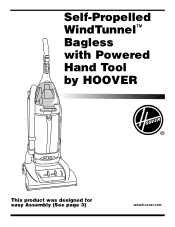
Self-Propelled WindTunnel™ Bagless with Powered Hand Tool by HOOVER ® This product was designed for easy Assembly (See page 3) www.hoover.com
Self-Propelled WindTunnel™ Bagless with Powered Hand Tool by HOOVER ® This product was designed for easy Assembly (See page 3) www.hoover.com

Product Manual
Page 2
...you attach your HOOVER product. Index Assembling Cleaner 3 Carton Contents 3 How To Use Cleaner Descriptions 4 Cleaning Tools 6-7 Embedded Dirt FINDERTM Feature .5 Upright Cleaner 4-6 Self-Propel Feature 4 Important Safeguards 2 Maintenance Authorized Service 13 Cleaning Filters 8-9 Emptying Cup 7-9 Lubrication 13 Replacing Belts 10-11 Replacing Power Hand Tool Belt .12 Replacing Brush Roll 10-11 Replacing Power Hand Tool Agitator Brush Roll 11-12 Replacing Edge Groomers . . . . .13 Replacing Headlight 9 Thermal Protector 13 Trouble Shooting 14 Clearing Blockages 14 Warranty...
...you attach your HOOVER product. Index Assembling Cleaner 3 Carton Contents 3 How To Use Cleaner Descriptions 4 Cleaning Tools 6-7 Embedded Dirt FINDERTM Feature .5 Upright Cleaner 4-6 Self-Propel Feature 4 Important Safeguards 2 Maintenance Authorized Service 13 Cleaning Filters 8-9 Emptying Cup 7-9 Lubrication 13 Replacing Belts 10-11 Replacing Power Hand Tool Belt .12 Replacing Brush Roll 10-11 Replacing Power Hand Tool Agitator Brush Roll 11-12 Replacing Edge Groomers . . . . .13 Replacing Headlight 9 Thermal Protector 13 Trouble Shooting 14 Clearing Blockages 14 Warranty...
Product Manual
Page 3
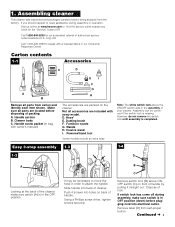
... operation, Visit us online at the back of cleaner. Crevice wand I. Powered hand tool *some models include an extra hose Note: The white switch lock above ONOFF switch (C) on the cleaner. 1. If you should happen to need assistance during assembly, make sure switch (A) is missing. Make sure all parts from carton and identify each item shown. Handle section B. Handle screw packet (in the OFF position. Furniture nozzle G. Wands H. Easy 3-step assembly...
... operation, Visit us online at the back of cleaner. Crevice wand I. Powered hand tool *some models include an extra hose Note: The white switch lock above ONOFF switch (C) on the cleaner. 1. If you should happen to need assistance during assembly, make sure switch (A) is missing. Make sure all parts from carton and identify each item shown. Handle section B. Handle screw packet (in the OFF position. Furniture nozzle G. Wands H. Easy 3-step assembly...

Product Manual
Page 4
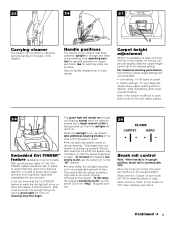
... . Cord hooks: wrap 12. To turn cleaner OFF, push switch down. Handle pet being cleaned. 2. To turn cleaner ON, push switch (A) up. Do not change the plug in the outlet, reverse the plug. Hose rack 23. 'Dirt FINDER' display* 24. Hose 7. Embedded 'Dirt FINDER' sensitivity switch* 11. The top hook 13. Extension wands operating or low posi- 28. Self-propel button 17. Powered hand tool 20. To move your cleaner from you have adjusted to deactivate the feature. Dirt cup handle...
... . Cord hooks: wrap 12. To turn cleaner OFF, push switch down. Handle pet being cleaned. 2. To turn cleaner ON, push switch (A) up. Do not change the plug in the outlet, reverse the plug. Hose rack 23. 'Dirt FINDER' display* 24. Hose 7. Embedded 'Dirt FINDER' sensitivity switch* 11. The top hook 13. Extension wands operating or low posi- 28. Self-propel button 17. Powered hand tool 20. To move your cleaner from you have adjusted to deactivate the feature. Dirt cup handle...
Product Manual
Page 5
... the next higher setting. 2-8 CD Embedded Dirt FINDERTM feature (available on some models) With red and green lights (C), the 'Dirt FINDER' system alerts the user to the "Reg." (Regular) position. 2-9 FLOOR CARPET HARD Brush roll control Note: When handle is first turned on when the cleaner is in the upright position. Cleaning may seldom come on . low for storage and when using the carrying handle on throughout cleaning except when...
... the next higher setting. 2-8 CD Embedded Dirt FINDERTM feature (available on some models) With red and green lights (C), the 'Dirt FINDER' system alerts the user to the "Reg." (Regular) position. 2-9 FLOOR CARPET HARD Brush roll control Note: When handle is first turned on when the cleaner is in the upright position. Cleaning may seldom come on . low for storage and when using the carrying handle on throughout cleaning except when...

Product Manual
Page 6
... the edge of the nozzle to remove dirt in moving the cleaner from clinging to the hose (F) by pushing it firmly into hose. Cleaning tools When using cleaning tools, cleaner handle must be in the upright position to top. Before reaching edge, push down on both sides of carpet or furniture. 2-13 2-14 2-15 F G E Stair Cleaning Use the hose and powered hand tool or furniture nozzle for convenience in carpet near baseboards and...
... the edge of the nozzle to remove dirt in moving the cleaner from clinging to the hose (F) by pushing it firmly into hose. Cleaning tools When using cleaning tools, cleaner handle must be in the upright position to top. Before reaching edge, push down on both sides of carpet or furniture. 2-13 2-14 2-15 F G E Stair Cleaning Use the hose and powered hand tool or furniture nozzle for convenience in carpet near baseboards and...

Product Manual
Page 7
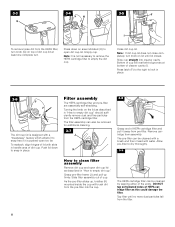
... with a detergent. When using . 3. Lift cup slightly and pull straight out to empty Disconnect cleaner from electrical outlet. CAUTION: Very fine materials, such as face powder, cornstarch or fireplace soot, may be used for this type of dust, empty the cup and clean the filters often. 3-2 F Dirt cup The dirt cup assembly consists of attached hose. How to remove from entering the HEPA cartridge filter chamber. K. It can be washed in water.
... with a detergent. When using . 3. Lift cup slightly and pull straight out to empty Disconnect cleaner from electrical outlet. CAUTION: Very fine materials, such as face powder, cornstarch or fireplace soot, may be used for this type of dust, empty the cup and clean the filters often. 3-2 F Dirt cup The dirt cup assembly consists of attached hose. How to remove from entering the HEPA cartridge filter chamber. K. It can be washed in water.
Product Manual
Page 8
... brush dirt from the pre-filter into cleaner cavity. Allow pre-filter to dry thoroughly. 3-9 How to clean filter assembly Remove dirt cup and open dirt cup lid. The pre-filter can be removed for additional cleaning. 3-7 J K 3-8 Grasp end of cup. Grasp pre-filter frame (J) and pull up , bristles (K) mounted inside the cup will rest behind grooves at least one complete turn. Slide cup straight into the cup. Filter assembly The HEPA cartridge filter and pre-filter are essentially self...
... brush dirt from the pre-filter into cleaner cavity. Allow pre-filter to dry thoroughly. 3-9 How to clean filter assembly Remove dirt cup and open dirt cup lid. The pre-filter can be removed for additional cleaning. 3-7 J K 3-8 Grasp end of cup. Grasp pre-filter frame (J) and pull up , bristles (K) mounted inside the cup will rest behind grooves at least one complete turn. Slide cup straight into the cup. Filter assembly The HEPA cartridge filter and pre-filter are essentially self...
Product Manual
Page 9
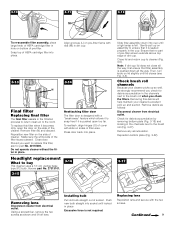
... electrical outlet. Continued 9 Snap top of the cleaner. Reposition new filter on the side of socket. Do not operate cleaner without the filter in the channels next to the brush roll when you want to snap free if it is pushed open the door on lid slightly until locked in the cup. Headlight replacement What to buy This cleaner uses a 12 volt, wedge base type 912 bulb, Hoover part...
... electrical outlet. Continued 9 Snap top of the cleaner. Reposition new filter on the side of socket. Do not operate cleaner without the filter in the channels next to the brush roll when you want to snap free if it is pushed open the door on lid slightly until locked in the cup. Headlight replacement What to buy This cleaner uses a 12 volt, wedge base type 912 bulb, Hoover part...

Product Manual
Page 10
... other is turned over. 3-18 A Removing bottom plate Place handle in low position and turn cleaner over large pulley (C) while rolling the pulley in direction shown. Warning - To check condition of the cleaner and should be required to buy When purchasing a new agitator, ask for flat belt Hoover belt part no. 38528035 (belt package part no. 40201170). To maintain cleaning effectiveness, replace agitator if brushes do not touch card. Brush roll can start suddenly. Unplug cleaner when it...
... other is turned over. 3-18 A Removing bottom plate Place handle in low position and turn cleaner over large pulley (C) while rolling the pulley in direction shown. Warning - To check condition of the cleaner and should be required to buy When purchasing a new agitator, ask for flat belt Hoover belt part no. 38528035 (belt package part no. 40201170). To maintain cleaning effectiveness, replace agitator if brushes do not touch card. Brush roll can start suddenly. Unplug cleaner when it...

Product Manual
Page 11
... brush roll. Replace with lettering on brush roll Before positioning belt onto brush roll, check for debris accumulation as shown in Fig. 3-19. To install new belt (with Hoover belt part no. 38528034 (belt package part no. 40201200). Push other side of brush roll (H) into place. Remove tool from hose and turn it out. Insert brush roll through belt and position belt in Fig. 4-1. Belt may fit loosely when properly installed. Then firmly pull on side of tool and remove bottom plate...
... brush roll. Replace with lettering on brush roll Before positioning belt onto brush roll, check for debris accumulation as shown in Fig. 3-19. To install new belt (with Hoover belt part no. 38528034 (belt package part no. 40201200). Push other side of brush roll (H) into place. Remove tool from hose and turn it out. Insert brush roll through belt and position belt in Fig. 4-1. Belt may fit loosely when properly installed. Then firmly pull on side of tool and remove bottom plate...

Product Manual
Page 12
... A Powered hand tool Belt replacement The powered hand tool belt is designed to pinch brush bristles in guard. Grasp turbine (E) and pull firmly to ensure that it is cracked, gouged or broken, it rotates freely. If belt is not normally replaced. Remove bottom plate, belt guard and brush roll as described in Figs. 3-28 through 3-33. Turn agitator, making sure not to last a long time and is cracked, gouged or broken, replace...
... A Powered hand tool Belt replacement The powered hand tool belt is designed to pinch brush bristles in guard. Grasp turbine (E) and pull firmly to ensure that it is cracked, gouged or broken, it rotates freely. If belt is not normally replaced. Remove bottom plate, belt guard and brush roll as described in Figs. 3-28 through 3-33. Turn agitator, making sure not to last a long time and is cracked, gouged or broken, replace...

Product Manual
Page 13
... include Hose Power (ASTM Test F558), Surface Litter Cleaning, Hard Floor Cleaning, Edge Cleaning, Cleaning Width and Air Filtration. Lubrication The motor is for 30 minutes, the thermal protector automatically resets and cleaning may need servicing (see "Service" section). When the thermal protector activates, the cleaner will only result in "The belt" section (Fig.3-18). 3-37 Installing groomers Lift off both sides of Hoover uprights only and not for Testing and Materials (ASTM) Carpet Cleaning...
... include Hose Power (ASTM Test F558), Surface Litter Cleaning, Hard Floor Cleaning, Edge Cleaning, Cleaning Width and Air Filtration. Lubrication The motor is for 30 minutes, the thermal protector automatically resets and cleaning may need servicing (see "Service" section). When the thermal protector activates, the cleaner will only result in "The belt" section (Fig.3-18). 3-37 Installing groomers Lift off both sides of Hoover uprights only and not for Testing and Materials (ASTM) Carpet Cleaning...
Product Manual
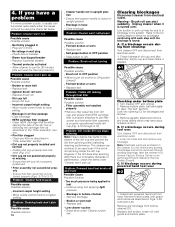
Page 14
... used even if the dirt is found : A. Brush roll can continue to a Hoover Factory Service Center or an Authorized Hoover Warranty Service Dealer (Depot). Problem: Brush roll not turning Possible cause Possible solution • Brush roll in the cleaner. Low suction or pick up Possible cause Possible solution • Broken or worn belt • Replace belt. • Agitator brush roll worn • Replace brush roll. • Dirt cup full • Empty dirt cup. • Incorrect carpet height setting • Move nozzle control knob to ON. Disconnect powered hand tool...
... used even if the dirt is found : A. Brush roll can continue to a Hoover Factory Service Center or an Authorized Hoover Warranty Service Dealer (Depot). Problem: Brush roll not turning Possible cause Possible solution • Brush roll in the cleaner. Low suction or pick up Possible cause Possible solution • Broken or worn belt • Replace belt. • Agitator brush roll worn • Replace brush roll. • Dirt cup full • Empty dirt cup. • Incorrect carpet height setting • Move nozzle control knob to ON. Disconnect powered hand tool...

Product Manual
Page 15
... at www.hoover.com This warranty does not cover pick up, delivery, or house calls; Full One Year Warranty (Domestic Use) Your HOOVER® appliance is warranted in normal household use, in accordance with the Owner's Manual against original defects in material and workmanship for warranty service, transportation will be required before service is rendered. 1. While this warranty or the availability of warranty service outlets...
... at www.hoover.com This warranty does not cover pick up, delivery, or house calls; Full One Year Warranty (Domestic Use) Your HOOVER® appliance is warranted in normal household use, in accordance with the Owner's Manual against original defects in material and workmanship for warranty service, transportation will be required before service is rendered. 1. While this warranty or the availability of warranty service outlets...

Product Manual
Page 16
HOOVER y son marcas registradas HOOVER et sont des marques déposées HOOVER and are registered trademarks R1 10-02 U6625/30-/55-900, U6630-960 Printed in Mexico 56511-B64
HOOVER y son marcas registradas HOOVER et sont des marques déposées HOOVER and are registered trademarks R1 10-02 U6625/30-/55-900, U6630-960 Printed in Mexico 56511-B64


