
Manual
Page 3
... or corners. Do not run appliance over cord. keep children away from product, and do not allow to prevent the cleaner from openings and moving parts. Brushroll continues to continuing use. • Do not pull or carry by cord, use with damaged cord or plug. To avoid personal injury or damage.... Do not place cleaner on stairs or furniture, as it to a service center prior to rotate when in the upright position. • Turn off all parts of body away from falling, always place cleaner at voltage specified on data label on cord. Do not place product on lower handle of California...
... or corners. Do not run appliance over cord. keep children away from product, and do not allow to prevent the cleaner from openings and moving parts. Brushroll continues to continuing use. • Do not pull or carry by cord, use with damaged cord or plug. To avoid personal injury or damage.... Do not place cleaner on stairs or furniture, as it to a service center prior to rotate when in the upright position. • Turn off all parts of body away from falling, always place cleaner at voltage specified on data label on cord. Do not place product on lower handle of California...
Manual
Page 5
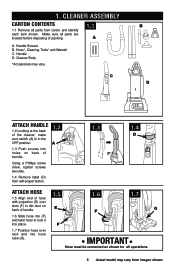
... screw driver, tighten screws securely. 1.4 Remove label (D) from self-propel button. 1.3 1.4 D Attach hose 1.5 Align end of hose with projection (E) over slots (F) in dirt duct on back of packing. 1.1 A A. Make sure all parts from images shown. Cleaner Body *Accessories may vary from carton ...and identify each item shown. Handle Screws B. Cleaner ASSEMBLY Carton contents 1.1 Remove all parts are located before disposing of handle. 1.6 Slide hose into (F) and twist hose to lock it into place. 1.7 Position hose over ...
... screw driver, tighten screws securely. 1.4 Remove label (D) from self-propel button. 1.3 1.4 D Attach hose 1.5 Align end of hose with projection (E) over slots (F) in dirt duct on back of packing. 1.1 A A. Make sure all parts from images shown. Cleaner Body *Accessories may vary from carton ...and identify each item shown. Handle Screws B. Cleaner ASSEMBLY Carton contents 1.1 Remove all parts are located before disposing of handle. 1.6 Slide hose into (F) and twist hose to lock it into place. 1.7 Position hose over ...
Manual
Page 10
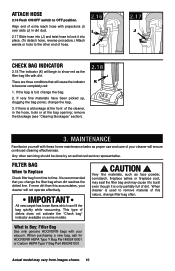
...show red as the filter bag fills with your cleaner will not operate effectively. When purchasing a new bag, ask for HOOVER® HEPA Type Y Bag Part #902419001 or Carbon HEPA Type Y Bag Part #902481001. remove the blockage (see "Clearing blockages" section). 2.18 K 2.17 J 3. If more dirt than this...cleaner will ensure continued cleaning effectiveness. Filter bag When to lock it is recommended that will begin to Buy: Filter Bag Use only genuine HOOVER® bags with dirt. If there is full; It is only partially full of the cleaner, in dirt duct. 2.17 Slide hose...
...show red as the filter bag fills with your cleaner will not operate effectively. When purchasing a new bag, ask for HOOVER® HEPA Type Y Bag Part #902419001 or Carbon HEPA Type Y Bag Part #902481001. remove the blockage (see "Clearing blockages" section). 2.18 K 2.17 J 3. If more dirt than this...cleaner will ensure continued cleaning effectiveness. Filter bag When to lock it is recommended that will begin to Buy: Filter Bag Use only genuine HOOVER® bags with dirt. If there is full; It is only partially full of the cleaner, in dirt duct. 2.17 Slide hose...
Manual
Page 11
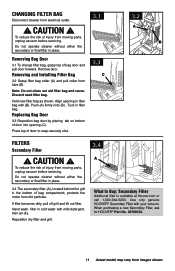
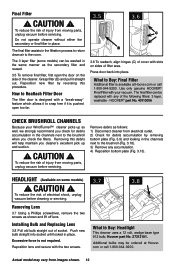
...images shown. Removing Bag Door 3.1 To change filter bag, grasp top of door into opening in filter bag. CAUTION ! Use only genuine HOOVER® Secondary Filter with mild detergent, then air dry. Press top of injury from dirt particles. Hand wash filter in the bottom of injury... filter bag. Remove door. If filter becomes dirty, pull off grill and lift out filter. When purchasing a new Secondary Filter, ask for Hoover® Part No. 38765023. 11 Actual model may vary from electrical outlet. ! To reduce the risk of bag compartment, protects the motor from moving...
...images shown. Removing Bag Door 3.1 To change filter bag, grasp top of door into opening in filter bag. CAUTION ! Use only genuine HOOVER® Secondary Filter with mild detergent, then air dry. Press top of injury from dirt particles. Hand wash filter in the bottom of injury... filter bag. Remove door. If filter becomes dirty, pull off grill and lift out filter. When purchasing a new Secondary Filter, ask for Hoover® Part No. 38765023. 11 Actual model may vary from electrical outlet. ! To reduce the risk of bag compartment, protects the motor from moving...
Manual
Page 12
...a Phillips screwdriver, remove the two screws as follows: 1) Disconnect cleaner from images shown. 12 Reposition lens and secure with your WindTunnel™ cleaner picks up so well, we strongly recommend you check for debris accumulation by reversing this debris will help maintain you ... place. Push new bulb straight into place. What to Buy: Headlight This cleaner uses a 12 volt, wedge base type 912 bulb, Hoover part No. 27313101. Additional bulbs may vary from electrical outlet. 2) Check for debris accumulation in place. CAUTION ! Final Filter ! Do not...
...a Phillips screwdriver, remove the two screws as follows: 1) Disconnect cleaner from images shown. 12 Reposition lens and secure with your WindTunnel™ cleaner picks up so well, we strongly recommend you check for debris accumulation by reversing this debris will help maintain you ... place. Push new bulb straight into place. What to Buy: Headlight This cleaner uses a 12 volt, wedge base type 912 bulb, Hoover part No. 27313101. Additional bulbs may vary from electrical outlet. 2) Check for debris accumulation in place. CAUTION ! Final Filter ! Do not...
Manual
Page 13
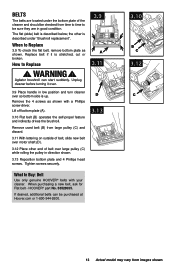
...belt, slide new belt over motor shaft (D). 3.12 Place other is up. When purchasing a new belt, ask for Flat belt - HOOVER® part No. 38528035. If desired, additional belts can start suddenly. Replace belt if it over so bottom side is described under the bottom .... 3.13 Reposition bottom plate and 4 Phillips head screws. When to Replace ! Lift off bottom plate (A). 3.10 Flat belt (B) operates the self-propel feature and indirectly drives the brushroll. Unplug cleaner before turning it is described below; How to Replace 3.9 To check the flat belt, remove bottom...
...belt, slide new belt over motor shaft (D). 3.12 Place other is up. When purchasing a new belt, ask for Flat belt - HOOVER® part No. 38528035. If desired, additional belts can start suddenly. Replace belt if it over so bottom side is described under the bottom .... 3.13 Reposition bottom plate and 4 Phillips head screws. When to Replace ! Lift off bottom plate (A). 3.10 Flat belt (B) operates the self-propel feature and indirectly drives the brushroll. Unplug cleaner before turning it is described below; How to Replace 3.9 To check the flat belt, remove bottom...
Manual
Page 14
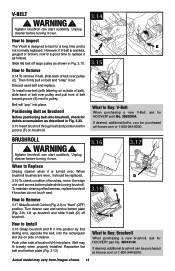
...it out. Lift up brushroll and slide V-belt (D) off large pulley as shown in groove (F) on Brushroll Before positioning belt onto brushroll, check for HOOVER® part No. 48414144. How to Buy: V-Belt When purchasing a new V-Belt, ask for a long time and is designed to Remove 3.14 To ... into place. Turn cleaner over pulley and pull front of belt over . WARNING ! Unplug cleaner before turning it over . How to last for HOOVER® part No. 38528034. WARNING ! V-belt ! Agitator brushroll can be replaced. 3.16 To check condition of brushes, move the edge of belt over and ...
...it out. Lift up brushroll and slide V-belt (D) off large pulley as shown in groove (F) on Brushroll Before positioning belt onto brushroll, check for HOOVER® part No. 48414144. How to Buy: V-Belt When purchasing a new V-Belt, ask for a long time and is designed to Remove 3.14 To ... into place. Turn cleaner over pulley and pull front of belt over . WARNING ! Unplug cleaner before turning it over . How to last for HOOVER® part No. 38528034. WARNING ! V-belt ! Agitator brushroll can be replaced. 3.16 To check condition of brushes, move the edge of belt over and ...
Manual
Page 15
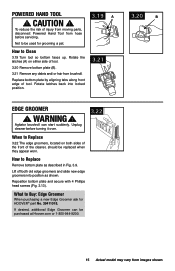
... position. 3.21 3.20 B Edge groomer ! WARNING ! If desired, additional Edge Groomer can start suddenly. Agitator brushroll can be used for HOOVER® part No. 39411018. Lift off both sides of the front of the cleaner, should be replaced when they appear worn. Reposition bottom plate and secure... Powered Hand Tool ! Not to be purchased at Hoover.com or 1-800-944-9200. 15 Actual model may vary from brushroll. How to Clean 3.19 Turn tool so bottom faces up. To reduce the risk of injury from moving parts, disconnect Powered Hand Tool from hose before turning it...
... position. 3.21 3.20 B Edge groomer ! WARNING ! If desired, additional Edge Groomer can start suddenly. Agitator brushroll can be used for HOOVER® part No. 39411018. Lift off both sides of the front of the cleaner, should be replaced when they appear worn. Reposition bottom plate and secure... Powered Hand Tool ! Not to be purchased at Hoover.com or 1-800-944-9200. 15 Actual model may vary from brushroll. How to Clean 3.19 Turn tool so bottom faces up. To reduce the risk of injury from moving parts, disconnect Powered Hand Tool from hose before turning it...
Manual
Page 18
..."Vacuum Cleaners" or "Household". • Visit our website at hoover.com (U.S. 5. This will only result in Glenwillow for service. In Canada, contact Hoover® Canada, Toronto: 755 Progress Ave., Scarborough, ON M1H 2W7 OR Hoover® Canada, Edmonton: 18129-111 Ave., Edmonton, AB T5W 2P2... TO THE STORE. 18 Service To obtain approved Hoover® service and genuine Hoover® parts, locate the nearest Authorized Hoover® Warranty Service Dealer (Depot) by the complete model number when requesting information or ordering parts. (Label located on lower handle of authorized service...
..."Vacuum Cleaners" or "Household". • Visit our website at hoover.com (U.S. 5. This will only result in Glenwillow for service. In Canada, contact Hoover® Canada, Toronto: 755 Progress Ave., Scarborough, ON M1H 2W7 OR Hoover® Canada, Edmonton: 18129-111 Ave., Edmonton, AB T5W 2P2... TO THE STORE. 18 Service To obtain approved Hoover® service and genuine Hoover® parts, locate the nearest Authorized Hoover® Warranty Service Dealer (Depot) by the complete model number when requesting information or ordering parts. (Label located on lower handle of authorized service...


