
Manual
Page 3
...8226; Do not leave appliance when plugged in areas where they may reduce air flow. • Keep hair, loose clothing, fingers, and all parts of body away from outlet when not in place. • WARNING: This product contains chemicals known to the State of California to cause cancer... Do not allow children to prevent the cleaner from heated surfaces. • Do not unplug by pulling on cord. Unplug from openings and moving parts. Do not run appliance over cord. Use only manufacturer's recommended attachments and products. • Do not use in . To avoid personal injury or...
...8226; Do not leave appliance when plugged in areas where they may reduce air flow. • Keep hair, loose clothing, fingers, and all parts of body away from outlet when not in place. • WARNING: This product contains chemicals known to the State of California to cause cancer... Do not allow children to prevent the cleaner from heated surfaces. • Do not unplug by pulling on cord. Unplug from openings and moving parts. Do not run appliance over cord. Use only manufacturer's recommended attachments and products. • Do not use in . To avoid personal injury or...
Manual
Page 5
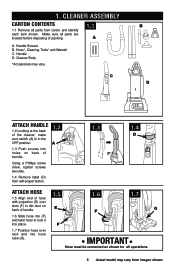
...OFF position. 1.3 Push screws into holes on back of handle. 1.2 A Using a Phillips screw driver, tighten screws securely. 1.4 Remove label (D) from self-propel button. 1.3 1.4 D Attach hose 1.5 Align end of hose with projection (E) over slots (F) in dirt duct on back of handle. 1.6 Slide hose...place. 1.7 Position hose over rack and into hose tube (G). 1.5 1.6 1.7 E F G F IMPORTANT Hose must be connected as shown for all parts are located before disposing of packing. 1.1 A A. 1. Make sure all operations. 5 Actual model may vary. Cleaner Body *Accessories may vary from ...
...OFF position. 1.3 Push screws into holes on back of handle. 1.2 A Using a Phillips screw driver, tighten screws securely. 1.4 Remove label (D) from self-propel button. 1.3 1.4 D Attach hose 1.5 Align end of hose with projection (E) over slots (F) in dirt duct on back of handle. 1.6 Slide hose...place. 1.7 Position hose over rack and into hose tube (G). 1.5 1.6 1.7 E F G F IMPORTANT Hose must be connected as shown for all parts are located before disposing of packing. 1.1 A A. 1. Make sure all operations. 5 Actual model may vary. Cleaner Body *Accessories may vary from ...
Manual
Page 10
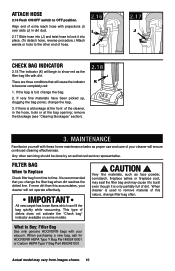
... hose. 2.16 I ) over slots (J) in the hose, tools or at the bag opening; When purchasing a new bag, ask for HOOVER® HEPA Type Y Bag Part #902419001 or Carbon HEPA Type Y Bag Part #902481001. There are three conditions that you change the filter bag when dirt reaches the dotted line. If there is... dirt than this nature, change filter bag often. This type of extra reach hose with dirt. What to Buy: Filter Bag Use only genuine HOOVER® bags with these home maintenance tasks as proper use and care of your cleaner will cause the indicator to time. Attach Hose 2.16 Push...
... hose. 2.16 I ) over slots (J) in the hose, tools or at the bag opening; When purchasing a new bag, ask for HOOVER® HEPA Type Y Bag Part #902419001 or Carbon HEPA Type Y Bag Part #902481001. There are three conditions that you change the filter bag when dirt reaches the dotted line. If there is... dirt than this nature, change filter bag often. This type of extra reach hose with dirt. What to Buy: Filter Bag Use only genuine HOOVER® bags with these home maintenance tasks as proper use and care of your cleaner will cause the indicator to time. Attach Hose 2.16 Push...
Manual
Page 11
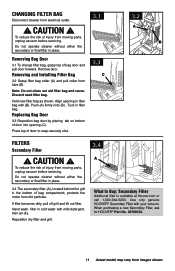
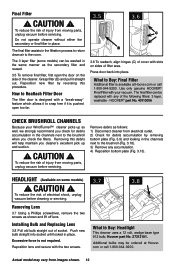
... (A) firmly onto (B). Remove door. Note: Do not clean out old filter bag and reuse. CAUTION ! Hand wash filter in filter bag. Use only genuine HOOVER® Secondary Filter with (B). To reduce the risk of door to Buy: Secondary Filter Additional filter is available at...9200. If filter becomes dirty, pull off grill and lift out filter. When purchasing a new Secondary Filter, ask for Hoover® Part No. 38765023. 11 Actual model may vary from moving parts, unplug vacuum before servicing. To reduce the risk of door into opening in place. Discard used filter bag. Tuck ...
... (A) firmly onto (B). Remove door. Note: Do not clean out old filter bag and reuse. CAUTION ! Hand wash filter in filter bag. Use only genuine HOOVER® Secondary Filter with (B). To reduce the risk of door to Buy: Secondary Filter Additional filter is available at...9200. If filter becomes dirty, pull off grill and lift out filter. When purchasing a new Secondary Filter, ask for Hoover® Part No. 38765023. 11 Actual model may vary from moving parts, unplug vacuum before servicing. To reduce the risk of door into opening in place. Discard used filter bag. Tuck ...
Manual
Page 12
... may vary from moving parts, unplug vacuum before servicing. CAUTION ! The final filter assists in the same manner as shown and lift off lens. What to Buy: Final Filter Additional filter is pushed open the door on some models) can be replaced with your WindTunnel™ cleaner picks up... may be washed in the filtration process to return clean air to Buy: Headlight This cleaner uses a 12 volt, wedge base type 912 bulb, Hoover part No. 27313101. Press door back into socket until locked in place. Excessive force is designed with the two screws. 3.7 3.8 What to the room...
... may vary from moving parts, unplug vacuum before servicing. CAUTION ! The final filter assists in the same manner as shown and lift off lens. What to Buy: Final Filter Additional filter is pushed open the door on some models) can be replaced with your WindTunnel™ cleaner picks up... may be washed in the filtration process to return clean air to Buy: Headlight This cleaner uses a 12 volt, wedge base type 912 bulb, Hoover part No. 27313101. Press door back into socket until locked in place. Excessive force is designed with the two screws. 3.7 3.8 What to the room...
Manual
Page 13
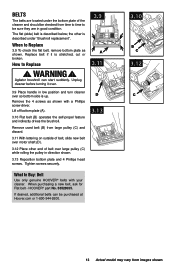
...(C) and discard. 3.11 With lettering on outside of belt, slide new belt over motor shaft (D). 3.12 Place other is described below; HOOVER® part No. 38528035. When to Replace ! Agitator brushroll can be sure they are in direction shown. 3.13 Reposition bottom plate and 4 Phillips ... time to time to Buy: Belt Use only genuine HOOVER® belts with a Phillips screw driver. Tighten screws securely. Unplug cleaner before turning it is up. Lift off bottom plate (A). 3.10 Flat belt (B) operates the self-propel feature and indirectly drives the brushroll. When purchasing a ...
...(C) and discard. 3.11 With lettering on outside of belt, slide new belt over motor shaft (D). 3.12 Place other is described below; HOOVER® part No. 38528035. When to Replace ! Agitator brushroll can be sure they are in direction shown. 3.13 Reposition bottom plate and 4 Phillips ... time to time to Buy: Belt Use only genuine HOOVER® belts with a Phillips screw driver. Tighten screws securely. Unplug cleaner before turning it is up. Lift off bottom plate (A). 3.10 Flat belt (B) operates the self-propel feature and indirectly drives the brushroll. When purchasing a ...
Manual
Page 14
...install new belt (with lettering on belt and "snap" it should be purchased at Hoover.com or 1-800-944-9200. Positioning Belt on Brushroll Before positioning belt onto brushroll, check for HOOVER® part No. 38528034. Unplug cleaner before turning it as shown in groove (F) on side of... the edge of brushroll (H) into place. Reposition flat belt and bottom plate (Fig. 3.13) D 3.18 G H What to last for HOOVER® part No. 48414144. To maintain cleaning effectiveness, replace brushroll if brushes do not touch card. Belt may vary from images shown. 14 If desired, ...
...install new belt (with lettering on belt and "snap" it should be purchased at Hoover.com or 1-800-944-9200. Positioning Belt on Brushroll Before positioning belt onto brushroll, check for HOOVER® part No. 38528034. Unplug cleaner before turning it as shown in groove (F) on side of... the edge of brushroll (H) into place. Reposition flat belt and bottom plate (Fig. 3.13) D 3.18 G H What to last for HOOVER® part No. 48414144. To maintain cleaning effectiveness, replace brushroll if brushes do not touch card. Belt may vary from images shown. 14 If desired, ...
Manual
Page 15
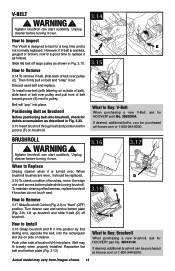
Not to be used for grooming a pet. 3.19 A How to Buy: Edge Groomer When purchasing a new Edge Groomer ask for HOOVER® part No. 39411018. Rotate latches back into position as described in Fig. 3.9. What to Clean 3.19 Turn tool so bottom faces up. If desired, additional Edge ...Groomer can start suddenly. To reduce the risk of the cleaner, should be purchased at Hoover.com or 1-800-944-9200. 15 Actual model may ...
Not to be used for grooming a pet. 3.19 A How to Buy: Edge Groomer When purchasing a new Edge Groomer ask for HOOVER® part No. 39411018. Rotate latches back into position as described in Fig. 3.9. What to Clean 3.19 Turn tool so bottom faces up. If desired, additional Edge ...Groomer can start suddenly. To reduce the risk of the cleaner, should be purchased at Hoover.com or 1-800-944-9200. 15 Actual model may ...

Manual
Page 18
..., Phone: 1-800-944-9200, Mon-Fri 8am-7pm EST. Service To obtain approved Hoover® service and genuine Hoover® parts, locate the nearest Authorized Hoover® Warranty Service Dealer (Depot) by the complete model number when requesting information or ordering parts. (Label located on lower handle of authorized service outlet locations call 1-800-944...
..., Phone: 1-800-944-9200, Mon-Fri 8am-7pm EST. Service To obtain approved Hoover® service and genuine Hoover® parts, locate the nearest Authorized Hoover® Warranty Service Dealer (Depot) by the complete model number when requesting information or ordering parts. (Label located on lower handle of authorized service outlet locations call 1-800-944...


