Manual
Page 1
www.hoover.com ® This product was designed for easy assembly (see page 3) WindTunnel™ Bagless by HOOVER Congratulations on your purchase!
www.hoover.com ® This product was designed for easy assembly (see page 3) WindTunnel™ Bagless by HOOVER Congratulations on your purchase!
Manual
Page 2
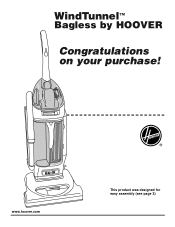
... Authorized Service 13 Cleaning filters 8-9 Emptying Dirt Cup 8 Replacing Agitator Brush Roll ......11 Replacing Power Hand Tool Agitator Brush Roll 12 Replacing Belt 10-11 Replacing Power Hand Tool Belt ..12 Replacing Edge Groomers 11 Replacing Headlight 10 Thermal Protector 13 Warranty 14 © 2004 The Hoover Company www.hoover.com Important Safeguards When using an electrical appliance, always follow basic precautions, including the following: READ ALL INSTRUCTIONS BEFORE USING THIS APPLIANCE Warning: To reduce the risk of the cleaner. For your sales receipt to run...
... Authorized Service 13 Cleaning filters 8-9 Emptying Dirt Cup 8 Replacing Agitator Brush Roll ......11 Replacing Power Hand Tool Agitator Brush Roll 12 Replacing Belt 10-11 Replacing Power Hand Tool Belt ..12 Replacing Edge Groomers 11 Replacing Headlight 10 Thermal Protector 13 Warranty 14 © 2004 The Hoover Company www.hoover.com Important Safeguards When using an electrical appliance, always follow basic precautions, including the following: READ ALL INSTRUCTIONS BEFORE USING THIS APPLIANCE Warning: To reduce the risk of the cleaner. For your sales receipt to run...
Manual
Page 3
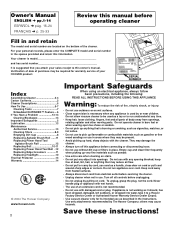
... continued if the switch lock is completed. If you should happen to need assistance during assembly or operation, call: Visit us on-line at www.hoover.com to speak with a representative in the assembly of service outlet locations (U.S. Carton contents 1-1 D A B C Remove all parts are located before being shipped from carton and identify each item shown. Hose, cleaning tools and wands (packed on the "Service" button) OR 1-800...
... continued if the switch lock is completed. If you should happen to need assistance during assembly or operation, call: Visit us on-line at www.hoover.com to speak with a representative in the assembly of service outlet locations (U.S. Carton contents 1-1 D A B C Remove all parts are located before being shipped from carton and identify each item shown. Hose, cleaning tools and wands (packed on the "Service" button) OR 1-800...
Manual
Page 4
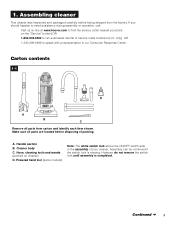
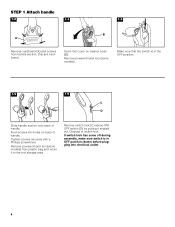
... off during assembly, make sure switch is in OFF position (down) before plugging into holes on cleaner body (B). OWNER'S MANUAL FOR COMPLETE INSTRUCTIONS B Remove cardboard (A) and screws from plastic bag and return it straight out. Dispose of handle. Push screws into electrical outlet. 4 Remove powered hand tool (some models). Remove switch lock (C) above ON/ OFF switch (D) by pulling it to the tool storage area. Remove powered hand tool (some models) from handle section. STEP 1 Attach handle 1-2 1-3 1-4 A FOR HANDLE ASSEMBLY REMOVE SEE...
... off during assembly, make sure switch is in OFF position (down) before plugging into holes on cleaner body (B). OWNER'S MANUAL FOR COMPLETE INSTRUCTIONS B Remove cardboard (A) and screws from plastic bag and return it straight out. Dispose of handle. Push screws into electrical outlet. 4 Remove powered hand tool (some models). Remove switch lock (C) above ON/ OFF switch (D) by pulling it to the tool storage area. Remove powered hand tool (some models) from handle section. STEP 1 Attach handle 1-2 1-3 1-4 A FOR HANDLE ASSEMBLY REMOVE SEE...
Manual
Page 5
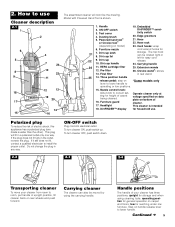
... rear wheels and push forward. DirtFINDER™ display for easy cord release. 24. Do not change the plug in rear wand. 25 14. ON-OFF switch Plug cord into electrical outlet. How to lower handle. Dusting brush 5. Powered hand tool* or Crevice tool* 19. Dirt cup lid 22 9. HEPA cartridge filter 12. Extension wands 26. To turn cleaner OFF, push switch down. 2-2 2-3 2-4 Transporting cleaner To move your cleaner has three positions; Carrying cleaner The cleaner can be moved by using cleaning tools; Handle...
... rear wheels and push forward. DirtFINDER™ display for easy cord release. 24. Do not change the plug in rear wand. 25 14. ON-OFF switch Plug cord into electrical outlet. How to lower handle. Dusting brush 5. Powered hand tool* or Crevice tool* 19. Dirt cup lid 22 9. HEPA cartridge filter 12. Extension wands 26. To turn cleaner OFF, push switch down. 2-2 2-3 2-4 Transporting cleaner To move your cleaner has three positions; Carrying cleaner The cleaner can be moved by using cleaning tools; Handle...
Manual
Page 6
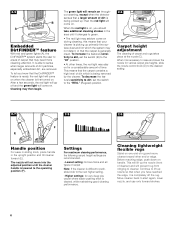
... nozzle so that your cleaner is picking up primarily fine surface dust and lint which is completely off and the green light will come on . To decrease the feature's sensitivity to dirt, set the switch (B) to the "HI" position. • At other end or edge. Settings For maximum cleaning performance, the following carpet height settings are removed. Move cleaner back to start again, lower nozzle, and use...
... nozzle so that your cleaner is picking up primarily fine surface dust and lint which is completely off and the green light will come on . To decrease the feature's sensitivity to dirt, set the switch (B) to the "HI" position. • At other end or edge. Settings For maximum cleaning performance, the following carpet height settings are removed. Move cleaner back to start again, lower nozzle, and use...
Manual
Page 7
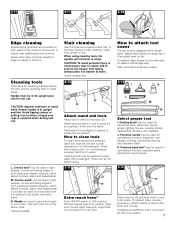
... submerge powered hand tool in dirt duct. Rinse and air dry before using cleaning tools, the agitator will continue to rotate. Furniture nozzle may be used for reaching hard to wand (H) by pushing it firmly onto the wand. M. It can be washed in warm water with your hose. When using . 2-15 O P Extra reach hose* Push ON/OFF switch to prevent the cleaner from cleaner. Twist wand or tool slightly to your cleaner. 7 How to remove dirt in carpet...
... submerge powered hand tool in dirt duct. Rinse and air dry before using cleaning tools, the agitator will continue to rotate. Furniture nozzle may be used for reaching hard to wand (H) by pushing it firmly onto the wand. M. It can be washed in warm water with your hose. When using . 2-15 O P Extra reach hose* Push ON/OFF switch to prevent the cleaner from cleaner. Twist wand or tool slightly to your cleaner. 7 How to remove dirt in carpet...
Manual
Page 8
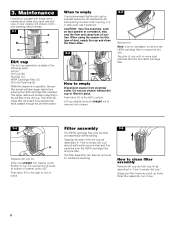
... straight out to the left side of the following parts: Lid (A) Dirt Cup (B) Pre-filter (C) HEPA Cartridge Filter (D) Dirt Inlet Opening (E) While the cleaner is in "How to empty dirt cup" should sufficiently remove dust and fine particles from electrical outlet. Do not use and care of your cleaner will ensure continued cleaning effectiveness. 3-1 E A B D C Dirt cup The dirt cup assembly consists of the dirt cup. This larger debris will rest behind grooves at bottom...
... straight out to the left side of the following parts: Lid (A) Dirt Cup (B) Pre-filter (C) HEPA Cartridge Filter (D) Dirt Inlet Opening (E) While the cleaner is in "How to empty dirt cup" should sufficiently remove dust and fine particles from electrical outlet. Do not use and care of your cleaner will ensure continued cleaning effectiveness. 3-1 E A B D C Dirt cup The dirt cup assembly consists of the dirt cup. This larger debris will rest behind grooves at bottom...
Manual
Page 9
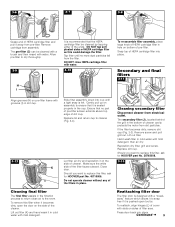
... the HEPA cartridge filter be cleaned with a brush and then rinsed with mild detergent, then air dry. Close door. The secondary filter (J), located behind the grill in the bottom of cleaner cavity, protects the motor from the filter. Hand wash filter in cold water with water. Make sure the white side of the filters in place. Cleaning secondary filter Disconnect cleaner from assembly. To remove this filter, ask for HOOVER part No. 38762008. 3-13 L Cleaning final filter...
... the HEPA cartridge filter be cleaned with a brush and then rinsed with mild detergent, then air dry. Close door. The secondary filter (J), located behind the grill in the bottom of cleaner cavity, protects the motor from the filter. Hand wash filter in cold water with water. Make sure the white side of the filters in place. Cleaning secondary filter Disconnect cleaner from assembly. To remove this filter, ask for HOOVER part No. 38762008. 3-13 L Cleaning final filter...
Manual
Page 10
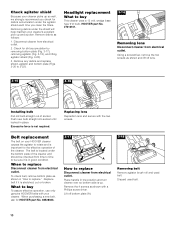
... cleaner picks up so well, we strongly recommend you check for HOOVER part No. 38528033. 3-17 A How to be checked from electrical outlet. To check belt, remove bottom plate as shown and lift off bottom plate (A). 3-18 Removing belt Remove agitator brush roll and used belt. 10 Removing debris under the agitator shield each time you clean the filters. Headlight replacement What to buy This cleaner uses a 12 volt, wedge base type 912 bulb, HOOVER part No. 27313101. 3-14 Removing lens Disconnect cleaner...
... cleaner picks up so well, we strongly recommend you check for HOOVER part No. 38528033. 3-17 A How to be checked from electrical outlet. To check belt, remove bottom plate as shown and lift off bottom plate (A). 3-18 Removing belt Remove agitator brush roll and used belt. 10 Removing debris under the agitator shield each time you clean the filters. Headlight replacement What to buy This cleaner uses a 12 volt, wedge base type 912 bulb, HOOVER part No. 27313101. 3-14 Removing lens Disconnect cleaner...
Manual
Page 11
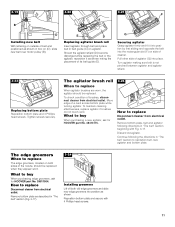
..., located on agitator. Move edge of brushes, disconnect cleaner from electrical outlet. Should the agitator shield (D) become dislodged while replacing the belt or the agitator, reposition it into position by first sliding end opposite the belt into the rectangular slot (F) on (D), slide new belt over motor pulley (B). Discard old agitator. The agitator brush roll When to buy When purchasing a new agitator, ask for HOOVER part No. 39511004. Remove bottom plate, belt and agitator following the directions in...
..., located on agitator. Move edge of brushes, disconnect cleaner from electrical outlet. Should the agitator shield (D) become dislodged while replacing the belt or the agitator, reposition it into position by first sliding end opposite the belt into the rectangular slot (F) on (D), slide new belt over motor pulley (B). Discard old agitator. The agitator brush roll When to buy When purchasing a new agitator, ask for HOOVER part No. 39511004. Remove bottom plate, belt and agitator following the directions in...
Manual
Page 12
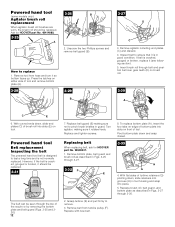
... HOOVER part No. 38528037. 1. Inspect belt to remove. 3. Grasp turbine (E) and pull firmly to ensure that it (see following section). 5. If belt is cracked, gouged or broken, replace it is cracked, gouged or broken, it should be seen through 3-30. 2. With curved ends down and snap closed. 3-33 H G 4. Powered hand tool (some models only) Agitator brush roll replacement When agitator brush roll brushes are worn, the brush roll should be replaced. 3-31 The belt...
... HOOVER part No. 38528037. 1. Inspect belt to remove. 3. Grasp turbine (E) and pull firmly to ensure that it (see following section). 5. If belt is cracked, gouged or broken, replace it is cracked, gouged or broken, it should be seen through 3-30. 2. With curved ends down and snap closed. 3-33 H G 4. Powered hand tool (some models only) Agitator brush roll replacement When agitator brush roll brushes are worn, the brush roll should be replaced. 3-31 The belt...
Manual
Page 13
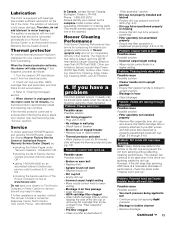
... lower setting • Blockage in air flow passage • Clear blockage • HEPA cartridge filter clogged • Clean HEPA cartridge filter by using tool applying light pressure. • Blockage in the "Filter assembly" section. • Pre-filter clogged • Clean pre-filter as follows: 1. Continued § 13 The addition of performance, check the items under "Vacuum Cleaners - When the thermal protector activates, the cleaner will reset the thermal protector) (see "Service" section). Service To obtain approved HOOVER service and genuine HOOVER parts, locate...
... lower setting • Blockage in air flow passage • Clear blockage • HEPA cartridge filter clogged • Clean HEPA cartridge filter by using tool applying light pressure. • Blockage in the "Filter assembly" section. • Pre-filter clogged • Clean pre-filter as follows: 1. Continued § 13 The addition of performance, check the items under "Vacuum Cleaners - When the thermal protector activates, the cleaner will reset the thermal protector) (see "Service" section). Service To obtain approved HOOVER service and genuine HOOVER parts, locate...
Manual
Page 14
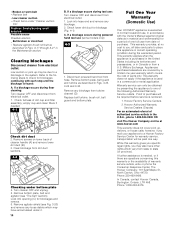
... powered hand tool from electrical outlet. While this warranty gives you specific legal rights, you mail your appliance to a Hoover Factory Service Center for a period of one of parts only. • Broken or worn belt • Replace belt • Low cleaner suction • Check items under bottom plate 4. Check lower dirt duct for blockages and remove. 6. Remove any loose debris which vary from state to one full year from dirt duct sections. 4-2 C Checking under "Cleaner suction low...
... powered hand tool from electrical outlet. While this warranty gives you specific legal rights, you mail your appliance to a Hoover Factory Service Center for a period of one of parts only. • Broken or worn belt • Replace belt • Low cleaner suction • Check items under bottom plate 4. Check lower dirt duct for blockages and remove. 6. Remove any loose debris which vary from state to one full year from dirt duct sections. 4-2 C Checking under "Cleaner suction low...
Manual
Page 36
HOOVER y ®son marcas registradas HOOVER et ®sont des marques déposées HOOVER and ® are registered trademarks 3-04 U5753-/65-/67-/69-900 Printed in Mexico 56511-C19
HOOVER y ®son marcas registradas HOOVER et ®sont des marques déposées HOOVER and ® are registered trademarks 3-04 U5753-/65-/67-/69-900 Printed in Mexico 56511-C19


