Owners Manual
Page 1
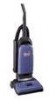
Owner's Manual ENGLISH § pp. 1-12 ESPAÑOL § pág. 13-20 FRANÇAIS § pág. 21-28 www.hoover.com ® This product was designed for your purchase! HOOVER® Bagged Tempo™ Upright Vacuum Cleaner Thank you for easy assembly (see page 3) Review this manual before operating cleaner
Owner's Manual ENGLISH § pp. 1-12 ESPAÑOL § pág. 13-20 FRANÇAIS § pág. 21-28 www.hoover.com ® This product was designed for your purchase! HOOVER® Bagged Tempo™ Upright Vacuum Cleaner Thank you for easy assembly (see page 3) Review this manual before operating cleaner
Owners Manual
Page 2
.... Turn off this owner's manual. Use only attachments recommended by pulling on cord. XXXXXXXXXXXX SERIAL NUMBER Contents Assembling Cleaner 3-4 How to use . keep free of dust, lint, hair, or anything that is used as described in the spaces provided. To unplug, grasp the plug, not the cord. Model Serial number Hint: Attach your cleaner. They may cause hazards. Keep cord away from heated surfaces. • Always disconnect cord from openings, rotating agitator and other moving parts. The numbers are located...
.... Turn off this owner's manual. Use only attachments recommended by pulling on cord. XXXXXXXXXXXX SERIAL NUMBER Contents Assembling Cleaner 3-4 How to use . keep free of dust, lint, hair, or anything that is used as described in the spaces provided. To unplug, grasp the plug, not the cord. Model Serial number Hint: Attach your cleaner. They may cause hazards. Keep cord away from heated surfaces. • Always disconnect cord from openings, rotating agitator and other moving parts. The numbers are located...
Owners Manual
Page 3
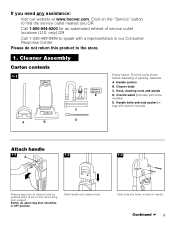
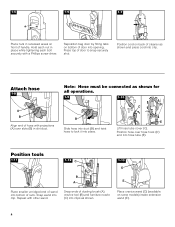
... down at www.hoover.com. Click on the "Service" button to find the service outlet nearest you need any assistance: Visit our website at top of door and pulling door outward. Please do not return this product to speak with a representative in OFF position. Cleaner body C. Crevice wand (included with owner's manual) D A B Attach handle 1-2 1-3 1-4 A Remove bag door on back of handle. Switch (A) above bag door should be...
... down at www.hoover.com. Click on the "Service" button to find the service outlet nearest you need any assistance: Visit our website at top of door and pulling door outward. Please do not return this product to speak with a representative in OFF position. Cleaner body C. Crevice wand (included with owner's manual) D A B Attach handle 1-2 1-3 1-4 A Remove bag door on back of handle. Switch (A) above bag door should be...
Owners Manual
Page 4
... and press cord into clip. Position cord on back of handle. Note: Hose must be connected as shown. Position hose over slots (B) in place while tightening each nut in dirt duct. Repeat with a Phillips screw driver. Position tools 1-11 1-12 C 1-13 D B A E Place smaller unridged end of wand into bottom of dusting brush (A), crevice tool (B) and furniture nozzle (C) into opening. Snap ends of rack. Attach hose 1-8 A B Align...
... and press cord into clip. Position cord on back of handle. Note: Hose must be connected as shown. Position hose over slots (B) in place while tightening each nut in dirt duct. Repeat with a Phillips screw driver. Position tools 1-11 1-12 C 1-13 D B A E Place smaller unridged end of wand into bottom of dusting brush (A), crevice tool (B) and furniture nozzle (C) into opening. Snap ends of rack. Attach hose 1-8 A B Align...
Owners Manual
Page 5
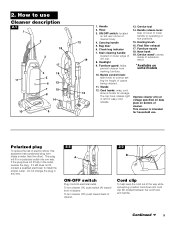
.... Cord clip To help keep the cord out of electric shock, this appliance has a polarized plug (one way. To turn cleaner OFF, push toward front of cleaner. Final filter exhaust 17. Do not change the plug in any way. 2-2 A 2-3 B ON-OFF switch Plug cord into cord clip (B) located between top cord hook and handle. Check bag indicator 7. Hose 3. Bag door 6. Headlight 9. The top hook rotates right or left rear corner of dirt cup. 8. Furniture nozzle 18...
.... Cord clip To help keep the cord out of electric shock, this appliance has a polarized plug (one way. To turn cleaner OFF, push toward front of cleaner. Final filter exhaust 17. Do not change the plug in any way. 2-2 A 2-3 B ON-OFF switch Plug cord into cord clip (B) located between top cord hook and handle. Check bag indicator 7. Hose 3. Bag door 6. Headlight 9. The top hook rotates right or left rear corner of dirt cup. 8. Furniture nozzle 18...
Owners Manual
Page 6
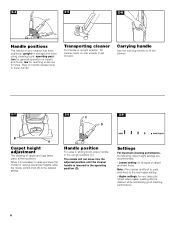
... cleaning of carpet and rugs takes place at the nozzle (A). Transporting cleaner Put handle in the upright position (C). low for storage and when using cleaning tools; Carrying handle Use the carrying handle to the next higher setting. • Higher settings: for various carpet pile heights, slide the nozzle control knob (B) to lower handle. Handle position For ease in sliding knob, place handle in upright position. upright for reaching under low furniture. Step on handle release...
... cleaning of carpet and rugs takes place at the nozzle (A). Transporting cleaner Put handle in the upright position (C). low for storage and when using cleaning tools; Carrying handle Use the carrying handle to the next higher setting. • Higher settings: for various carpet pile heights, slide the nozzle control knob (B) to lower handle. Handle position For ease in sliding knob, place handle in upright position. upright for reaching under low furniture. Step on handle release...
Owners Manual
Page 7
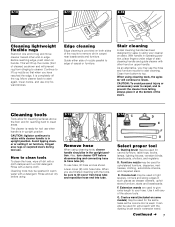
... clean areas. Avoid tipping cleaner or setting it at the bottom of the stairs. Also, turn cleaner OFF before using. 2-13 B A Remove hose When using cleaning tools, the agitator will prevent rug from hose tube and reposition hose end into tube. 2-14 C D E F G Select proper tool C. Extension wands are finished cleaning with a detergent. Before reaching edge, push down on upper handle. Rinse and air dry before disconnecting and connecting hose to hose tube (A). Lower cover (B) onto hose tube. Clean...
... clean areas. Avoid tipping cleaner or setting it at the bottom of the stairs. Also, turn cleaner OFF before using. 2-13 B A Remove hose When using cleaning tools, the agitator will prevent rug from hose tube and reposition hose end into tube. 2-14 C D E F G Select proper tool C. Extension wands are finished cleaning with a detergent. Before reaching edge, push down on upper handle. Rinse and air dry before disconnecting and connecting hose to hose tube (A). Lower cover (B) onto hose tube. Clean...
Owners Manual
Page 8
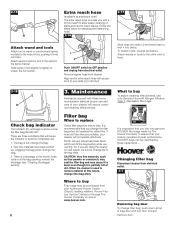
... cleaning effectiveness. Remove regular hose from electrical outlet. If more dirt than this nature, change the filter bag often. Very fine materials have been picked up, clogging the bag pores; It is full; NOTE: All new carpet has loose fibers which can be sure to the hose (H) by The Hoover Company to become completely red: 1. Follow the steps below for attaching and detaching hose. 2-16 2-17 J Attach wand and tools Attach tool or wand...
... cleaning effectiveness. Remove regular hose from electrical outlet. If more dirt than this nature, change the filter bag often. Very fine materials have been picked up, clogging the bag pores; It is full; NOTE: All new carpet has loose fibers which can be sure to the hose (H) by The Hoover Company to become completely red: 1. Follow the steps below for attaching and detaching hose. 2-16 2-17 J Attach wand and tools Attach tool or wand...
Owners Manual
Page 9
... of filter. 3-6 B Removing and replacing filter Lift out filter (B) and hand wash it on bottom of cleaner. Check for HOOVER part No. 40110004. Should you want to replace this filter, ask for debris accumulation under the shield will help maintain your cleaner picks up and suction. Reposition bag door. If filter becomes dirty, pull off grill and lift out filter. Cleaning secondary filter Disconnect cleaner from tube (B). Let filter air dry and reposition it in returning clean air to...
... of filter. 3-6 B Removing and replacing filter Lift out filter (B) and hand wash it on bottom of cleaner. Check for HOOVER part No. 40110004. Should you want to replace this filter, ask for debris accumulation under the shield will help maintain your cleaner picks up and suction. Reposition bag door. If filter becomes dirty, pull off grill and lift out filter. Cleaning secondary filter Disconnect cleaner from tube (B). Let filter air dry and reposition it in returning clean air to...
Owners Manual
Page 10
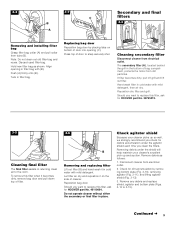
.... Belt replacement The belt on outside of the cleaner and should be checked from electrical outlet. When to rotate and is located under the bottom plate of belt and positioned as shown with the two screws. 3-11 Remove agitator brush roll Remove agitator and used belt. 3-12 C 3-13 D 3-14 B Install new belt With lettering on your cleaner. Discard used belt. Pull old bulb straight out of cleaner. The belt is important for HOOVER part No. 38528033 (belt package part number...
.... Belt replacement The belt on outside of the cleaner and should be checked from electrical outlet. When to rotate and is located under the bottom plate of belt and positioned as shown with the two screws. 3-11 Remove agitator brush roll Remove agitator and used belt. 3-12 C 3-13 D 3-14 B Install new belt With lettering on your cleaner. Discard used belt. Pull old bulb straight out of cleaner. The belt is important for HOOVER part No. 38528033 (belt package part number...
Owners Manual
Page 11
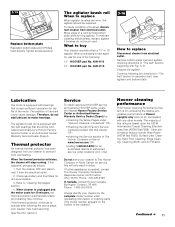
... into your cleaner to motor bearings. Turn the cleaner OFF and disconnect it from electrical outlet. Household" OR - • checking the list of Factory Service Centers provided with two ball bearings that contain sufficient lubrication for service, this happens, proceed as follows: 1. Other performance factors include Hose Power (ASTM Test F558), Surface Litter Cleaning, Hard Floor Cleaning, Edge Cleaning, Cleaning Width, and Air Filtration. The agitator brush roll When to...
... into your cleaner to motor bearings. Turn the cleaner OFF and disconnect it from electrical outlet. Household" OR - • checking the list of Factory Service Centers provided with two ball bearings that contain sufficient lubrication for service, this happens, proceed as follows: 1. Other performance factors include Hose Power (ASTM Test F558), Surface Litter Cleaning, Hard Floor Cleaning, Edge Cleaning, Cleaning Width, and Air Filtration. The agitator brush roll When to...
Owners Manual
Page 12
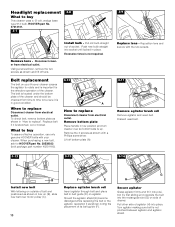
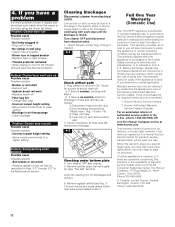
...; Replace agitator brush roll belt as follows: 1) DIsconnect hose from a U.S. change if needed , or if there are covered by presenting the appliance to place this warranty gives you specific legal rights, you mail your appliance to a Hoover Factory Service Center for warranty service, transportation will be due to a blockage in wall plug • Check fuse or breaker • Blown fuse or tripped breaker • Replace fuse or reset breaker • Thermal protector activated...
...; Replace agitator brush roll belt as follows: 1) DIsconnect hose from a U.S. change if needed , or if there are covered by presenting the appliance to place this warranty gives you specific legal rights, you mail your appliance to a Hoover Factory Service Center for warranty service, transportation will be due to a blockage in wall plug • Check fuse or breaker • Blown fuse or tripped breaker • Replace fuse or reset breaker • Thermal protector activated...


