
Product Manual
Page 2
...; authorized dealer nearest you or call 1-800-944-9200 to speak with a customer service representative; Thank you for warranty service of your HOOVER® product. Please enter the complete model and Manufacturing Code in Mexico Manufacturing code (Label located on bottom of canister) Contents Important Safety Instructions 3 Assembling Cleaner...5 Carton Contents...5 Connect...
...; authorized dealer nearest you or call 1-800-944-9200 to speak with a customer service representative; Thank you for warranty service of your HOOVER® product. Please enter the complete model and Manufacturing Code in Mexico Manufacturing code (Label located on bottom of canister) Contents Important Safety Instructions 3 Assembling Cleaner...5 Carton Contents...5 Connect...
Product Manual
Page 5
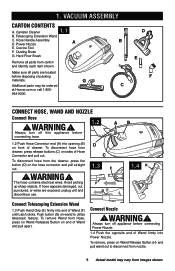
... materials. To remove, press on the hose connector and pull straight out. Telescoping Extension Wand C. Crevice Tool F. To disconnect hose from nozzle. 5 Actual model may be ordered C at Hoover.com or call 1-800- 944-9200. Hard Floor Brush Remove all parts are exposed, unplug unit and discontinue use. To disconnect hose from...
... materials. To remove, press on the hose connector and pull straight out. Telescoping Extension Wand C. Crevice Tool F. To disconnect hose from nozzle. 5 Actual model may be ordered C at Hoover.com or call 1-800- 944-9200. Hard Floor Brush Remove all parts are exposed, unplug unit and discontinue use. To disconnect hose from...
Product Manual
Page 6
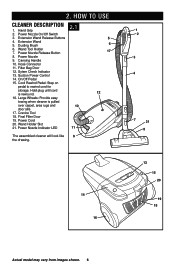
.... Power Nozzle Indicator LED 2.1 10 11 5 6 17 12 The assembled cleaner will look like 9 the drawing. 14 16 1 2 3 4 7 21 8 13 15 20 19 18 Actual model may vary from images shown. 6 Power Nozzle On/Off Switch 3. Hold plug until cord is pulled over carpet, area rugs and door sills 17. Hand...
.... Power Nozzle Indicator LED 2.1 10 11 5 6 17 12 The assembled cleaner will look like 9 the drawing. 14 16 1 2 3 4 7 21 8 13 15 20 19 18 Actual model may vary from images shown. 6 Power Nozzle On/Off Switch 3. Hold plug until cord is pulled over carpet, area rugs and door sills 17. Hand...

Product Manual
Page 7
... not pull the cord out any further. Use extra care when cleaning on stairs or furniture, as it may result in injury or damage. 7 Actual model may vary from falling, always place cleaner at bottom of the plug and pull to prevent the cleaner from images shown. Brushroll off: Vacuums hard...
... not pull the cord out any further. Use extra care when cleaning on stairs or furniture, as it may result in injury or damage. 7 Actual model may vary from falling, always place cleaner at bottom of the plug and pull to prevent the cleaner from images shown. Brushroll off: Vacuums hard...
Product Manual
Page 8
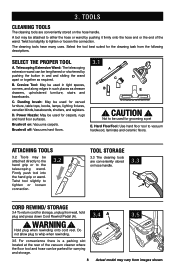
... the hose end or the end of the wand. The cleaning tools have many uses. Select the tool best suited for carrying and storage. 8 Actual model may be used in tight spaces, corners, and along edges in and and sliding the wand apart or together as dresser drawers, upholstered furniture, stairs...
... the hose end or the end of the wand. The cleaning tools have many uses. Select the tool best suited for carrying and storage. 8 Actual model may be used in tight spaces, corners, and along edges in and and sliding the wand apart or together as dresser drawers, upholstered furniture, stairs...
Product Manual
Page 9
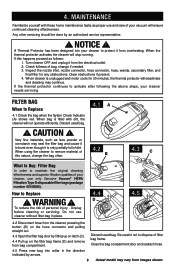
...full of dirt. When using the cleaner to maintain the original cleaning effectiveness and superior filtration qualities of your cleaner, use only Genuine Hoover® HEPA Filtration Type S disposable filter bags (package number 40108085). Discard used bag. ! Any other servicing should be done by... order to remove material of this happens proceed as proper use cleaner without filter bag in the direction indicated by arrows. 9 Actual model may continue. How to Replace 4.1 Check the bag when the Sytem Check Indicator (A) shows red. Discard used bag. CAUTION ! ...
...full of dirt. When using the cleaner to maintain the original cleaning effectiveness and superior filtration qualities of your cleaner, use only Genuine Hoover® HEPA Filtration Type S disposable filter bags (package number 40108085). Discard used bag. ! Any other servicing should be done by... order to remove material of this happens proceed as proper use cleaner without filter bag in the direction indicated by arrows. 9 Actual model may continue. How to Replace 4.1 Check the bag when the Sytem Check Indicator (A) shows red. Discard used bag. CAUTION ! ...
Product Manual
Page 10
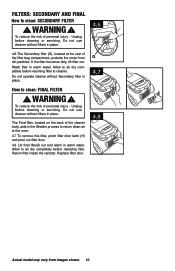
... servicing. Unplug before returning filter to air dry completely before cleaning or servicing. Do not use cleaner without filters in place. Replace filter door. 4.8 Actual model may vary from dirt particles. Unplug before replacing filter. Wash filter in place. Return filter inside the canister. If the filter becomes dirty, lift filter...
... servicing. Unplug before returning filter to air dry completely before cleaning or servicing. Do not use cleaner without filters in place. Replace filter door. 4.8 Actual model may vary from dirt particles. Unplug before replacing filter. Wash filter in place. Return filter inside the canister. If the filter becomes dirty, lift filter...
Product Manual
Page 11
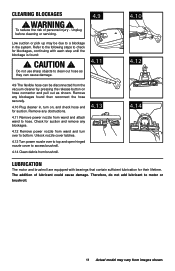
... release button on , and check hose end for suction and remove any blockages found : ! Refer to the following steps to motor or brushroll. 11 Actual model may be disconnected from images shown. Remove any blockages. 4.12 Remove power nozzle from wand and attach wand to hose. The addition of personal injury...
... release button on , and check hose end for suction and remove any blockages found : ! Refer to the following steps to motor or brushroll. 11 Actual model may be disconnected from images shown. Remove any blockages. 4.12 Remove power nozzle from wand and attach wand to hose. The addition of personal injury...
Product Manual
Page 12
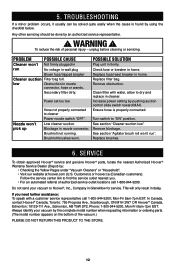
... (U.S. Customers) or hoover.ca (Canadian customers). Turn switch to cleaner Power nozzle switch "OFF". Always identify your vacuum to dry and replace in firmly. Replace brushes. 6. Do not send your vacuum by the complete model number when requesting information or ordering parts. (The model number appears on the bottom of the vacuum.) PLEASE...
... (U.S. Customers) or hoover.ca (Canadian customers). Turn switch to cleaner Power nozzle switch "OFF". Always identify your vacuum to dry and replace in firmly. Replace brushes. 6. Do not send your vacuum by the complete model number when requesting information or ordering parts. (The model number appears on the bottom of the vacuum.) PLEASE...

