
Manual
Page 3
... To avoid injury or damage, keep free of California to cause cancer, birth defects or reproductive harm. 3 Do not attempt to repair damaged hose, take it to a service center prior to be used near children. Unplug from openings and moving parts. • Turn off this manual.... If appliance is not working as described in this appliance before connecting or disconnecting either hose or motorized nozzle. • Unplug before unplugging. • Use extra care when cleaning on bottom of body away from outlet when not ...
... To avoid injury or damage, keep free of California to cause cancer, birth defects or reproductive harm. 3 Do not attempt to repair damaged hose, take it to a service center prior to be used near children. Unplug from openings and moving parts. • Turn off this manual.... If appliance is not working as described in this appliance before connecting or disconnecting either hose or motorized nozzle. • Unplug before unplugging. • Use extra care when cleaning on bottom of body away from outlet when not ...
Manual
Page 4
... the proper outlet. If the plug does not fit fully in any way. 4 If it still does not fit, contact a qualified electrican to clean out hose as they can cause damage. Do not change the plug in the outlet, reverse the plug. CAUTION: TO REDUCE THE RISK OF DAMAGE: • Avoid...
... the proper outlet. If the plug does not fit fully in any way. 4 If it still does not fit, contact a qualified electrican to clean out hose as they can cause damage. Do not change the plug in the outlet, reverse the plug. CAUTION: TO REDUCE THE RISK OF DAMAGE: • Avoid...
Manual
Page 5
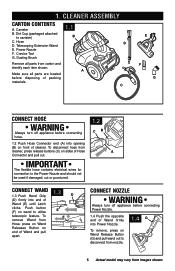
... from cleaner, press release buttons (C) on end of Hose A Connector and pull out. Power Nozzle F. A Make sure all parts from Hose, press on Wand Releases Button on sides of Wand and pull apart. Hose D D. Dusting Brush Remove all parts are located before... E telescopic feature. To F remove Wand from carton and identify each item shown. Cleaner ASSEMBLY Carton contents A. C E F G Connect Hose WARNING Always turn off appliance before connecting Power Nozzle. 1.4 Push the opposite end of cleaner. 1. Canister 1.1 B. Connect Wand 1.3 1.3 Push...
... from cleaner, press release buttons (C) on end of Hose A Connector and pull out. Power Nozzle F. A Make sure all parts from Hose, press on Wand Releases Button on sides of Wand and pull apart. Hose D D. Dusting Brush Remove all parts are located before... E telescopic feature. To F remove Wand from carton and identify each item shown. Cleaner ASSEMBLY Carton contents A. C E F G Connect Hose WARNING Always turn off appliance before connecting Power Nozzle. 1.4 Push the opposite end of cleaner. 1. Canister 1.1 B. Connect Wand 1.3 1.3 Push...
Manual
Page 6
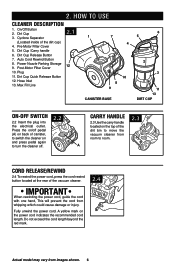
... the cleaner off. 2.2 Carry Handle 2.3 Use the carry handle located on the power cord indicates the recommended cord length. Dirt Cup 3. Dirt Cup /Carry handle 6. Hose Inlet 13. Post-Motor Filter Cover 10. Plug 11. Cyclone Separator 2.1 1 (Located inside of the vacuum cleaner. Dirt Cup Release Button 7. Press the on/off...
... the cleaner off. 2.2 Carry Handle 2.3 Use the carry handle located on the power cord indicates the recommended cord length. Dirt Cup 3. Dirt Cup /Carry handle 6. Hose Inlet 13. Post-Motor Filter Cover 10. Plug 11. Cyclone Separator 2.1 1 (Located inside of the vacuum cleaner. Dirt Cup Release Button 7. Press the on/off...
Manual
Page 7
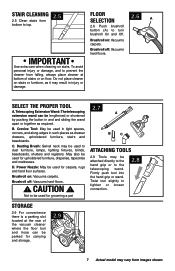
... may vary from bottom to prevent the cleaner from falling, always place cleaner at the rear of the vacuum cleaner where the floor tool and hose can be used for grooming a pet Storage 2.9 For convenience there is a parking slot located at bottom of stairs or on floor.
... may vary from bottom to prevent the cleaner from falling, always place cleaner at the rear of the vacuum cleaner where the floor tool and hose can be used for grooming a pet Storage 2.9 For convenience there is a parking slot located at bottom of stairs or on floor.
Manual
Page 8
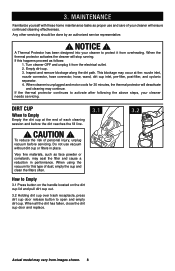
NOTICE ! A Thermal Protector has been designed into your cleaner to Empty Empty the dirt cup at the: nozzle inlet, nozzle connector, hose connector, hose, wand, dirt cup inlet, pre-filter, post-filter, and cyclonic separator. 4. Empty dirt cup. 3. CAUTION ! Very fine materials, such as face powder or cornstarch, may ...
NOTICE ! A Thermal Protector has been designed into your cleaner to Empty Empty the dirt cup at the: nozzle inlet, nozzle connector, hose connector, hose, wand, dirt cup inlet, pre-filter, post-filter, and cyclonic separator. 4. Empty dirt cup. 3. CAUTION ! Very fine materials, such as face powder or cornstarch, may ...

Manual
Page 11
...shown. 11 Clearing blockages ! Remove any blockages. 3.17 Remove power nozzle from the vacuum cleaner by pressing the release button on , and check hose end for suction. Unlock nozzle cover latches. 3.18 Turn power nozzle over to a blockage in the system. To reduce the risk of personal ...injury, unplug vacuum before servicing. Check for blockages, continuing with each step until the blockage is found then reconnect the hose securely. 3.15 Plug cleaner in, turn over to top and open hinged nozzle cover to access brushroll. 3.19 Clean debris from brushroll. 3....
...shown. 11 Clearing blockages ! Remove any blockages. 3.17 Remove power nozzle from the vacuum cleaner by pressing the release button on , and check hose end for suction. Unlock nozzle cover latches. 3.18 Turn power nozzle over to a blockage in the system. To reduce the risk of personal ...injury, unplug vacuum before servicing. Check for blockages, continuing with each step until the blockage is found then reconnect the hose securely. 3.15 Plug cleaner in, turn over to top and open hinged nozzle cover to access brushroll. 3.19 Clean debris from brushroll. 3....
Manual
Page 12
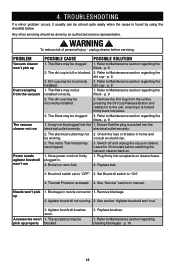
... checklist below. The accessory may not be clogged: 3. p. 10 12 WARNING ! Refer to Maintenance section regarding the installed. The filters may be plugged into place. 3. p. 9 1. Hose power cord not firmly plugged in nozzle connector. 1. Plug firmly into the electrical outlet correctly. Blockage in . 2. Agitator brushroll not running. 2. Agitator brushroll brushes worn...
... checklist below. The accessory may not be clogged: 3. p. 10 12 WARNING ! Refer to Maintenance section regarding the installed. The filters may be plugged into place. 3. p. 9 1. Hose power cord not firmly plugged in nozzle connector. 1. Plug firmly into the electrical outlet correctly. Blockage in . 2. Agitator brushroll not running. 2. Agitator brushroll brushes worn...


