

Manual
Page 1
Central Vacuum S y s t e m s Power Canisters Owner's Manual English § pp. 1-7 Français § p. 8-11 Thank you (click on -line at www.hoover.com to need assistance during assembly or operation, call 1-800-944-9200 for selecting a HOOVER® product. Review this manual before being shipped from the factory. only) OR 1-330-499-9499 to speak...
Central Vacuum S y s t e m s Power Canisters Owner's Manual English § pp. 1-7 Français § p. 8-11 Thank you (click on -line at www.hoover.com to need assistance during assembly or operation, call 1-800-944-9200 for selecting a HOOVER® product. Review this manual before being shipped from the factory. only) OR 1-330-499-9499 to speak...

Manual
Page 2
Never handle plug or appliance with wet hands. • Unplug cleaner when not in and retain The HOOVER Central Vacuum System Power unit will be permanently mounted. Fill in use. Do not use with damaged cord or plug. Turn ...• Do not use 4 Important safeguards 2 Maintenance 5 If you have a problem 5 Where and how to a Hoover Factory Service Center or Authorized Hoover Warranty Service Dealer (Depot). • Use vacuum cleaner only for warranty service. Do not use with any objects to this owner's manual. Index Canister description 3 Grounding ...
Never handle plug or appliance with wet hands. • Unplug cleaner when not in and retain The HOOVER Central Vacuum System Power unit will be permanently mounted. Fill in use. Do not use with damaged cord or plug. Turn ...• Do not use 4 Important safeguards 2 Maintenance 5 If you have a problem 5 Where and how to a Hoover Factory Service Center or Authorized Hoover Warranty Service Dealer (Depot). • Use vacuum cleaner only for warranty service. Do not use with any objects to this owner's manual. Index Canister description 3 Grounding ...
Manual
Page 4
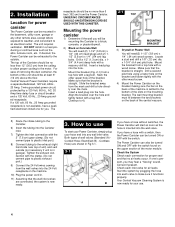
...deep hole with a wood screw. Make sure that the bracket is straight. The Power Canister can be mounting the Canister to an electrical outlet. Central Vacuum Power Canisters require a separate/dedicated, 120 Volt, 60Hz., 20 Amp, 3 wire grounded power circuit, protected by plugging the hose into each ... and fasten tightly with the switch found on the mounting bracket. Electrified (B) - If one for you may hear a "hissing" sound. Your Central Vacuum Cleaning System is now ready for proper seal and that the wall inlet valves are shown in Fig 3-1. 3-1 A B If you have a ...
...deep hole with a wood screw. Make sure that the bracket is straight. The Power Canister can be mounting the Canister to an electrical outlet. Central Vacuum Power Canisters require a separate/dedicated, 120 Volt, 60Hz., 20 Amp, 3 wire grounded power circuit, protected by plugging the hose into each ... and fasten tightly with the switch found on the mounting bracket. Electrified (B) - If one for you may hear a "hissing" sound. Your Central Vacuum Cleaning System is now ready for proper seal and that the wall inlet valves are shown in Fig 3-1. 3-1 A B If you have a ...

Manual
Page 5
...Make sure the cloth filter is fitting properly into the groove. Replace inlet valve. • Problem with low voltage circuit • Turn on central vacuum with ON/ OFF switch located on each side of the dirt container. 2) Place a plastic grocery bag over end of the hose to do ...the filter. 3) Using the plastic bag as required and periodically cleaning the filter. for the nearest location where approved service and genuine HOOVER replacement parts may be remedied quite easily when the cause is found by model number when requesting information or ordering replacement parts. •...
...Make sure the cloth filter is fitting properly into the groove. Replace inlet valve. • Problem with low voltage circuit • Turn on central vacuum with ON/ OFF switch located on each side of the dirt container. 2) Place a plastic grocery bag over end of the hose to do ...the filter. 3) Using the plastic bag as required and periodically cleaning the filter. for the nearest location where approved service and genuine HOOVER replacement parts may be remedied quite easily when the cause is found by model number when requesting information or ordering replacement parts. •...


