
Manual
Page 5
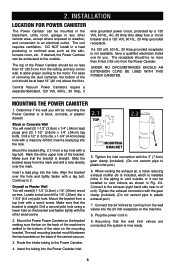
... plastic exhaust port.) 7. Mount the bracket from a top hole with the 3" (7.6cm) gear clamp (included). (Do not cement pipe to of the central vacuum. 2.1 2.2 TOP MOUNTING A BRACKET 5. Connect to the exhaust (right hand side near to plastic inlet port.) 6. Insert the tubing into the hole. ...on the back of the machine is block, concrete, or plaster/ drywall. For ease of removing the dust container, the bottom of the bracket. Central Vacuum Power Canisters require a separate/dedicated, 120 Volt, 60Hz., 20 Amp, 3 wire grounded power circuit, protected by a 120 Volt, 60 Hz.,...
... plastic exhaust port.) 7. Mount the bracket from a top hole with the 3" (7.6cm) gear clamp (included). (Do not cement pipe to of the central vacuum. 2.1 2.2 TOP MOUNTING A BRACKET 5. Connect to the exhaust (right hand side near to plastic inlet port.) 6. Insert the tubing into the hole. ...on the back of the machine is block, concrete, or plaster/ drywall. For ease of removing the dust container, the bottom of the bracket. Central Vacuum Power Canisters require a separate/dedicated, 120 Volt, 60Hz., 20 Amp, 3 wire grounded power circuit, protected by a 120 Volt, 60 Hz.,...
Manual
Page 7
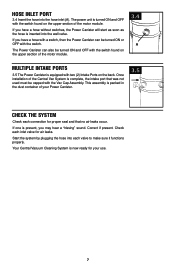
...ON or OFF with the switch found on the back. Correct if present. The Power Canister can be capped with the Vac Cap Assembly. Your Central Vacuum Cleaning System is equipped with the switch found on the upper section of the motor module. 3.4 A Multiple Intake Ports 3.5 The Power Canister is...complete, the intake port that no air leaks occur. Once installation of your use. 7 This assembly is packed in the dust container of the Central Vac System is turned ON and OFF with the switch. Check each inlet valve for your Power Canister. 3.5 Check the System Check each valve...
...ON or OFF with the switch found on the back. Correct if present. The Power Canister can be capped with the Vac Cap Assembly. Your Central Vacuum Cleaning System is equipped with the switch found on the upper section of the motor module. 3.4 A Multiple Intake Ports 3.5 The Power Canister is...complete, the intake port that no air leaks occur. Once installation of your use. 7 This assembly is packed in the dust container of the Central Vac System is turned ON and OFF with the switch. Check each inlet valve for your Power Canister. 3.5 Check the System Check each valve...
Manual
Page 11
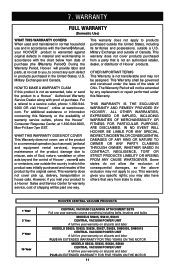
...everything including belts, brushes and bulbs MODELS S5605, S5610, S5615 CENTRAL VACUUM POWER UNIT A full five year warranty on all parts and labor MODELS S5620, S5625, S5626, S5627, S5629, SH80005, SH80015 CENTRAL VACUUM POWER UNIT A full five year warranty on all parts and labor...the product was initially purchased and resales of Canada. you mail your HOOVER¨ product is not transferable and may not apply to state. 1 Year 5 Year 7 Year 10 Year HOOVER CENTRAL VACUUM PRODUCTS CENTRAL VACUUM CLEANING ATTACHMENT SETS Full one way. Military Exchanges and Canada. warranty ...
...everything including belts, brushes and bulbs MODELS S5605, S5610, S5615 CENTRAL VACUUM POWER UNIT A full five year warranty on all parts and labor MODELS S5620, S5625, S5626, S5627, S5629, SH80005, SH80015 CENTRAL VACUUM POWER UNIT A full five year warranty on all parts and labor...the product was initially purchased and resales of Canada. you mail your HOOVER¨ product is not transferable and may not apply to state. 1 Year 5 Year 7 Year 10 Year HOOVER CENTRAL VACUUM PRODUCTS CENTRAL VACUUM CLEANING ATTACHMENT SETS Full one way. Military Exchanges and Canada. warranty ...


