Product Manual
Page 1
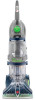
página E1 www.hoover.com IMPORTANT: READ CAREFULLY BEFORE ASSEMBLY AND USE. PLEASE DO NOT RETURN THIS PRODUCT TO THE STORE. Questions or concerns? IF USED COMMERCIALLY WARRANTY IS VOID. ©2011 Techtronic Floor Care Technology Limited. All rights reserved. #56518217 ID100262-R2 THIS PRODUCT IS INTENDED FOR HOUSEHOLD USE ONLY. For assistance, please call Customer Service at 1-800-944-9200 Mon-Fri 8am-7pm EST. Owner's Manual Operating and Servicing Instructions Español -
página E1 www.hoover.com IMPORTANT: READ CAREFULLY BEFORE ASSEMBLY AND USE. PLEASE DO NOT RETURN THIS PRODUCT TO THE STORE. Questions or concerns? IF USED COMMERCIALLY WARRANTY IS VOID. ©2011 Techtronic Floor Care Technology Limited. All rights reserved. #56518217 ID100262-R2 THIS PRODUCT IS INTENDED FOR HOUSEHOLD USE ONLY. For assistance, please call Customer Service at 1-800-944-9200 Mon-Fri 8am-7pm EST. Owner's Manual Operating and Servicing Instructions Español -
Product Manual
Page 3
...as gasoline or use with this manual.) • Use only on surfaces moistened by Hoover®; Do not immerse product. • Connect to be followed, including the following: READ ALL INSTRUCTIONS BEFORE USING THIS APPLIANCE. If an extension cord is absolutely necessary, use at any ... THE RISK OF FIRE, ELECTRIC SHOCK OR INJURY: • To avoid internal component damage, use only Hoover® cleaning products intended for its intended use cord as described in the instructions. • Use only attachments recommended by the cleaning process or small spills. See "Grounding...
...as gasoline or use with this manual.) • Use only on surfaces moistened by Hoover®; Do not immerse product. • Connect to be followed, including the following: READ ALL INSTRUCTIONS BEFORE USING THIS APPLIANCE. If an extension cord is absolutely necessary, use at any ... THE RISK OF FIRE, ELECTRIC SHOCK OR INJURY: • To avoid internal component damage, use only Hoover® cleaning products intended for its intended use cord as described in the instructions. • Use only attachments recommended by the cleaning process or small spills. See "Grounding...
Product Manual
Page 4
..., lint, hair, and anything that may reduce air flow. • To help prevent matting and resoiling, avoid contact with carpets until they are dry. Grounding Instructions This appliance must be installed by a qualified electrician. DANGER: Improper connection of the equipment-grounding conductor can be held in . • DO NOT USE THIS...
..., lint, hair, and anything that may reduce air flow. • To help prevent matting and resoiling, avoid contact with carpets until they are dry. Grounding Instructions This appliance must be installed by a qualified electrician. DANGER: Improper connection of the equipment-grounding conductor can be held in . • DO NOT USE THIS...
Product Manual
Page 11
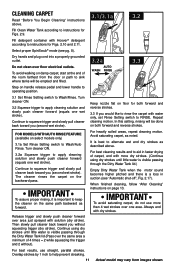
...use more dry strokes. (Continue using dry strokes until little water is a loss in faster drying of carpet, end with Hoover® detergent according to instructions for Figs. 2.9. Overlap strokes by 1 inch to RINSE. Do not clean over one wet stroke). In this setting, rinsing...cord into a properly grounded outlet. Avoid saturating carpet, as described above . 3.1/3.1a 3.2 Rinse ON AUWTAOSRIHNSE OFF Fill Clean Water Tank according to instructions for Figs. 2.10 and 2.11. To avoid walking on damp carpet, start at the end of 4 times = 2 while squeezing the ...
...use more dry strokes. (Continue using dry strokes until little water is a loss in faster drying of carpet, end with Hoover® detergent according to instructions for Figs. 2.9. Overlap strokes by 1 inch to RINSE. Do not clean over one wet stroke). In this setting, rinsing...cord into a properly grounded outlet. Avoid saturating carpet, as described above . 3.1/3.1a 3.2 Rinse ON AUWTAOSRIHNSE OFF Fill Clean Water Tank according to instructions for Figs. 2.10 and 2.11. To avoid walking on damp carpet, start at the end of 4 times = 2 while squeezing the ...
Product Manual
Page 12
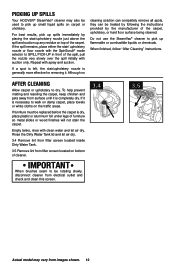
Picking up spills Your HOOVER® SteamVac® cleaner may vary from images shown. 12 If a spot is left, the stair/upholstery nozzle is generally more effective for removing it is completely dry. When finished, follow "After Cleaning" instructions. To help prevent matting and resoiling the carpet, keep ... to walk on damp carpet, place towels or white cloths on bottom of cleaner. If furniture must be treated by following the instructions provided by placing the stair/upholstery nozzle just above the spill and suction up spills immediately by the manufacturer of furniture so metal ...
Picking up spills Your HOOVER® SteamVac® cleaner may vary from images shown. 12 If a spot is left, the stair/upholstery nozzle is generally more effective for removing it is completely dry. When finished, follow "After Cleaning" instructions. To help prevent matting and resoiling the carpet, keep ... to walk on damp carpet, place towels or white cloths on bottom of cleaner. If furniture must be treated by following the instructions provided by placing the stair/upholstery nozzle just above the spill and suction up spills immediately by the manufacturer of furniture so metal ...

Product Manual
Page 15
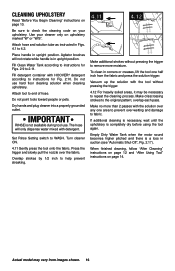
... without pressing trigger (dry stroke). Agitator brushes will not rotate while handle is completely dry before using the tool again. Attach tool to instructions for Figs. 2.9 to WASH. Pull tool slowly over the carpet (second wet stroke). Overlap strokes by holding the tool (A) or (B)... about one inch above . Always end with HOOVER® detergent according to end of stroke. 4.10 Lift tool, and position it into a properly grounded outlet. If additional cleaning is necessary,...
... without pressing trigger (dry stroke). Agitator brushes will not rotate while handle is completely dry before using the tool again. Attach tool to instructions for Figs. 2.9 to WASH. Pull tool slowly over the carpet (second wet stroke). Overlap strokes by holding the tool (A) or (B)... about one inch above . Always end with HOOVER® detergent according to end of stroke. 4.10 Lift tool, and position it into a properly grounded outlet. If additional cleaning is necessary,...
Product Manual
Page 16
... outlet. Agitator brushes will only dispense water mixed with the tool without pressing the trigger to remove more than 2 passes with HOOVER® detergent according to instructions for Figs. 2.9 to help prevent streaking. 4.11 4.12 Make additional strokes without pressing the trigger. 4.12 For heavily soiled... Press the trigger and slowly pull the nozzle over -wetting and damage to prevent over the fabric. Attach hose and solution tube as instructed in corners or creases, lift the tool one area to fabric. To clean in Figs. 4.1 to the original pattern; If additional ...
... outlet. Agitator brushes will only dispense water mixed with the tool without pressing the trigger to remove more than 2 passes with HOOVER® detergent according to instructions for Figs. 2.9 to help prevent streaking. 4.11 4.12 Make additional strokes without pressing the trigger. 4.12 For heavily soiled... Press the trigger and slowly pull the nozzle over -wetting and damage to prevent over the fabric. Attach hose and solution tube as instructed in corners or creases, lift the tool one area to fabric. To clean in Figs. 4.1 to the original pattern; If additional ...
Product Manual
Page 19
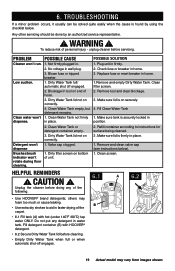
...cap clogged. 1. Unplug the cleaner before doing any detergent in home. 3. To reduce risk of the carpet. • 6.1 Fill tank (A) with HOOVER® detergent. • 6.2 Secure Dirty Water Tank lid before servicing. unplug cleaner before cleaning. • Empty Dirty Water Tank when full or ... tripped breaker. 1. Clean Water Tank not firmly in home. 1.Remove and empty Dirty Water Tank. B • Use extra dry strokes to instructions for surface being cleaned. 3 .Make sure lid is found by an authorized service representative. ! Make sure lid is securely locked in firmly. ...
...cap clogged. 1. Unplug the cleaner before doing any detergent in home. 3. To reduce risk of the carpet. • 6.1 Fill tank (A) with HOOVER® detergent. • 6.2 Secure Dirty Water Tank lid before servicing. unplug cleaner before cleaning. • Empty Dirty Water Tank when full or ... tripped breaker. 1. Clean Water Tank not firmly in home. 1.Remove and empty Dirty Water Tank. B • Use extra dry strokes to instructions for surface being cleaned. 3 .Make sure lid is found by an authorized service representative. ! Make sure lid is securely locked in firmly. ...


