Product Manual
Page 3
Table of Contents Safety Instructions...4 Carton Contents...6 Product Guide...7 Tools and Accessories...8 Before You Begin Cleaning...9 Getting Started...10 How to Assemble Your SmartWash™ Carpet Cleaner 10 Using your SmartWash™ Carpet Cleaner 11 Maintenance...13 Hoover® Professional Series Solution Guide 20 Troubleshooting...21 Warranty ...23 French...25 Spanish...49 3
Table of Contents Safety Instructions...4 Carton Contents...6 Product Guide...7 Tools and Accessories...8 Before You Begin Cleaning...9 Getting Started...10 How to Assemble Your SmartWash™ Carpet Cleaner 10 Using your SmartWash™ Carpet Cleaner 11 Maintenance...13 Hoover® Professional Series Solution Guide 20 Troubleshooting...21 Warranty ...23 French...25 Spanish...49 3

Product Manual
Page 7
Dirty Water/Recovery Tank 5. Automatic Wash/ Dry LED Display 8. On/Off Pedal 6 7 8 9 10 11 12 13 7 Clean Water Tank 3. Hose Connection 6. Removable FlexDuo™ PowerBrushes 3 9. Handle release Pedal 5 13. Triggerless Handle Design 1 2. Filter 4. Carry Handle 11. Removable Recovery Nozzle 2 7. Solution Tank 4 10. Getting to Know Your Hoover® SmartWash™ 1. Cord Wrap 12.
Dirty Water/Recovery Tank 5. Automatic Wash/ Dry LED Display 8. On/Off Pedal 6 7 8 9 10 11 12 13 7 Clean Water Tank 3. Hose Connection 6. Removable FlexDuo™ PowerBrushes 3 9. Handle release Pedal 5 13. Triggerless Handle Design 1 2. Filter 4. Carry Handle 11. Removable Recovery Nozzle 2 7. Solution Tank 4 10. Getting to Know Your Hoover® SmartWash™ 1. Cord Wrap 12.
Product Manual
Page 10
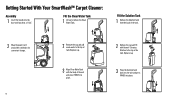
Getting Started With Your SmartWash™ Carpet Cleaner: Assembly 1 Insert the handle into place. Replace cap. 3 Place the Solution Tank back into the unit and press FIRMLY into the base until you hear a "click". Fill the Clean Water Tank 1 Lift up to the top of tank. Fill the Solution Tank 1 Remove the Solution... cord around the cord hooks for convenient storage. 10 2 Remove the cap and add warm water to the top of the tank. Replace cap. 3 Align Clean Water Tank with the body of the unit and press FIRMLY into place. 2 Remove the cap and fill with...
Getting Started With Your SmartWash™ Carpet Cleaner: Assembly 1 Insert the handle into place. Replace cap. 3 Place the Solution Tank back into the unit and press FIRMLY into the base until you hear a "click". Fill the Clean Water Tank 1 Lift up to the top of tank. Fill the Solution Tank 1 Remove the Solution... cord around the cord hooks for convenient storage. 10 2 Remove the cap and add warm water to the top of the tank. Replace cap. 3 Align Clean Water Tank with the body of the unit and press FIRMLY into place. 2 Remove the cap and fill with...

Product Manual
Page 11
Using Your SmartWash™ Carpet Cleaner 1 Unwrap the power cord and plug unit in an electrical outlet. 3 Step on the Power Pedal to turn ON. 2 Step on the Handle Release Pedal to recline the unit for cleaning position. 11
Using Your SmartWash™ Carpet Cleaner 1 Unwrap the power cord and plug unit in an electrical outlet. 3 Step on the Power Pedal to turn ON. 2 Step on the Handle Release Pedal to recline the unit for cleaning position. 11

Product Manual
Page 12
.... This will automatically dispense the optimal amount of water and cleaning solution. 6 When your carpets. The unit will remove residual carpet cleaning solution from your carpets by extracting the water. 7 For best results, Hoover recommends rinsing the carpet with clean water only, remove... the Solution Tank and then repeat steps 4 through the nozzle. 5 Slowly pull backward. To Rinse with clean water only. Using Your SmartWash...
.... This will automatically dispense the optimal amount of water and cleaning solution. 6 When your carpets. The unit will remove residual carpet cleaning solution from your carpets by extracting the water. 7 For best results, Hoover recommends rinsing the carpet with clean water only, remove... the Solution Tank and then repeat steps 4 through the nozzle. 5 Slowly pull backward. To Rinse with clean water only. Using Your SmartWash...


