Product Manual
Page 15
...result in poor suction performance. 3.12 3.14 3.13 3.15 IMPORTANT Be sure to remove any debris that has accumulated in faster drying of the motor changes to a hard surface and (b) place unit on floor for both forward and reverse strokes. A higher concentration of shampoo may reduce the ...water is visible passing through the Dirty Water Tank lid.) NOTE: Empty Dirty Water Tank when the motor sound becomes higher pitched and there is equipped with a shut off ") For best cleaning results, Hoover recommends to release. 3.13 To empty dirty water tank, unplug the Quick Spout Pour Cap (A),...
...result in poor suction performance. 3.12 3.14 3.13 3.15 IMPORTANT Be sure to remove any debris that has accumulated in faster drying of the motor changes to a hard surface and (b) place unit on floor for both forward and reverse strokes. A higher concentration of shampoo may reduce the ...water is visible passing through the Dirty Water Tank lid.) NOTE: Empty Dirty Water Tank when the motor sound becomes higher pitched and there is equipped with a shut off ") For best cleaning results, Hoover recommends to release. 3.13 To empty dirty water tank, unplug the Quick Spout Pour Cap (A),...
Product Manual
Page 19
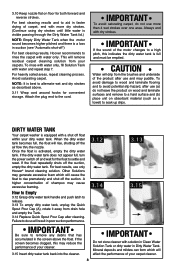
.... 4.7 Belt: What to Buy For Belt Style 29 replacements or to locate a dealer nearest you, please call 1-800-9449200 or visit our website at www.hoover.com How to Remove 4.7 Flip cleaner on its side to expose bottom of brushrolls without brushes. 4.13 With belt in place, pull and slide brushrolls.... 4.9 4.12 4.14 4.8 4.10 4.13 10 Secure by replacing all screws. IMPORTANT Rotate brushrolls manually to Replace 4.12 Slip brushrolls through belt. NOTE: Place belt on motor shaft. 4.15 Replace belt cover. Belt or Brushroll: How to remove the seven screws.
.... 4.7 Belt: What to Buy For Belt Style 29 replacements or to locate a dealer nearest you, please call 1-800-9449200 or visit our website at www.hoover.com How to Remove 4.7 Flip cleaner on its side to expose bottom of brushrolls without brushes. 4.13 With belt in place, pull and slide brushrolls.... 4.9 4.12 4.14 4.8 4.10 4.13 10 Secure by replacing all screws. IMPORTANT Rotate brushrolls manually to Replace 4.12 Slip brushrolls through belt. NOTE: Place belt on motor shaft. 4.15 Replace belt cover. Belt or Brushroll: How to remove the seven screws.
Product Manual
Page 22
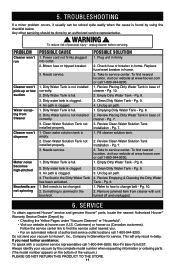
...Tank Installation - Pg. 7. 3. To find nearest location, visit our website at hoover.com (U.S. Review Emptying & Cleaning the Dirty Water Tank - Remove jammed item from Cleaner Cleaner won't dispense Motor noise becomes high-pitched Brushrolls are not spinning POSSIBLE CAUSE 1. Service To obtain ...approved Hoover® service and genuine Hoover® parts, locate the nearest Authorized Hoover® Warranty Service Dealer (Depot) by ...
...Tank Installation - Pg. 7. 3. To find nearest location, visit our website at hoover.com (U.S. Review Emptying & Cleaning the Dirty Water Tank - Remove jammed item from Cleaner Cleaner won't dispense Motor noise becomes high-pitched Brushrolls are not spinning POSSIBLE CAUSE 1. Service To obtain ...approved Hoover® service and genuine Hoover® parts, locate the nearest Authorized Hoover® Warranty Service Dealer (Depot) by ...


