
Manual
Page 5
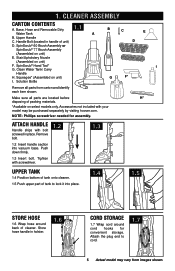
... C. Store hose handle in holster. 1.6 Cord storaGe 1.7 Wrap cord around back of tank to cord. 1.7 5 Actual model may be purchased separately by visiting hoover.com. Solution Bottle b C Carpet Upholstery Cleaner bare floor E cleaner PreCleaner D I G F* Remove all parts are located before H* disposing of unit) D. Tighten with bolt screwed in handle of packing materials. *Available...
... C. Store hose handle in holster. 1.6 Cord storaGe 1.7 Wrap cord around back of tank to cord. 1.7 5 Actual model may be purchased separately by visiting hoover.com. Solution Bottle b C Carpet Upholstery Cleaner bare floor E cleaner PreCleaner D I G F* Remove all parts are located before H* disposing of unit) D. Tighten with bolt screwed in handle of packing materials. *Available...
Manual
Page 7
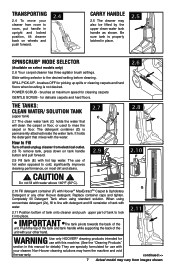
CAUTION ! Non-Hoover cleaning solutions may also be lifted by the upper clean water tank handle as shown. continued >> 7 Actual model may vary from electrical outlet. 2.8 To remove tank, press down on tank handle button and pull forward. 2.9 2.9 Fill tank (E) with hot tap water....2.7 (upper tank) C D 2.7 The clean water tank (C) holds the water that mixes with water. 2.11 Position bottom of tank onto cleaner and push upper part of hot water opposed to cold, significantly improves cleaning performance, on most dirt and stains. Do not fill with water above 140°F (60°...
CAUTION ! Non-Hoover cleaning solutions may also be lifted by the upper clean water tank handle as shown. continued >> 7 Actual model may vary from electrical outlet. 2.8 To remove tank, press down on tank handle button and pull forward. 2.9 2.9 Fill tank (E) with hot tap water....2.7 (upper tank) C D 2.7 The clean water tank (C) holds the water that mixes with water. 2.11 Position bottom of tank onto cleaner and push upper part of hot water opposed to cold, significantly improves cleaning performance, on most dirt and stains. Do not fill with water above 140°F (60°...
Manual
Page 11
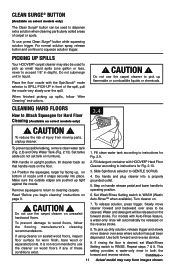
Picking up spills Your HOOVER® carpet cleaner may vary from moving parts, unplug cleaner. Set tanks aside (do not set Wash/Rinse...exist. 7. Do not use the carpet cleaner to use the cleaner on the reverse stroke. 8. For models with Auto-Rinse feature, a water-only rinse will be released on wood floors if any of carpet or...possible leaking, remove clean water tank (Fig. 2.8) and Dirty Water Tank (Fig. 2.13). If using cleaner on select models only) ! To reduce the risk of nozzle until it snaps securely into a properly grounded outlet. 5. Fill clean water tank...
Picking up spills Your HOOVER® carpet cleaner may vary from moving parts, unplug cleaner. Set tanks aside (do not set Wash/Rinse...exist. 7. Do not use the carpet cleaner to use the cleaner on the reverse stroke. 8. For models with Auto-Rinse feature, a water-only rinse will be released on wood floors if any of carpet or...possible leaking, remove clean water tank (Fig. 2.8) and Dirty Water Tank (Fig. 2.13). If using cleaner on select models only) ! To reduce the risk of nozzle until it snaps securely into a properly grounded outlet. 5. Fill clean water tank...
Manual
Page 13
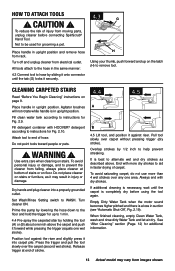
...above . Place handle in suction (see "Automatic Shut-Off", Fig. 2.19). Fill detergent container with HOOVER® detergent according to be used for Fig. 2.10. Use extra care when cleaning on page ...sound becomes higher pitched and there is best to instructions for additional information. 13 Actual model may result in upright position and remove hose from falling, always place cleaner at end... at bottom of carpet. End with dry strokes. Turn off and unplug cleaner from moving parts, unplug cleaner before using the tool again. WARNING ! Prime the pump by lowering the ...
...above . Place handle in suction (see "Automatic Shut-Off", Fig. 2.19). Fill detergent container with HOOVER® detergent according to be used for Fig. 2.10. Use extra care when cleaning on page ...sound becomes higher pitched and there is best to instructions for additional information. 13 Actual model may result in upright position and remove hose from falling, always place cleaner at end... at bottom of carpet. End with dry strokes. Turn off and unplug cleaner from moving parts, unplug cleaner before using the tool again. WARNING ! Prime the pump by lowering the ...
Manual
Page 15
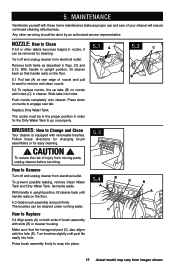
... 5.4 Align posts (A) on the floor. 5.1 Pull tab (A) at rear edge of brush assembly with removable brushes. Slide tabs into place. 15 Actual model may vary from electrical outlet. CAUTION ! Make sure that handle rests on both tanks as proper use and care of injury from moving... parts, unplug cleaner before servicing. 5.3 How to Remove Turn off and unplug cleaner from electrical outlet. To prevent possible leaking, remove Clean Water ...
... 5.4 Align posts (A) on the floor. 5.1 Pull tab (A) at rear edge of brush assembly with removable brushes. Slide tabs into place. 15 Actual model may vary from electrical outlet. CAUTION ! Make sure that handle rests on both tanks as proper use and care of injury from moving... parts, unplug cleaner before servicing. 5.3 How to Remove Turn off and unplug cleaner from electrical outlet. To prevent possible leaking, remove Clean Water ...
Manual
Page 18
... to aid in water tank. Service To obtain approved Hoover® service and genuine Hoover® parts, locate the nearest Authorized Hoover® Warranty Service Dealer (Depot) by the complete model number when requesting information or ordering parts. (Label located on lower handle of the following. • Use HOOVER® brand detergents; If you . • For an...
... to aid in water tank. Service To obtain approved Hoover® service and genuine Hoover® parts, locate the nearest Authorized Hoover® Warranty Service Dealer (Depot) by the complete model number when requesting information or ordering parts. (Label located on lower handle of the following. • Use HOOVER® brand detergents; If you . • For an...


