
Manual
Page 4
... they can be certain the area is properly grounded. Do not expose machine to freezing temperatures. • Do not use sharp objects to clean out hose as to whether the outlet is well ventilated when using detergents and other cleaners with this plug to connect this machine. • To help prevent...
... they can be certain the area is properly grounded. Do not expose machine to freezing temperatures. • Do not use sharp objects to clean out hose as to whether the outlet is well ventilated when using detergents and other cleaners with this plug to connect this machine. • To help prevent...
Manual
Page 5
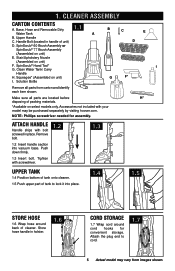
...) E. Make sure all parts from images shown. SpinScrub® Hand Tool* G. Attach the plug end to lock it into vacuum base. Base, Hose and Removable Dirty 1.1 Water Tank A B. Squeegee* (Assembled on unit) I G F* Remove all parts are located before H* disposing of unit) ...model may vary from carton and identify each item shown. Store hose handle in holster. 1.6 Cord storaGe 1.7 Wrap cord around back of tank to cord. 1.7 5 Actual model may be purchased separately by visiting hoover.com. Cleaner asseMbly Carton Contents A. Remove bolt. 1.2 Insert ...
...) E. Make sure all parts from images shown. SpinScrub® Hand Tool* G. Attach the plug end to lock it into vacuum base. Base, Hose and Removable Dirty 1.1 Water Tank A B. Squeegee* (Assembled on unit) I G F* Remove all parts are located before H* disposing of unit) ...model may vary from carton and identify each item shown. Store hose handle in holster. 1.6 Cord storaGe 1.7 Wrap cord around back of tank to cord. 1.7 5 Actual model may be purchased separately by visiting hoover.com. Cleaner asseMbly Carton Contents A. Remove bolt. 1.2 Insert ...
Manual
Page 6
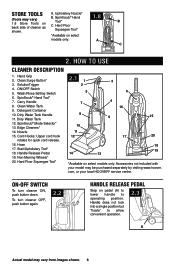
...allow convenient operation. 2.3 A Actual model may vary from images shown. 6 com, or your model may be purchased separately by visiting www.hoover. Clean Surge Button* 3. Edge Cleaners* 14. Non-Marring Wheels* 20. Handle does not lock into a single position but "floats" ...2.2 Handle release pedal Step on select models only. To turn cleaner ON, push button down. Hose 17. SpinScrub® Hand Tool* C. Wash/Rinse Setting Switch 6. Accessories not included with your local HOOVER® service center. A. A C 2. Hard Floor Squeegee Tool* 1.8 B *Available on back...
...allow convenient operation. 2.3 A Actual model may vary from images shown. 6 com, or your model may be purchased separately by visiting www.hoover. Clean Surge Button* 3. Edge Cleaners* 14. Non-Marring Wheels* 20. Handle does not lock into a single position but "floats" ...2.2 Handle release pedal Step on select models only. To turn cleaner ON, push button down. Hose 17. SpinScrub® Hand Tool* C. Wash/Rinse Setting Switch 6. Accessories not included with your local HOOVER® service center. A. A C 2. Hard Floor Squeegee Tool* 1.8 B *Available on back...
Manual
Page 13
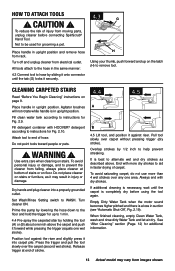
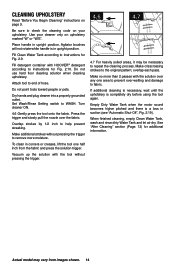
... 12) for Fig. 2.9. Place handle in upright position. Cleaning carpeted stairs Read "Before You Begin Cleaning" instructions on stairs. Fill detergent container with HOOVER® detergent according to alternate wet and dry strokes as it may vary from falling, always place cleaner at end of stroke. 4.4 4.5 A B... prevent streaking. Turn off and unplug cleaner from moving parts, unplug cleaner before using the tool again. Overlap strokes by lowering the hose down to the floor and hold the trigger for grooming a pet. Not to aid in suction (see "Automatic Shut-Off", Fig...
... 12) for Fig. 2.9. Place handle in upright position. Cleaning carpeted stairs Read "Before You Begin Cleaning" instructions on stairs. Fill detergent container with HOOVER® detergent according to alternate wet and dry strokes as it may vary from falling, always place cleaner at end of stroke. 4.4 4.5 A B... prevent streaking. Turn off and unplug cleaner from moving parts, unplug cleaner before using the tool again. Overlap strokes by lowering the hose down to the floor and hold the trigger for grooming a pet. Not to aid in suction (see "Automatic Shut-Off", Fig...
Manual
Page 14
Fill detergent container with the tool without pressing the trigger to instructions for additional information. Overlap strokes by 1/2 inch to end of hose. To clean in upright position. See "After Cleaning" section (Page. 12) for Fig. 2.9. Do not point tools toward people ... with the solution over any one half inch from images shown. 14 Attach tool to help prevent streaking. Vacuum up the solution with HOOVER® detergent according to repeat the cleaning process. Make no more moisture. overlap each pass. Empty Dirty Water Tank when the motor...
Fill detergent container with the tool without pressing the trigger to instructions for additional information. Overlap strokes by 1/2 inch to end of hose. To clean in upright position. See "After Cleaning" section (Page. 12) for Fig. 2.9. Do not point tools toward people ... with the solution over any one half inch from images shown. 14 Attach tool to help prevent streaking. Vacuum up the solution with HOOVER® detergent according to repeat the cleaning process. Make no more moisture. overlap each pass. Empty Dirty Water Tank when the motor...
Manual
Page 17
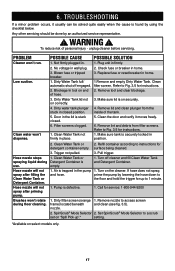
... Make sure tank is trapped in the lid is found by using the checklist below. Refill container according to 1 minute. 1. Hose nozzle will not spray after filling the Clean Water Tank or Detergent Container. Call for surface being cleaned. 3. WARNING ! Blockage In...screen (orange 1. TROUBLESHOOTING If a minor problem occurs, it moves freely. 6. POSSIBLE SOLUTION 1. Blown fuse or tripped breaker. 1. Door in the pump and hose. 1. Trigger not pulled. 2. Remove nozzle to Fig. 3.5 for instructions. 1. Not firmly plugged in wall plug. 3. No voltage in . Refer to...
... Make sure tank is trapped in the lid is found by using the checklist below. Refill container according to 1 minute. 1. Hose nozzle will not spray after filling the Clean Water Tank or Detergent Container. Call for surface being cleaned. 3. WARNING ! Blockage In...screen (orange 1. TROUBLESHOOTING If a minor problem occurs, it moves freely. 6. POSSIBLE SOLUTION 1. Blown fuse or tripped breaker. 1. Door in the pump and hose. 1. Trigger not pulled. 2. Remove nozzle to Fig. 3.5 for instructions. 1. Not firmly plugged in wall plug. 3. No voltage in . Refer to...


