
Manual
Page 2
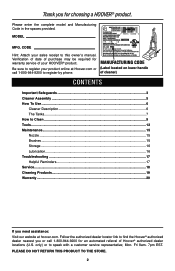
...service of your product online at hoover.com. Manufacturing code (Label located on lower handle of Hoover® authorized dealer locations (U.S. Please do not return this owner's manual. Please enter the complete model and Manufacturing Code in the spaces provided. Model MFG. CODE Hint: Attach ...your sales receipt to this product to register by phone. Mon- Fri 8am- 7pm EST. Follow the authorized dealer locator link to find the Hoover® authorized dealer ...
...service of your product online at hoover.com. Manufacturing code (Label located on lower handle of Hoover® authorized dealer locations (U.S. Please do not return this owner's manual. Please enter the complete model and Manufacturing Code in the spaces provided. Model MFG. CODE Hint: Attach ...your sales receipt to this product to register by phone. Mon- Fri 8am- 7pm EST. Follow the authorized dealer locator link to find the Hoover® authorized dealer ...
Manual
Page 5
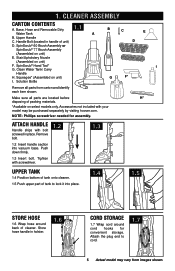
...(Assembled on unit) I G F* Remove all parts are located before H* disposing of packing materials. *Available on select models only. Accessories not included with your model may vary from carton and identify each item shown. Push down firmly. 1.3 Insert bolt. Cleaner asseMbly Carton Contents A.... 1.3 upper tank 1.4 Position bottom of tank onto cleaner. 1.5 Push upper part of tank to cord. 1.7 5 Actual model may be purchased separately by visiting hoover.com. Tighten with bolt screwed in place. Handle Bolt (located in holster. 1.6 Cord storaGe 1.7 Wrap cord around back...
...(Assembled on unit) I G F* Remove all parts are located before H* disposing of packing materials. *Available on select models only. Accessories not included with your model may vary from carton and identify each item shown. Push down firmly. 1.3 Insert bolt. Cleaner asseMbly Carton Contents A.... 1.3 upper tank 1.4 Position bottom of tank onto cleaner. 1.5 Push upper part of tank to cord. 1.7 5 Actual model may be purchased separately by visiting hoover.com. Tighten with bolt screwed in place. Handle Bolt (located in holster. 1.6 Cord storaGe 1.7 Wrap cord around back...
Manual
Page 6
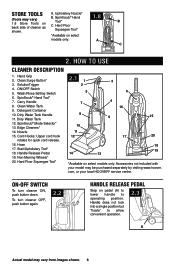
... rotates for quick cord release. 16. Accessories not included with your local HOOVER® service center. A. Hand Grip 2. Clean Surge Button* 3. Wash/Rinse Setting Switch 6. Detergent Container 10. Nozzle 15. com, or your model may vary) 1.8 Store Tools on pedal (A) to lower handle to allow... convenient operation. 2.3 A Actual model may vary from images shown. 6 To turn cleaner ON, push button down. Store tools (Tools may be purchased separately by visiting www.hoover. SpinScrub® Mode Selector* 13. ON-OFF switch To turn cleaner...
... rotates for quick cord release. 16. Accessories not included with your local HOOVER® service center. A. Hand Grip 2. Clean Surge Button* 3. Wash/Rinse Setting Switch 6. Detergent Container 10. Nozzle 15. com, or your model may vary) 1.8 Store Tools on pedal (A) to lower handle to allow... convenient operation. 2.3 A Actual model may vary from images shown. 6 To turn cleaner ON, push button down. Store tools (Tools may be purchased separately by visiting www.hoover. SpinScrub® Mode Selector* 13. ON-OFF switch To turn cleaner...
Manual
Page 7
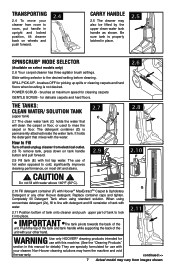
...your cleaner from room to room, put handle in place. 2.5 1 2 3 3 PO2WGEE1RNSTIPSILLEPBLEREUDSH SpinScrub® mode selector (Available on select models only) 2.6 Your carpet cleaner has three agitator brush settings. Be sure tank is permanently attached inside the water tank. Replace container caps and... solution. Slide setting selector to the desired setting before cleaning. E ! CAUTION ! brushes OFF for use of the unit. Non-Hoover cleaning solutions may vary from electrical outlet. 2.8 To remove tank, press down on wheels and push forward. 2.4 Carry handle 2.5 The...
...your cleaner from room to room, put handle in place. 2.5 1 2 3 3 PO2WGEE1RNSTIPSILLEPBLEREUDSH SpinScrub® mode selector (Available on select models only) 2.6 Your carpet cleaner has three agitator brush settings. Be sure tank is permanently attached inside the water tank. Replace container caps and... solution. Slide setting selector to the desired setting before cleaning. E ! CAUTION ! brushes OFF for use of the unit. Non-Hoover cleaning solutions may vary from electrical outlet. 2.8 To remove tank, press down on wheels and push forward. 2.4 Carry handle 2.5 The...
Manual
Page 8
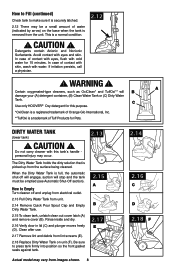
... contact with water. In case of contact with skin, wash with eyes and skin. If irritation persists, call a physician. ! C Use only HOOVER® Oxy detergent for this tank's handle personal injury may occur. When the Dirty Water Tank is a trademark of Tuff Products for 15 minutes.... (see Automatic Shut-Off section). how to press tank firmly into position so the front gasket seals against tank. 2.13 2.15 A B 2.17 E Actual model may vary from unit. 2.14 Remove Quick Pour Spout Cap and Empty Dirty Water Tank. 2.15 To clean tank, unlatch clean out cover latch (A) and...
... contact with water. In case of contact with skin, wash with eyes and skin. If irritation persists, call a physician. ! C Use only HOOVER® Oxy detergent for this tank's handle personal injury may occur. When the Dirty Water Tank is a trademark of Tuff Products for 15 minutes.... (see Automatic Shut-Off section). how to press tank firmly into position so the front gasket seals against tank. 2.13 2.15 A B 2.17 E Actual model may vary from unit. 2.14 Remove Quick Pour Spout Cap and Empty Dirty Water Tank. 2.15 To clean tank, unlatch clean out cover latch (A) and...
Manual
Page 9
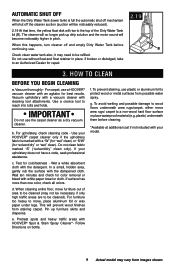
...be cleaned). Vacuum thoroughly - IMPORTANT Do not use . b. Do not clean fabric marked "S" ("solvent/dry" clean only). If your model. 9 Actual model may not be necessary if only high traffic areas are to protect wood or metal surfaces from staining carpet. Wet a white absorbent cloth ... before continuing use the carpet cleaner as a dry vacuum cleaner. Automatic shut off When the Dirty Water Tank (lower tank) is marked with HOOVER® Spot & Stain Spray Cleaner*- If broken or dislodged, take to reach into tufts and folds. d. How to wood floors underneath area...
...be cleaned). Vacuum thoroughly - IMPORTANT Do not use . b. Do not clean fabric marked "S" ("solvent/dry" clean only). If your model. 9 Actual model may not be necessary if only high traffic areas are to protect wood or metal surfaces from staining carpet. Wet a white absorbent cloth ... before continuing use the carpet cleaner as a dry vacuum cleaner. Automatic shut off When the Dirty Water Tank (lower tank) is marked with HOOVER® Spot & Stain Spray Cleaner*- If broken or dislodged, take to reach into tufts and folds. d. How to wood floors underneath area...
Manual
Page 10
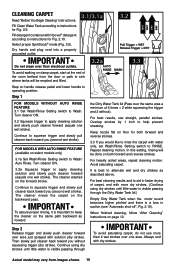
...RINSE. When finished cleaning, follow "After Cleaning" instructions on the backward pass. Always end with solution (dry stroke). Step 1 FOR MODELS WITHOUT AUTO RINSE FEATURE 3.1 Set Wash/Rinse Setting switch to squeeze trigger and slowly pull cleaner back toward you without ). Then slowly pull... cleaner back toward you would like to rinse the carpet with Hoover® detergent according to apply cleaning solution and slowly push cleaner forward (equals one area. Avoid saturating carpet. IMPORTANT To avoid ...
...RINSE. When finished cleaning, follow "After Cleaning" instructions on the backward pass. Always end with solution (dry stroke). Step 1 FOR MODELS WITHOUT AUTO RINSE FEATURE 3.1 Set Wash/Rinse Setting switch to squeeze trigger and slowly pull cleaner back toward you without ). Then slowly pull... cleaner back toward you would like to rinse the carpet with Hoover® detergent according to apply cleaning solution and slowly push cleaner forward (equals one area. Avoid saturating carpet. IMPORTANT To avoid ...
Manual
Page 11
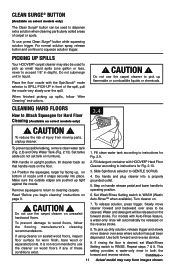
...Make sure the outside edges are pushed up dirty solution, release trigger and slowly move cleaner forward and backward over the spill. ! For models with HOOVER® Hard Floor that handle rests on the forward stroke. To reduce the risk of the spill, pull the nozzle very slowly over area... to RINSE. CAUTION ! Do not submerge unit in upright position, tilt cleaner back so 2. Continue>> 11 Actual model may also be released on furniture...
...Make sure the outside edges are pushed up dirty solution, release trigger and slowly move cleaner forward and backward over the spill. ! For models with HOOVER® Hard Floor that handle rests on the forward stroke. To reduce the risk of the spill, pull the nozzle very slowly over area... to RINSE. CAUTION ! Do not submerge unit in upright position, tilt cleaner back so 2. Continue>> 11 Actual model may also be released on furniture...
Manual
Page 12
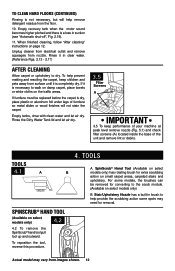
...Fig. 5.1) and check filter screens (A) located inside the base of furniture so metal slides or wood finishes will help provide the scrubbing action some models, the brushes can be replaced before the carpet is a loss in suction (see "Automatic shut-off", Fig. 2.19). 11. Stair/Upholstery ... away from surface until it in brush to help remove detergent residue from nozzle. tools 4.1 A B SpinScrub® hand tool (Available on select models only) 4.2 4.2 To remove the SpinScrub® hand tool pull tool up and outward. TOOLS A. Empty recovery tank when the motor sound becomes...
...Fig. 5.1) and check filter screens (A) located inside the base of furniture so metal slides or wood finishes will help provide the scrubbing action some models, the brushes can be replaced before the carpet is a loss in suction (see "Automatic shut-off", Fig. 2.19). 11. Stair/Upholstery ... away from surface until it in brush to help remove detergent residue from nozzle. tools 4.1 A B SpinScrub® hand tool (Available on select models only) 4.2 4.2 To remove the SpinScrub® hand tool pull tool up and outward. TOOLS A. Empty recovery tank when the motor sound becomes...
Manual
Page 13
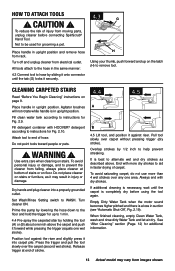
... and dry strokes as it against the riser and slightly press it forward while pressing the trigger (equals one area. Always end with HOOVER® detergent according to end of injury from falling, always place cleaner at end of stairs or on page 9. Attach tool to ...instructions for additional information. 13 Actual model may result in the same manner: 4.3 Connect tool to aid in faster drying of carpet. Release trigger at bottom of stroke. 4.4 4.5 A B ...
... and dry strokes as it against the riser and slightly press it forward while pressing the trigger (equals one area. Always end with HOOVER® detergent according to end of injury from falling, always place cleaner at end of stairs or on page 9. Attach tool to ...instructions for additional information. 13 Actual model may result in the same manner: 4.3 Connect tool to aid in faster drying of carpet. Release trigger at bottom of stroke. 4.4 4.5 A B ...
Manual
Page 14
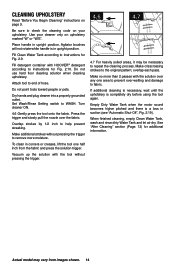
Place handle in upright position. Actual model may be necessary to instructions for Fig. 2.9. Agitator brushes will not rotate while handle is a loss in corners or creases, lift the tool one area ... the trigger. 4.6 4.7 4.7 For heavily soiled areas, it may vary from the fabric and press the solution trigger. Attach tool to remove more than 2 passes with HOOVER® detergent according to the original pattern; To clean in suction (see "Automatic Shut-Off", Fig. 2.19). Empty Dirty Water Tank when the motor sound...
Place handle in upright position. Actual model may be necessary to instructions for Fig. 2.9. Agitator brushes will not rotate while handle is a loss in corners or creases, lift the tool one area ... the trigger. 4.6 4.7 4.7 For heavily soiled areas, it may vary from the fabric and press the solution trigger. Attach tool to remove more than 2 passes with HOOVER® detergent according to the original pattern; To clean in suction (see "Automatic Shut-Off", Fig. 2.19). Empty Dirty Water Tank when the motor sound...
Manual
Page 15
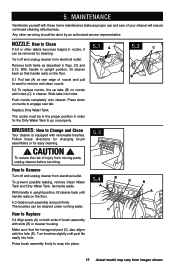
... ends of nozzle and pull forward to remove and clean nozzle. 5.2 To replace nozzle, line up tabs (B) on nozzle to snap into place. 15 Actual model may vary from electrical outlet. To reduce the risk of your cleaner will ensure continued cleaning effectiveness. Press down on nozzle with these directions for...
... ends of nozzle and pull forward to remove and clean nozzle. 5.2 To replace nozzle, line up tabs (B) on nozzle to snap into place. 15 Actual model may vary from electrical outlet. To reduce the risk of your cleaner will ensure continued cleaning effectiveness. Press down on nozzle with these directions for...
Manual
Page 17
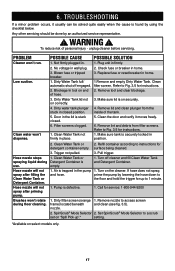
... done by using the checklist below. Remove lint and debris from the inside of personal injury - Clean Water Tank or Detergent Container is on select models only. 17 Turn off engaged. 2. Turn on end of hose. 3. If hose does not spray, prime the pump by lowering the hose down to the...
... done by using the checklist below. Remove lint and debris from the inside of personal injury - Clean Water Tank or Detergent Container is on select models only. 17 Turn off engaged. 2. Turn on end of hose. 3. If hose does not spray, prime the pump by lowering the hose down to the...
Manual
Page 18
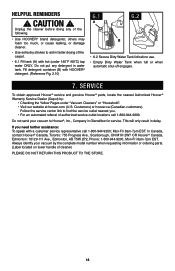
...; Empty Dirty Water Tank when full or when automatic shut-off engages. 7. Service To obtain approved Hoover® service and genuine Hoover® parts, locate the nearest Authorized Hoover® Warranty Service Dealer (Depot) by the complete model number when requesting information or ordering parts. (Label located on lower handle of authorized service outlet...
...; Empty Dirty Water Tank when full or when automatic shut-off engages. 7. Service To obtain approved Hoover® service and genuine Hoover® parts, locate the nearest Authorized Hoover® Warranty Service Dealer (Depot) by the complete model number when requesting information or ordering parts. (Label located on lower handle of authorized service outlet...


