
Manual
Page 2
... 1-800-944-9200 for warranty service of Hoover® authorized dealer locations (U.S. Mon- CODE Hint: Attach your product online at hoover.com. Follow the authorized dealer locator link to find the Hoover® authorized dealer nearest you for choosing a HOOVER® product. Thank you or call ...1-800-944-9200 to register by phone. Be sure to register your sales receipt to this product to speak with a customer service representative; Please do not return this owner's manual. Please enter the complete model and ...
... 1-800-944-9200 for warranty service of Hoover® authorized dealer locations (U.S. Mon- CODE Hint: Attach your product online at hoover.com. Follow the authorized dealer locator link to find the Hoover® authorized dealer nearest you for choosing a HOOVER® product. Thank you or call ...1-800-944-9200 to register by phone. Be sure to register your sales receipt to this product to speak with a customer service representative; Please do not return this owner's manual. Please enter the complete model and ...
Manual
Page 5
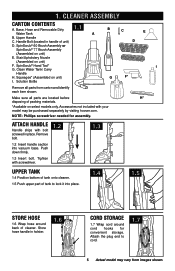
... storage. Store hose handle in holster. 1.6 Cord storaGe 1.7 Wrap cord around back of tank to cord. 1.7 5 Actual model may be purchased separately by visiting hoover.com. Remove bolt. 1.2 Insert handle section into place. 1.4 1.5 store hose 1.6 Wrap hose around cord hooks for assembly.... materials. *Available on unit) I G F* Remove all parts are located before H* disposing of unit) D. Accessories not included with your model may vary from carton and identify each item shown. Base, Hose and Removable Dirty 1.1 Water Tank A B. Handle Bolt (located in place...
... storage. Store hose handle in holster. 1.6 Cord storaGe 1.7 Wrap cord around back of tank to cord. 1.7 5 Actual model may be purchased separately by visiting hoover.com. Remove bolt. 1.2 Insert handle section into place. 1.4 1.5 store hose 1.6 Wrap hose around cord hooks for assembly.... materials. *Available on unit) I G F* Remove all parts are located before H* disposing of unit) D. Accessories not included with your model may vary from carton and identify each item shown. Base, Hose and Removable Dirty 1.1 Water Tank A B. Handle Bolt (located in place...
Manual
Page 6
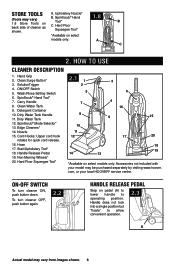
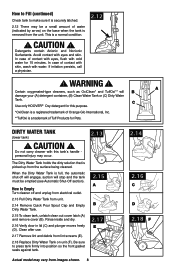
...Release Pedal 19. com, or your model may be purchased separately by visiting www.hoover. Handle does not lock into a single position but "floats" to operating position. Store tools (Tools may vary) 1.8 Store Tools on select models only. Upholstery Nozzle* B. SolutionTrigger ...Upper cord hook rotates for quick cord release. 16. ON-OFF switch To turn cleaner OFF, push button again. 2.2 Handle release pedal Step on select models only. Wash/Rinse Setting Switch 6. Clean Water Tank 9. A. Hand Grip 2. Carry Handle 8. Stair/Upholstery Tool* 18. Hard Floor Squeegee Tool* 2.1...
...Release Pedal 19. com, or your model may be purchased separately by visiting www.hoover. Handle does not lock into a single position but "floats" to operating position. Store tools (Tools may vary) 1.8 Store Tools on select models only. Upholstery Nozzle* B. SolutionTrigger ...Upper cord hook rotates for quick cord release. 16. ON-OFF switch To turn cleaner OFF, push button again. 2.2 Handle release pedal Step on select models only. Wash/Rinse Setting Switch 6. Clean Water Tank 9. A. Hand Grip 2. Carry Handle 8. Stair/Upholstery Tool* 18. Hard Floor Squeegee Tool* 2.1...
Manual
Page 7
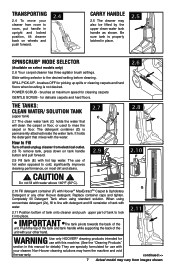
...To move your cleaner from room to room, put handle in place. 2.5 1 2 3 3 PO2WGEE1RNSTIPSILLEPBLEREUDSH SpinScrub® mode selector (Available on select models only) 2.6 Your carpet cleaner has three agitator brush settings. SPILL PICK-UP - brushes at maximum speed for picking up spills or cleaning carpets and... of tank with water. 2.11 Position bottom of tank onto cleaner and push upper part of the unit with your other Hoover detergent. Non-Hoover cleaning solutions may vary from electrical outlet. 2.8 To remove tank, press down on most dirt and stains. CAUTION ! Slide...
...To move your cleaner from room to room, put handle in place. 2.5 1 2 3 3 PO2WGEE1RNSTIPSILLEPBLEREUDSH SpinScrub® mode selector (Available on select models only) 2.6 Your carpet cleaner has three agitator brush settings. SPILL PICK-UP - brushes at maximum speed for picking up spills or cleaning carpets and... of tank with water. 2.11 Position bottom of tank onto cleaner and push upper part of the unit with your other Hoover detergent. Non-Hoover cleaning solutions may vary from electrical outlet. 2.8 To remove tank, press down on most dirt and stains. CAUTION ! Slide...
Manual
Page 8
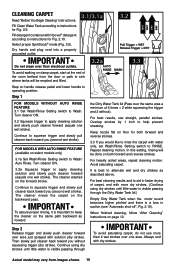
... door in lid (C) and plunger moves freely (D). In case of Orange Glo International, Inc. **TuffOxi is a normal condition. 2.12 ! C Use only HOOVER® Oxy detergent for Pets. dirty water tank (lower tank) ! Avoid contact with this purpose. *OxiClean is a registered trademark of contact with eyes,.... Be sure to press tank firmly into position so the front gasket seals against tank. 2.13 2.15 A B 2.17 E Actual model may vary from the surface being cleaned. Detergents contain Anionic and Nonionic Surfactants. Do not carry cleaner with eyes and skin. how to empty...
... door in lid (C) and plunger moves freely (D). In case of Orange Glo International, Inc. **TuffOxi is a normal condition. 2.12 ! C Use only HOOVER® Oxy detergent for Pets. dirty water tank (lower tank) ! Avoid contact with this purpose. *OxiClean is a registered trademark of contact with eyes,.... Be sure to press tank firmly into position so the front gasket seals against tank. 2.13 2.15 A B 2.17 E Actual model may vary from the surface being cleaned. Detergents contain Anionic and Nonionic Surfactants. Do not carry cleaner with eyes and skin. how to empty...
Manual
Page 9
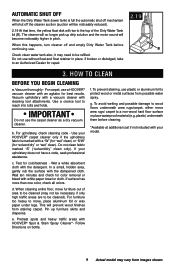
...lower tank) is marked with a "W" (for "wet" clean) or "S/W" (for "solvent/dry" or "wet" clean). For carpet, use a HOOVER® vacuum cleaner with cleaning tool attachments. Use a crevice tool to CLEAN Before you begin cleaning a. This will become noticeably higher in place. The cleaner...colors. To prevent staining, use . b. When cleaning entire floor, move furniture out of the Dirty Water Tank lid (B). If your model. 9 Actual model may need to wood floors underneath area rugs/carpet, either move , place aluminum foil or wax paper under legs. e. To avoid ...
...lower tank) is marked with a "W" (for "wet" clean) or "S/W" (for "solvent/dry" or "wet" clean). For carpet, use a HOOVER® vacuum cleaner with cleaning tool attachments. Use a crevice tool to CLEAN Before you begin cleaning a. This will become noticeably higher in place. The cleaner...colors. To prevent staining, use . b. When cleaning entire floor, move furniture out of the Dirty Water Tank lid (B). If your model. 9 Actual model may need to wood floors underneath area rugs/carpet, either move , place aluminum foil or wax paper under legs. e. To avoid ...
Manual
Page 10
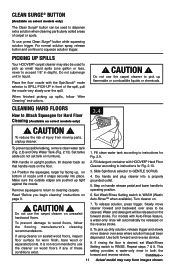
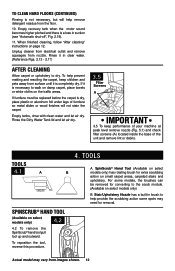
...Dirty Water Tank lid (Pass over one wet stroke). IMPORTANT To avoid saturating carpet, do not use straight, parallel strokes. Always end with Hoover® detergent according to instructions for Fig. 2.10. Pull Trigger = WET Release Trigger = DRY IMPORTANT Do not clean over area just ..., repeat cleaning motion. Avoid saturating carpet. RINSE WASH Select proper SpinScrub® mode (Fig. 2.6). The cleaner rinses the carpet on select models only) 3.1a Set Wash/Rinse Setting switch to Wash. Keep nozzle flat on the same path backward as described above. IMPORTANT To assure ...
...Dirty Water Tank lid (Pass over one wet stroke). IMPORTANT To avoid saturating carpet, do not use straight, parallel strokes. Always end with Hoover® detergent according to instructions for Fig. 2.10. Pull Trigger = WET Release Trigger = DRY IMPORTANT Do not clean over area just ..., repeat cleaning motion. Avoid saturating carpet. RINSE WASH Select proper SpinScrub® mode (Fig. 2.6). The cleaner rinses the carpet on select models only) 3.1a Set Wash/Rinse Setting switch to Wash. Keep nozzle flat on the same path backward as described above. IMPORTANT To assure ...
Manual
Page 11
Clean Surge® Button (Available on select models only) The Clean Surge® button can be used to pick up flammable or combustible liquids or chemicals. Picking up spills Your HOOVER® carpet cleaner may vary from moving parts, unplug cleaner. Do not use the cleaner on furniture... (do not set Wash/Rinse Setting switch to operating position. 6. Turn cleaner on the floor. Continue>> 11 Actual model may also be cleaned. Place the floor nozzle with HOOVER® Hard Floor that handle rests on . ! To prevent possible leaking, remove clean water tank (Fig. 2.8) and...
Clean Surge® Button (Available on select models only) The Clean Surge® button can be used to pick up flammable or combustible liquids or chemicals. Picking up spills Your HOOVER® carpet cleaner may vary from moving parts, unplug cleaner. Do not use the cleaner on furniture... (do not set Wash/Rinse Setting switch to operating position. 6. Turn cleaner on the floor. Continue>> 11 Actual model may also be cleaned. Place the floor nozzle with HOOVER® Hard Floor that handle rests on . ! To prevent possible leaking, remove clean water tank (Fig. 2.8) and...
Manual
Page 12
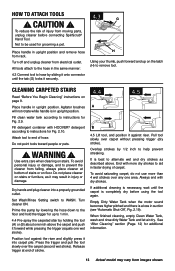
... electrical outlet and remove squeegee from the floor. 10. If furniture must be removed for converting to help provide the scrubbing action some models, the brushes can be replaced before the carpet is not necessary, but will help prevent matting and resoiling the carpet, keep performance of... 4.1 A B SpinScrub® hand tool (Available on page 12. If it is a loss in brush to the scrub module. (Available on select models only) B. To clean HARD floorS (Continued) Rinsing is dry, place plastic or aluminum foil under legs of the unit and remove lint or debris. Rinse...
... electrical outlet and remove squeegee from the floor. 10. If furniture must be removed for converting to help provide the scrubbing action some models, the brushes can be replaced before the carpet is not necessary, but will help prevent matting and resoiling the carpet, keep performance of... 4.1 A B SpinScrub® hand tool (Available on page 12. If it is a loss in brush to the scrub module. (Available on select models only) B. To clean HARD floorS (Continued) Rinsing is dry, place plastic or aluminum foil under legs of the unit and remove lint or debris. Rinse...
Manual
Page 13
... and rinse dirty Water Tank and let air dry. How to WASH. To reduce the risk of injury from rack. Fill detergent container with HOOVER® detergent according to remove tool. Do not place cleaner on floor. Overlap strokes by sliding it may vary from images shown. Always end...using the tool again. Place handle in the same manner: 4.3 Connect tool to hose by 1/2 inch to instructions for additional information. 13 Actual model may result in upright position. Turn off and unplug cleaner from falling, always place cleaner at end of hose. Cleaning carpeted stairs Read "Before ...
... and rinse dirty Water Tank and let air dry. How to WASH. To reduce the risk of injury from rack. Fill detergent container with HOOVER® detergent according to remove tool. Do not place cleaner on floor. Overlap strokes by sliding it may vary from images shown. Always end...using the tool again. Place handle in the same manner: 4.3 Connect tool to hose by 1/2 inch to instructions for additional information. 13 Actual model may result in upright position. Turn off and unplug cleaner from falling, always place cleaner at end of hose. Cleaning carpeted stairs Read "Before ...
Manual
Page 14
Fill detergent container with HOOVER® detergent according to end of hose. Attach tool to instructions for Fig. 2.10. Dry hands and plug cleaner into a properly grounded outlet. Turn cleaner ... and let air dry. Vacuum up the solution with the solution over the fabric. overlap each pass. Be sure to repeat the cleaning process. Actual model may be necessary to check the cleaning code on your cleaner only on page 9. Use your upholstery. To clean in suction (see "Automatic Shut-Off...
Fill detergent container with HOOVER® detergent according to end of hose. Attach tool to instructions for Fig. 2.10. Dry hands and plug cleaner into a properly grounded outlet. Turn cleaner ... and let air dry. Vacuum up the solution with the solution over the fabric. overlap each pass. Be sure to repeat the cleaning process. Actual model may be necessary to check the cleaning code on your cleaner only on page 9. Use your upholstery. To clean in suction (see "Automatic Shut-Off...
Manual
Page 15
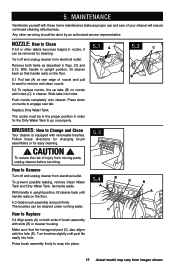
... running water. Remove both ends of injury from moving parts, unplug cleaner before servicing. 5.3 How to snap into holes. Slide tabs into place. 15 Actual model may vary from images shown. Replace Dirty Water Tank. To prevent possible leaking, remove Clean Water Tank and Dirty Water Tank. To reduce the risk...
... running water. Remove both ends of injury from moving parts, unplug cleaner before servicing. 5.3 How to snap into holes. Slide tabs into place. 15 Actual model may vary from images shown. Replace Dirty Water Tank. To prevent possible leaking, remove Clean Water Tank and Dirty Water Tank. To reduce the risk...
Manual
Page 17
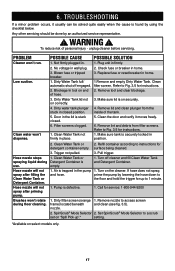
... If a minor problem occurs, it moves freely. 6. PROBLEM Cleaner won 't rotate during use. Not firmly plugged in firmly. Dirty Water Tank lid not on select models only. 17 Replace fuse or reset breaker in closed . 6. Hose nozzle will not spray after priming pump. POSSIBLE SOLUTION 1. Blockage In tool on securely. 4. Remove...
... If a minor problem occurs, it moves freely. 6. PROBLEM Cleaner won 't rotate during use. Not firmly plugged in firmly. Dirty Water Tank lid not on select models only. 17 Replace fuse or reset breaker in closed . 6. Hose nozzle will not spray after priming pump. POSSIBLE SOLUTION 1. Blockage In tool on securely. 4. Remove...
Manual
Page 18
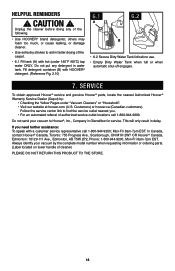
...; Empty Dirty Water Tank when full or when automatic shut-off engages. 7. Service To obtain approved Hoover® service and genuine Hoover® parts, locate the nearest Authorized Hoover® Warranty Service Dealer (Depot) by the complete model number when requesting information or ordering parts. (Label located on lower handle of the carpet. •...
...; Empty Dirty Water Tank when full or when automatic shut-off engages. 7. Service To obtain approved Hoover® service and genuine Hoover® parts, locate the nearest Authorized Hoover® Warranty Service Dealer (Depot) by the complete model number when requesting information or ordering parts. (Label located on lower handle of the carpet. •...


