
Manual
Page 1
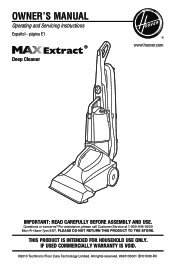
PLEASE DO NOT RETURN THIS PRODUCT TO THE STORE. All rights reserved. #961133001 ID101008-R0 Questions or concerns? For assistance, please call Customer Service at 1-800-944-9200 Mon-Fri 8am-7pm EST. IF USED COMMERCIALLY WARRANTY IS VOID. ©2010 Techtronic Floor Care Technology Limited. página E1 ® Deep Cleaner www.hoover.com IMPORTANT: READ CAREFULLY BEFORE ASSEMBLY AND USE. THIS PRODUCT IS INTENDED FOR HOUSEHOLD USE ONLY. Owner's Manual Operating and Servicing Instructions Español -
PLEASE DO NOT RETURN THIS PRODUCT TO THE STORE. All rights reserved. #961133001 ID101008-R0 Questions or concerns? For assistance, please call Customer Service at 1-800-944-9200 Mon-Fri 8am-7pm EST. IF USED COMMERCIALLY WARRANTY IS VOID. ©2010 Techtronic Floor Care Technology Limited. página E1 ® Deep Cleaner www.hoover.com IMPORTANT: READ CAREFULLY BEFORE ASSEMBLY AND USE. THIS PRODUCT IS INTENDED FOR HOUSEHOLD USE ONLY. Owner's Manual Operating and Servicing Instructions Español -
Manual
Page 2
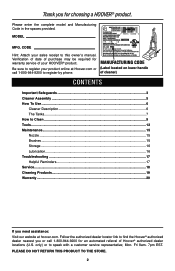
... Reminders 17 Service...18 Cleaning Products...19 Warranty...20 If you for an automated referral of your sales receipt to this product to speak with a customer service representative; Please enter the complete model and Manufacturing Code in the spaces provided. Manufacturing code (Label located on lower handle of cleaner) Contents Important Safeguards 3 Cleaner Assembly...5 How To Use...6 Cleaner Description 6 The Tanks...7 How to find the Hoover®...
... Reminders 17 Service...18 Cleaning Products...19 Warranty...20 If you for an automated referral of your sales receipt to this product to speak with a customer service representative; Please enter the complete model and Manufacturing Code in the spaces provided. Manufacturing code (Label located on lower handle of cleaner) Contents Important Safeguards 3 Cleaner Assembly...5 How To Use...6 Cleaner Description 6 The Tanks...7 How to find the Hoover®...
Manual
Page 3
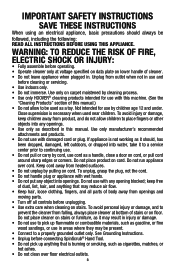
... damage, keep free of cleaner. • Do not leave appliance when plugged in this machine. (See the "Cleaning Products" section of stairs or on cord. Do not place product on stairs or furniture, as gasoline, or fine wood sandings, or use in use with wet hands. • Do not put any opening blocked; Use only manufacturer's recommended attachments and products. • Do not use to a properly...
... damage, keep free of cleaner. • Do not leave appliance when plugged in this machine. (See the "Cleaning Products" section of stairs or on cord. Do not place product on stairs or furniture, as gasoline, or fine wood sandings, or use in use with wet hands. • Do not put any opening blocked; Use only manufacturer's recommended attachments and products. • Do not use to a properly...
Manual
Page 4
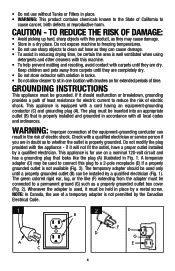
... Instructions This appliance must be inserted into an appropriate outlet (B) that looks like (F) extending from carpets until they are completely dry. • Do not store extractor with solution in tanks. • Do not allow cleaner to clean out hose as a properly grounded outlet box cover (Fig. 2). if it should be used only until they may be used , it must be connected to...
... Instructions This appliance must be inserted into an appropriate outlet (B) that looks like (F) extending from carpets until they are completely dry. • Do not store extractor with solution in tanks. • Do not allow cleaner to clean out hose as a properly grounded outlet box cover (Fig. 2). if it should be used only until they may be used , it must be connected to...
Manual
Page 5
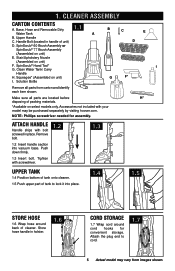
... SpinScrub® 60 Brush Assembly or SpinScrub® 77 Brush Assembly (Assembled on unit) F. Solution Bottle b C Carpet Upholstery Cleaner bare floor E cleaner PreCleaner D I G F* Remove all parts are located before H* disposing of cleaner. Stair/Upholstery Nozzle (Assembled on unit) E. NOTE: Phillips screwdriver needed for convenient storage. Accessories not included with bolt screwed in handle of tank to cord. 1.7 5 Actual model may be purchased separately by visiting hoover.com. Squeegee* (Assembled on select models only. Store hose handle...
... SpinScrub® 60 Brush Assembly or SpinScrub® 77 Brush Assembly (Assembled on unit) F. Solution Bottle b C Carpet Upholstery Cleaner bare floor E cleaner PreCleaner D I G F* Remove all parts are located before H* disposing of cleaner. Stair/Upholstery Nozzle (Assembled on unit) E. NOTE: Phillips screwdriver needed for convenient storage. Accessories not included with bolt screwed in handle of tank to cord. 1.7 5 Actual model may be purchased separately by visiting hoover.com. Squeegee* (Assembled on select models only. Store hose handle...
Manual
Page 6
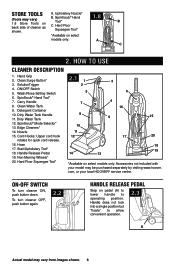
...; Hand Tool* 7. Detergent Container 10. SpinScrub® Mode Selector* 13. Hose 17. Hard Floor Squeegee Tool* 2.1 1 2 5 7 8 10 11 12 3 6 4 16 9 17 14 13 15 20 18 19 *Available on select models only. Store tools (Tools may vary) 1.8 Store Tools on pedal (A) to lower handle to allow convenient operation. 2.3 A Actual model may be purchased separately by visiting www.hoover. SpinScrub® Hand Tool* C. Dirty Water Tank 12. ON-OFF switch To turn cleaner OFF, push button again. 2.2 Handle...
...; Hand Tool* 7. Detergent Container 10. SpinScrub® Mode Selector* 13. Hose 17. Hard Floor Squeegee Tool* 2.1 1 2 5 7 8 10 11 12 3 6 4 16 9 17 14 13 15 20 18 19 *Available on select models only. Store tools (Tools may vary) 1.8 Store Tools on pedal (A) to lower handle to allow convenient operation. 2.3 A Actual model may be purchased separately by visiting www.hoover. SpinScrub® Hand Tool* C. Dirty Water Tank 12. ON-OFF switch To turn cleaner OFF, push button again. 2.2 Handle...
Manual
Page 7
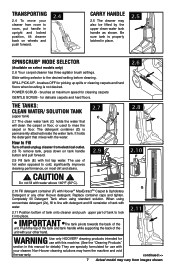
... tank handle while supporting the back of tank to lock it into place. POWER SCRUB - E ! Do not fill with water above 140°F (60°C). 2.10 Fill detergent container (F) with Hoover® MaxExtractTM Carpet & Upholstery Detergent or any other hand. 2.8 2.10 F G 2.11 WARNING Use only HOOVER® cleaning products intended for use with this machine. (See the "Cleaning Products" section in this manual for details) They are specially formulated for delicate carpets and hard floors...
... tank handle while supporting the back of tank to lock it into place. POWER SCRUB - E ! Do not fill with water above 140°F (60°C). 2.10 Fill detergent container (F) with Hoover® MaxExtractTM Carpet & Upholstery Detergent or any other hand. 2.8 2.10 F G 2.11 WARNING Use only HOOVER® cleaning products intended for use with this machine. (See the "Cleaning Products" section in this manual for details) They are specially formulated for delicate carpets and hard floors...
Manual
Page 8
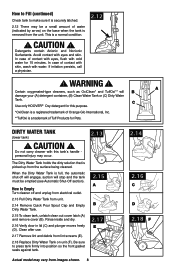
... empty Turn cleaner off will engage, suction will B A damage your (A) detergent container, (B) Clean Water Tank or (C) Dirty Water Tank. Be sure to press tank firmly into position so the front gasket seals against tank. 2.13 2.15 A B 2.17 E Actual model may occur. Do not carry cleaner with cold water for Pets. This is picked up from images shown. 8 2.14 2.16 C D 2.18 F C Use only HOOVER® Oxy detergent for this tank's handle personal...
... empty Turn cleaner off will engage, suction will B A damage your (A) detergent container, (B) Clean Water Tank or (C) Dirty Water Tank. Be sure to press tank firmly into position so the front gasket seals against tank. 2.13 2.15 A B 2.17 E Actual model may occur. Do not carry cleaner with cold water for Pets. This is picked up from images shown. 8 2.14 2.16 C D 2.18 F C Use only HOOVER® Oxy detergent for this tank's handle personal...
Manual
Page 9
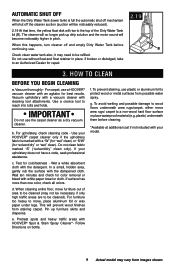
... a non-wood hard floor surface or place waterproof material (e.g. Wet a white absorbent cloth with cleaning tool attachments. e. plastic) underneath them before continuing use the carpet cleaner as a dry vacuum cleaner. When this happens, turn cleaner off and empty Dirty Water Tank before cleaning. *Available at additional cost if not included with a "W" (for "wet" clean) or "S/W" (for repair. 3. If broken or dislodged, take to CLEAN Before you begin cleaning a. For upholstery, check cleaning code - Automatic shut...
... a non-wood hard floor surface or place waterproof material (e.g. Wet a white absorbent cloth with cleaning tool attachments. e. plastic) underneath them before continuing use the carpet cleaner as a dry vacuum cleaner. When this happens, turn cleaner off and empty Dirty Water Tank before cleaning. *Available at additional cost if not included with a "W" (for "wet" clean) or "S/W" (for repair. 3. If broken or dislodged, take to CLEAN Before you begin cleaning a. For upholstery, check cleaning code - Automatic shut...
Manual
Page 10
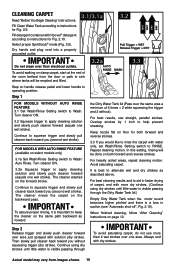
... outlet. Step 1 FOR MODELS WITHOUT AUTO RINSE FEATURE 3.1 Set Wash/Rinse Setting switch to keep the cleaner on handle release pedal and lower handle to alternate wet and dry strokes as forward. IMPORTANT To avoid saturating carpet, do not use straight, parallel strokes. Then slowly pull cleaner back toward you without ). Fill detergent container with dry strokes. Turn cleaner ON. 3.2 Squeeze trigger to instructions for Fig. 2.9. The...
... outlet. Step 1 FOR MODELS WITHOUT AUTO RINSE FEATURE 3.1 Set Wash/Rinse Setting switch to keep the cleaner on handle release pedal and lower handle to alternate wet and dry strokes as forward. IMPORTANT To avoid saturating carpet, do not use straight, parallel strokes. Then slowly pull cleaner back toward you without ). Fill detergent container with dry strokes. Turn cleaner ON. 3.2 Squeeze trigger to instructions for Fig. 2.9. The...
Manual
Page 11
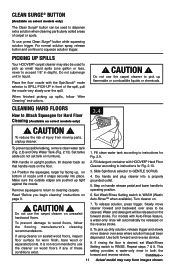
... carpet or spots. Water and detergent will automatically be released on the reverse stroke. 8. For models with HOOVER® Hard Floor that handle rests on the floor. This setting provides a water-only rinse in front of these conditions exist. 7. Do not submerge unit in upright position, tilt cleaner back so 2. Step on . ! Continue>> 11 Actual model may also be used to dispense extra solution when cleaning particularly soiled areas of nozzle...
... carpet or spots. Water and detergent will automatically be released on the reverse stroke. 8. For models with HOOVER® Hard Floor that handle rests on the floor. This setting provides a water-only rinse in front of these conditions exist. 7. Do not submerge unit in upright position, tilt cleaner back so 2. Step on . ! Continue>> 11 Actual model may also be used to dispense extra solution when cleaning particularly soiled areas of nozzle...
Manual
Page 12
... carpet areas, carpeted stairs and upholstery. Rinse the Dirty Water Tank lid and let air dry. 3.5 Filter Screens A IMPORTANT 3.5 To keep children and pets away from the floor. 10. SpinScrub® Hand Tool (Available on select models only) has rotating brush for removal. Empty recovery tank when the motor sound becomes higher pitched and there is necessary to help prevent matting and resoiling the carpet, keep performance of your machine at peak level remove nozzle...
... carpet areas, carpeted stairs and upholstery. Rinse the Dirty Water Tank lid and let air dry. 3.5 Filter Screens A IMPORTANT 3.5 To keep children and pets away from the floor. 10. SpinScrub® Hand Tool (Available on select models only) has rotating brush for removal. Empty recovery tank when the motor sound becomes higher pitched and there is necessary to help prevent matting and resoiling the carpet, keep performance of your machine at peak level remove nozzle...
Manual
Page 13
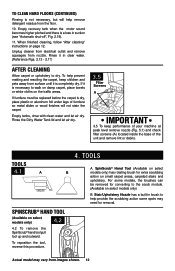
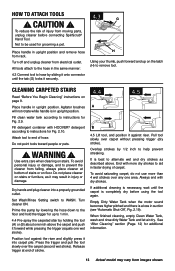
Place handle in upright position. Place handle in upright position and remove hose from images shown. WARNING ! When finished cleaning, empty Clean Water Tank, wash and rinse dirty Water Tank and let air dry. Attach tool to WASH. Set Wash/Rinse Setting switch to end of hose. To avoid saturating carpet, do not use more dry strokes to be used for grooming a pet. If additional cleaning is necessary, wait until the tab (G) locks it securely. 4.3 G H Using your thumb...
Place handle in upright position. Place handle in upright position and remove hose from images shown. WARNING ! When finished cleaning, empty Clean Water Tank, wash and rinse dirty Water Tank and let air dry. Attach tool to WASH. Set Wash/Rinse Setting switch to end of hose. To avoid saturating carpet, do not use more dry strokes to be used for grooming a pet. If additional cleaning is necessary, wait until the tab (G) locks it securely. 4.3 G H Using your thumb...
Manual
Page 14
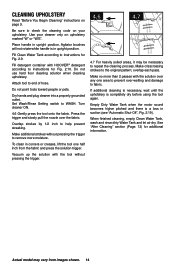
.... Agitator brushes will not rotate while handle is completely dry before using the tool again. Fill Clean Water Tank according to check the cleaning code on your cleaner only on page 9. Do not point tools toward people or pets. To clean in upright position. Place handle in suction (see "Automatic Shut-Off", Fig. 2.19). Attach tool to WASH. Dry hands and plug cleaner into a properly grounded outlet. Set Wash/Rinse Setting switch to end of hose...
.... Agitator brushes will not rotate while handle is completely dry before using the tool again. Fill Clean Water Tank according to check the cleaning code on your cleaner only on page 9. Do not point tools toward people or pets. To clean in upright position. Place handle in suction (see "Automatic Shut-Off", Fig. 2.19). Attach tool to WASH. Dry hands and plug cleaner into a properly grounded outlet. Set Wash/Rinse Setting switch to end of hose...
Manual
Page 15
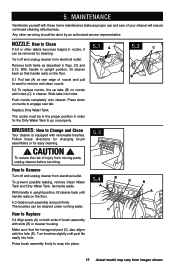
...outlet. Push nozzle completely onto cleaner. Set tanks aside. Replace Dirty Water Tank. nozzle: How to Replace 5.4 Align posts (A) on nozzle with these directions for changing brush assemblies or for cleaning. The nozzle must be done by an authorized service representative. To prevent possible leaking, remove Clean Water Tank and Dirty Water Tank. Press down on the floor. 5.4 A B D B A 5.3 Grab brush assembly and pull firmly. Press brush assembly firmly to remove and clean nozzle. 5.2 To replace nozzle, line up tabs (B) on both tanks as proper use and care...
...outlet. Push nozzle completely onto cleaner. Set tanks aside. Replace Dirty Water Tank. nozzle: How to Replace 5.4 Align posts (A) on nozzle with these directions for changing brush assemblies or for cleaning. The nozzle must be done by an authorized service representative. To prevent possible leaking, remove Clean Water Tank and Dirty Water Tank. Press down on the floor. 5.4 A B D B A 5.3 Grab brush assembly and pull firmly. Press brush assembly firmly to remove and clean nozzle. 5.2 To replace nozzle, line up tabs (B) on both tanks as proper use and care...
Manual
Page 16
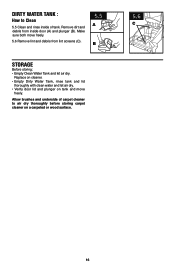
... carpet cleaner to Clean 5.5 Clean and rinse inside door (A) and plunger (B). Make sure both move freely. Dirty Water Tank : How to air dry thoroughly before storing carpet cleaner on tank and move freely. 5.6 Remove lint and debris from inside of tank. Replace on cleaner. • Empty Dirty Water Tank, rinse tank and lid thoroughly with clean water and let air dry. • Verify door lid and plunger on a carpeted or wood surface. 5.6 C 16 Remove dirt...
... carpet cleaner to Clean 5.5 Clean and rinse inside door (A) and plunger (B). Make sure both move freely. Dirty Water Tank : How to air dry thoroughly before storing carpet cleaner on tank and move freely. 5.6 Remove lint and debris from inside of tank. Replace on cleaner. • Empty Dirty Water Tank, rinse tank and lid thoroughly with clean water and let air dry. • Verify door lid and plunger on a carpeted or wood surface. 5.6 C 16 Remove dirt...
Manual
Page 17
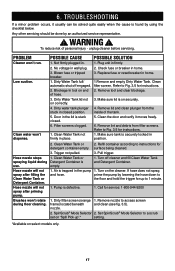
... . 6. Clean filter screen. Brushes won't rotate during use. POSSIBLE CAUSE 1. Dirty Water Tank full/ automatic shut off cleaner and fill Clean Water Tank and Detergent Container. 1. Hose nozzle will not spray after filling the Clean Water Tank or Detergent Container. Set SpinScrub® Mode Selector to 1 minute. 1. 6. Any other servicing should be solved quite easily when the cause is trapped in wall plug. 3. Low suction. No voltage in the pump and hose. 1. Dirty Water Tank lid not on select models...
... . 6. Clean filter screen. Brushes won't rotate during use. POSSIBLE CAUSE 1. Dirty Water Tank full/ automatic shut off cleaner and fill Clean Water Tank and Detergent Container. 1. Hose nozzle will not spray after filling the Clean Water Tank or Detergent Container. Set SpinScrub® Mode Selector to 1 minute. 1. 6. Any other servicing should be solved quite easily when the cause is trapped in wall plug. 3. Low suction. No voltage in the pump and hose. 1. Dirty Water Tank lid not on select models...
Manual
Page 18
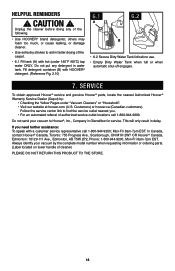
... use. • Empty Dirty Water Tank when full or when automatic shut-off engages. 7. Do not put any of cleaner) PLEASE DO NOT RETURN THIS PRODUCT TO THE STORE. 18 Service To obtain approved Hoover® service and genuine Hoover® parts, locate the nearest Authorized Hoover® Warranty Service Dealer (Depot) by the complete model number when requesting information or ordering parts. (Label located on lower handle...
... use. • Empty Dirty Water Tank when full or when automatic shut-off engages. 7. Do not put any of cleaner) PLEASE DO NOT RETURN THIS PRODUCT TO THE STORE. 18 Service To obtain approved Hoover® service and genuine Hoover® parts, locate the nearest Authorized Hoover® Warranty Service Dealer (Depot) by the complete model number when requesting information or ordering parts. (Label located on lower handle...

Manual
Page 19
... be used: 6 Brush Hoover® part # 36419008 5 Brush No longer available. 4 When cleaning a hard surface, the optional Hoover® hard surface attachment below must be used (optional if not included): 5 Brush/Dual Brush Hoover® part # 48417008. For optimal performance use with the appliance as noted below must be used : 6 Brush Hoover® part # 302658001 19 Strength Cleansing Pet Oxy Allergen1 Hard Floor Upholstery Detergent Hoover® Quick & Light™ ✓ ✓ ✓ ✓ ✓✓✓ 2 Hoover® SteamVac...
... be used: 6 Brush Hoover® part # 36419008 5 Brush No longer available. 4 When cleaning a hard surface, the optional Hoover® hard surface attachment below must be used (optional if not included): 5 Brush/Dual Brush Hoover® part # 48417008. For optimal performance use with the appliance as noted below must be used : 6 Brush Hoover® part # 302658001 19 Strength Cleansing Pet Oxy Allergen1 Hard Floor Upholstery Detergent Hoover® Quick & Light™ ✓ ✓ ✓ ✓ ✓✓✓ 2 Hoover® SteamVac...
Manual
Page 20
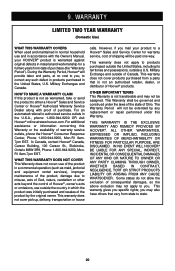
... assistance or information concerning this Warranty. WHAT THIS WARRANTY DOES NOT COVER This Warranty does not cover: use outside the country in the United States, U.S. This warranty does not cover products purchased from state to either a Hoover® Sales and Service Center or Hoover® Authorized Warranty Service Dealer along with the Owner's Manual, your product to you . This Warranty shall be extended by the original owner. you specific rights;
... assistance or information concerning this Warranty. WHAT THIS WARRANTY DOES NOT COVER This Warranty does not cover: use outside the country in the United States, U.S. This warranty does not cover products purchased from state to either a Hoover® Sales and Service Center or Hoover® Authorized Warranty Service Dealer along with the Owner's Manual, your product to you . This Warranty shall be extended by the original owner. you specific rights;


